
Start the Account Import wizard in the Adminsitration console. Click Tools, Account Import Wizard. The wizard steps you through each stage of the import process.
Note: Some wizard screens may not appear, depending on which import options you choose.
In the first wizard screen, specify the source for the imported user details.
Choose the LDAP Database or Data File check boxes to synchronize your existing CA DataMinder user hierarchy with these external sources.
If you choose both the LDAP and Data File check boxes (that is, you want to simultaneously import from an LDAP directory and a data file), you can specify how Account Import handles duplicate records (any user listed in both sources). By default, the user record in the XML directory is imported while the record in the data file is ignored, but you can override this default.
Specify the command file that contains the changes or additions to your existing CA DataMinder user hierarchy.
Note: By default, when you export any branch of the CA DataMinder user hierarchy to a command file, the target file name has an .acc extension. You can then edit this file before re-importing it.
(Only applicable if importing from an LDAP directory. See step 1.)
You must supply logon details for the source LDAP Directory:
Identify the server hosting the source LDAP directory. Enter its name or an IP address.
Enter the TCP/IP port number used to connect to the LDAP server. CA DataMinder uses this port to communicate with the LDAP server.
Identify the LDAP server’s base DN or domain. For example, to specify an Active Directory domain, enter one of these formats:
company.com
dc=company,dc=com
Note: If Account Import can detect the default DN, it is shown automatically. Also, some configurations, for example Domino Server, may require you to leave this field empty.
Enter your user name on the LDAP Server. The format for this name depends on the type of LDAP database. For example, if you import users from a Microsoft Exchange server, this name will be the same as your domain user name, with your domain and name separated with a backslash, such as:
unipraxis\frankschaeffer
On other LDAP databases, this name may be a fully qualified LDAP distinguished name, for example:
cn=frankschaeffer,o=unipraxis
Enter the password for your LDAP user.
Note: If the LDAP server permits anonymous access, leave both the User and Password fields blank.
(Only applicable if importing from an LDAP directory. See step 1.)
Where possible, the wizard automatically detects the type of LDAP directory (for example, Microsoft Active Directory) and key details about the LDAP directory structure. The wizard provides 'best guess' default search filters, but you can override these if necessary. Specifically, you must ensure that the following fields contain correct values:
Specify the LDAP attribute that holds the user names.
Specify the LDAP search filter needed by the wizard to extract users from the LDAP database.
Specify the LDAP search filter needed by the wizard to extract the LDAP containers that correspond to CA DataMinder user groups.
Note: If you override the default search filters and specify different object classes and categories, ensure that the new filter conforms to RFC 2254.
(Only applicable if importing from an LDAP directory. See step 1.)
Specify the root directory for user data extracted from the LDAP directory. All users and groups at and below this root directory will be copied into CA DataMinder. Click Browse to select the root-level LDAP tree level.
For example, select ‘ou=Unipraxis/ou=Sales’ to import all users from this level downwards:

Specify the target parent group in the CA DataMinder user hierarchy. You can only choose one of your management groups as the parent group. All users and groups imported from LDAP and or a data file are added to this parent group.
Note: If you choose to reorganize existing CA DataMinder users to match the directory structure in LDAP or the structure specified the data file (you choose this in step 6), the reorganization only affects CA DataMinder users within the target parent group.
(Applicable if importing from an LDAP directory or a data file. See step 1.)
Now define the synchronization scope. The Account Import wizard enables you to synchronize your CA DataMinder user hierarchy with an external source. You can select any combination of the following synchronization options.
This option creates new CA DataMinder accounts for unknown users. That is, it creates a new account for each imported user who has no corresponding account in CA DataMinder.
Note: If a user is created with a user name matching a user account that was previously deleted, CA DataMinder can automatically recreate the deleted user.
This option rearranges the existing hierarchy of CA DataMinder users and groups to synchronize it with the Group Structure. You define the Group Structure in the next wizard screen.
If you do not select this option, all existing CA DataMinder users stay in their current group.
This option updates existing user accounts with e-mail addresses and attributes imported from corresponding users in the LDAP directory or data file. You specify these attributes in later wizard screens. See steps 9 and 10 for details.
Note: The full name associated with each CA DataMinder user account is imported automatically from the LDAP directory.
Important! We do not recommend that you use this parameter, as existing email events may no longer be associated with the correct user—see the /ed parameter for details.
This option prefixes names for new user accounts with the specified domain (such as unipraxis\srimmel). If importing users from an LDAP directory, specify the domain for the LDAP host server.
Note: This option is essential if single sign-on is enabled on your CMS.
This option exempts specified CA DataMinder user accounts from policy.
If you are importing user details from a data file, verify that the data file uses the correct format to identify policy-exempt users.
(Available only if importing users directly from an LDAP directory) Click the LDAP attribute that you want to use to identify exempt users. CA DataMinder automatically exempts any imported users from policy if they have this attribute.
If required, you can use specific attribute values to filter the users that you want to exempt from policy. For example, you select the Office attribute and set the value to London, you can exempt all users in your London office from policy.
These options determine how Account Import handles anomalous users and groups, whether you must confirm the changes, and how new user names are composed.
These options determine how imported users are organized into parent groups in the CA DataMinder user hierarchy.
Available only if you selected ‘Create new users’ in step 6.
The LDAP directory structure may contain empty containers. These are containers that hold subcontainers or other items, but no users. When importing users from the LDAP directory, you can set up the import wizard to ignore these empty containers or to create corresponding empty user groups in CA DataMinder.
If you select this option, the wizard creates empty user groups for each empty LDAP or data file container.
If you clear this option, the wizard ignores empty containers. For example, an LDAP directory may include the following branch:
LDAP: ou=Unipraxis/ou=London/ou=Sales
If the ‘Sales’ container is empty of users but the ‘London’ container is not empty, the wizard creates the following hierarchy in the Administration console:
CA DataMinder: Unipraxis/London
(Available only if you selected ‘Re-organize existing users’ in step 6.)
If your existing CA DataMinder user hierarchy contains users or groups not present in the LDAP directory, you can move them to an 'exceptions' group. The exceptions group can be any existing group in the user hierarchy. If you do not select this option, any non-LDAP users and groups are preserved in the CA DataMinder user hierarchy.
This option only affects CA DataMinder users within the specified target parent group.
Users prepended with a domain name other than the one set on the Synchronization Scope screen are not moved (see 'Synchronize users from this domain' in step 6).
Select this check box to exempt unknown users from policy.
If your existing CA DataMinder user hierarchy contains users not present in the LDAP directory or XML data file, you can exempt them from policy.
Exempt users are users who have a CA DataMinder account on the CMS but who are exempt from policy. That is, CA DataMinder does not monitor email, web or file activity for policy-exempt users.
If you select this option, you must confirm the all of the resulting changes to the user hierarchy. If you do not select this option, synchronization is automatic and you cannot confirm or reject individual changes.
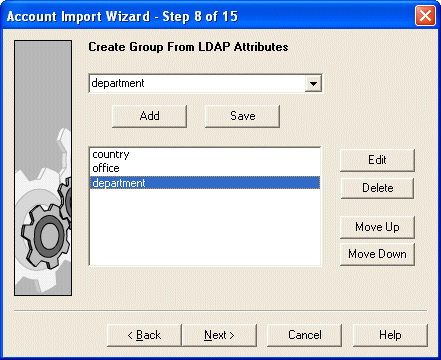
(Only available only if you selected ‘Use LDAP attributes to group users’ in step 7.)

If required, Account Import can derive a hierarchy of parent groups based on a concatenation of specified LDAP attributes.
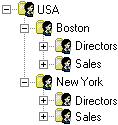
Choose which LDAP attributes to use, and specify the order in which they are used to derive a group hierarchy. For example, when these LDAP attributes are arranged in the following order:
country
office
department
They produce this group hierarchy in CA DataMinder:

Account Import only displays the most commonly used LDAP attributes in this screen. If you need to add an attribute not listed here (for example, an employee attribute custom created for your organization), use the Edit and Save buttons to add this attribute to the group-defining list.
If you need to modify the values of an LDAP attribute before using these values to derive a group hierarchy in CA DataMinder, you can append a conversion expression, enclosed in square brackets, to the attribute name. Use the Edit and Save buttons to add the attribute-plus-expression to the attribute list.
For example, an LDAP directory for Unipraxis includes an 'office' attribute. Values for the office attribute have a 'UX-' prefix, such as UX-Boston and UX-New York. Use the following conversion expression to strip out the prefix in the resulting CA DataMinder user groups (that is, Boston and New York):
office[if"UX-"["???{%untilEnd%}"] else["{?%untilEnd%}"]]
(Available only if importing from an LDAP directory and you selected ‘Copy user attributes’ in step 6.)
Account Import can sychronize e-mail addresses in the CMS database with addresses in an external source, typically an LDAP directory. Such synchronization is essential for CA DataMinder features that rely on e-mail address mapping!
Add the LDAP attributes that contain e-mail addresses. Each imported address is associated with a CA DataMinder user. The association is based on an anchor attribute that ties each LDAP user to a specific CA DataMinder user (see Step 11).
Note: If you use the ICAP agent to integrate with BlueCoat ProxySG servers, you must import the distinguishedName attribute.
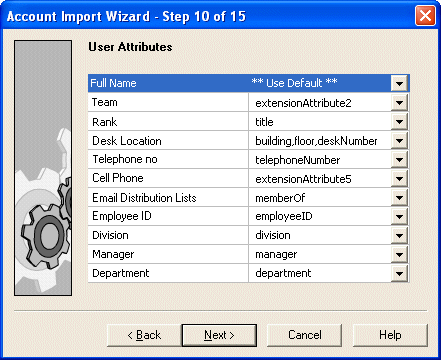
(Only available only if importing from an LDAP directory and you selected ‘Copy user attributes’ in step 6.)
Use this screen to import LDAP attributes and map them to attributes for CA DataMinder user accounts. CA DataMinder attributes are listed on the left. LDAP attributes are listed on the right.

CA DataMinder lets you define custom attributes for user accounts. For example, you can create an Employee ID attribute and assign a unique ID to each user in your organization. When the import operation runs, the Account Import updates the attributes for each CA DataMinder user with the corresponding attribute values in the LDAP directory.
To map an LDAP attribute to CA DataMinder attribute, select CA DataMinder attribute then choose an LDAP user attribute from the drop-down list.
To combine multiple LDAP attributes and write them as a single value to a CA DataMinder attribute, double-click the LDAP attribute, then manually type a comma separated list of the LDAP attributes you want to combine.For example:
Desk Location = building,floor,deskNumber
You can rename any CA DataMinder or LDAP attribute. Double-click the attribute and type its new name.
You can modify the imported value for any LDAP attribute before writing it to an attribute of a CA DataMinder user account. Double-click the LDAP attribute and then append a conversion expression to the attribute name. Enclosed the expression in square brackets.
You can use a CA DataMinder account attribute to synchronize CA DataMinder users with LDAP users (or users in a data file). This CA DataMinder attribute is the anchor attribute. It can be the user name, the user full name, or any of the defined user attributes. Account Import uses the anchor attribute to establish a link between the target user account in CA DataMinder and the source user account in the LDAP directory (or data file). Account Import then updates the account details in CA DataMinder with the imported information (the user's parent group, e-mail addresses and other attributes).
You specified the LDAP attribute mapped to CA DataMinder user names in the User Name Attribute field in step 3.
You specified the LDAP attribute mapped to CA DataMinder user full names was specified in step 10.
You specified the LDAP attributes mapped to CA DataMinder account attributes in step 10. Enter a value in the Attribute Index field, where index 1 refers UserAttribute1, index 2 to UserAttribute2, and so on.
This check box prevents CA DataMinder user names being inadvertently overwritten if the CA DataMinder name is different to the value of the LDAP attribute (or XML user tag) that identifies the user name. For example, this can happen if a user recently got married.
To stop the user name in the CA DataMinder database being overwritten during a synchronization process, clear this check box.
Note: This check box is automatically selected and disabled if you choose to anchor the user synchronization on the user name. This is because the synchronization does not match against a CA DataMinder user unless the user names are the same.
Wait while Account Import identifies all the changes and additions that must be made to the CA DataMinder user hierarchy.
(Only available if you selected the ‘Manual confirmation’ option in step 7.)
Confirm or reject all of the changes to the existing user or machine hierarchies.
Click this button to view the proposed changes to the CA DataMinder user hierarchy. The changes can take several minutes to appear if the import operation involves substantial additions or changes to the user hierarchy. When the list of changes appears, you can accept or reject all of the changes.
(Applicable only if importing from a command file. See step 1)
If you select this check box, any emaildelete commands in the command file are executed during the import operation. (An emaildelete command deletes an email address associated with a CA DataMinder user.)
Important! Use this parameter with caution! After running an emaildelete command, existing mail events may no longer be associated with the correct user.
The wizard now has all the information it needs. Wait while it imports the user data and updates the CA DataMinder user hierarchy.
Details about the import operation are recorded in a log file.
|
Copyright © 2014 CA.
All rights reserved.
|
|