
This information in this chapter describes how a system or a database administrator configures CA ControlMinder Enterprise Management with multiple LDAP servers using CA Directory. Working with multiple LDAP servers, enables the administrator to integrate multiple LDAP user stores into a single enterprise-wide user store.
CA Directory supports the integration of LDAP servers into a distributed directory backbone.
CA Directory provides a utility called DXlink,that enables searches over a number of LDAP directory servers.
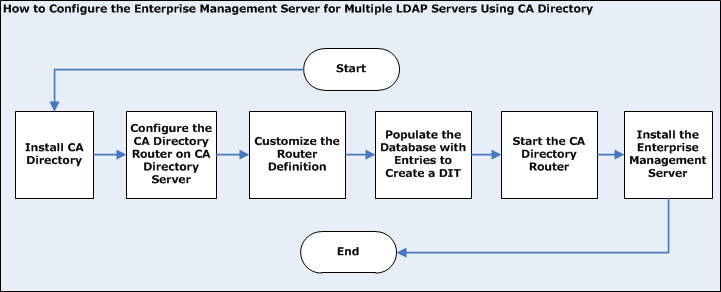
The following diagram illustrates how to configure CA ControlMinder Enterprise Management for multiple LDAP servers using CA Directory:

You perform the following steps to configure the Enterprise Management Server for multiple LDAP servers using CA Directory:
Important! When you install the Enterprise Management Server, specify the following:
Note: When you log in to CA ControlMinder Enterprise Management, verify that you specify the domain name that the administrative account you are using is a member.
CA Directory routes requests to the Active Directory that correspond to the suffix defined in the client request to the Active Directory used by CA ControlMinder. CA Directory uses the DXlink utility to route the request.
Before you completed this procedure, you installed two Active Directory user stores, for example: acdir1 and acdir2 and CA Directory, named dsarouter.
Follow these steps:
dxnewdsa -s 1 cadirhost-adrouter 25389
Specify the database size of 1 MB
Defines the name of the router
Specifies the router port
dxserver stop cadirhost-adrouter
dxserver install cadirhost-adrouter
DXHOME/config/knowledge
set dsa "acdir1-dxlink" =
{
    prefix            = <dc "acdir1"><dc "com">
    dsa-name          = <cn "acdir1-dxlink">
    dsa-password      = "secret"
    ldap-dsa-name     = <dc "acdir1"><dc "com"><cn "users"><cn "Administrator">
    ldap-dsa-password = "{CADIR}yKW2cVbG"
    address           = tcp "acdir1" port 389
    auth-levels       = clear-password
    trust-flags       = allow-check-password, no-server-credentials
    link-flags        = dsp-ldap, ms-ad
};
Specifies the Distinguished Named (DN) used to bind to Active Directory
Defines the encrypted password for the DN
Note: Use the dxpassword utility to encrypt the password. For example: dxpassword -P CADIR <password>.
Specifies the Active Directory domain controller address
set dsa "aclabcail-dxlink" =
{
    prefix            = <dc "acdir2"><dc "com">
    dsa-name          = <cn "acdir2-dxlink">
    dsa-password      = "secret"
    ldap-dsa-name     = <dc "acl"><dc "aclab"><cn "users"><cn "Administrator">
    ldap-dsa-password = "{CADIR}yKW2cVbG"
    address           = tcp "acdir2" port 389
    auth-levels       = clear-password
    trust-flags       = allow-check-password, no-server-credentials
    link-flags        = dsp-ldap, ms-ad
};
You have configured the CA Directory router.
After configuring the CA Directory router, you need to customize the CA Directory router definitions.
Follow these steps:
DXHOME/config/limits
# size limits
set max-users = 255;
set max-local-ops = 100;
set max-op-size = 0;

# time limits
set max-bind-time = none;
set bind-idle-time = 3600;
set max-op-time = 600;
Save and close the file.
DXHOME/config/settings
# directory information base
set alias-integrity = true;
# distribution controls
set multi-casting = true;
set always-chain-down = false;
# security controls
set min-auth = clear-password;
set allow-binds = true;
set ssl-auth-bypass-entry-check = false;
# general controls
set op-attrs = true;
set transparent-routing = true;
Save and close the file
DXHOME/config/knowledge
set dsa "cadirhost-adrouter" =
{
    prefix        = <>
    dsa-name      = <cn "cadirhost-adrouter">
    dsa-password  = "secret"
    address       = tcp "cadirhost" port 25389
    disp-psap     = DISP
    snmp-port     = 25389
    console-port  = 25390
auth-levels = clear-password
Save and close the file.
Important! If you installed CA Directory on a server where both IPv4 and IPv6 addresses are defined, specify IPv6 and IPv4 address types in the tcp value. For example: address = tcp "fe80::20d:56ff:fed4:8300%5" port 19389, tcp "192.168.1.1" port 19389
source "dsarouter-adrouter.dxc";
source "acdir1-dxlink.dxc";
source "acdir2-dxlink.dxc";
DXHOME/config/logging
DXHOME/config/servers
#
# Initialization file written by DXnewdsa
#
# logging and tracing
source "../logging/cadirhost-adrouter.dxc";
# schema
clear schema;
source "../schema/default.dxg";
# knowledge
clear dsas;
source "../knowledge/adrouter.dxg";
# operational settings
source "../settings/cadirhost-adrouter.dxc";
# service limits
source "../limits/cadirhost-adrouter.dxc";
# access controls
clear access;
source "../access/default.dxc";
# ssl
source "../ssld/default.dxc";
# replication agreements (rarely used)
# source "../replication/";
# multiwrite DISP recovery
set multi-write-disp-recovery = false;
# grid configuration
set dxgrid-db-location = "data";
set dxgrid-db-size = 1;
set cache-index = all-attributes;
set lookup-cache = true;
Note: Replace cadirhost with the CA Directory host name.
You have customized the CA Directory router definitions.
You can choose to populate the CA Directory database with entities to create a Directory Informational Tree (DIT). A DIT enables you to browse the organizational hierarchy from the top down.
Follow these steps:
dn: dc=com
objectClass: domain
objectClass: top
dc: com

dn: dc=company,dc=com
objectClass: domain
objectClass: top
dc: company

dn: dc=demo
objectClass: domain
objectClass: top
dc: demo
dxloaddb cadirhost-adrouter input.ldif
dxserver start cadirhost-adrouter
Note: Replace cadirhost with the CA Directory host name.
You have populated the CA Directory database with entities to create a DIT.
|
Copyright © 2013 CA Technologies.
All rights reserved.
|
|