

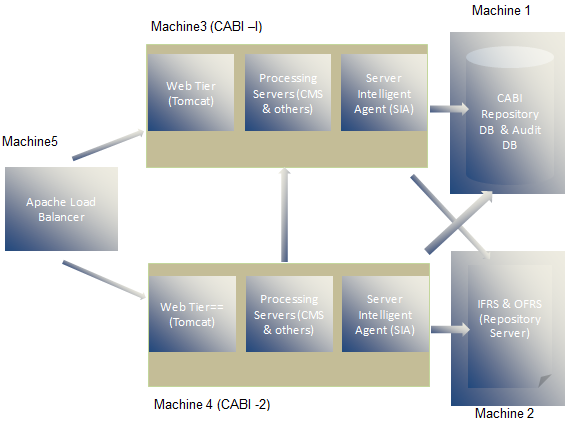
To support a high availability report server, this chapter describes installing CA Business Intelligence on Linux platform using Apache Tomcat as the application server. The Apache HTTP Server is used as a load balancer. See the following diagram for details on this architecture.
Prerequisites
Complete the following prerequisites:
System1 (Database Server)
Install the Oracle server and create two databases, one for CMS and one for Auditing. See the Oracle documentation for instructions on how to install Oracle on Linux and how to create databases on Linux after installing Oracle.
System2 (File Repository Server)
Perform the following steps on the File Repository Server system to configure and to start the NFS Server.
service nfs start
service nfs status
mkdir -p /home/nfs/cabi
useradd -s /bin/bash cabiuser
chown cabiuser /home/nfs/cabi
id cabiuser
append /home/nfs/cabi System*(rw,all_squash,anonuid=501,anongid=501) to /etc/exports file
exportfs -a
showmount -e System2
su cabiuser
mkdir frsinput frsoutput
System3
This non-root user creation is mandatory to install CA Business Intelligence on Linux.
See the CA Business Intelligence implementation guide for more information about the installation process.
Once the installation is complete, make sure that you are able to log in to CMC through the web URL.
http://System3:8080/CmcApp
System 4
See the CA Business Intelligence implementation guide for more information about the installation process.
Make sure that you can log in to the CMC through the web URL:
http://System4:8080/CmcApp
Setup NFS client on both CA Business Intelligence systems:
Perform the following steps on both CA Business Intelligence systems (System3 and System4) to set up the NFS client, which is required to access a shared location in the file repository server.
mkdir -p /home/nfs/cabi
useradd -s /bin/bash -m cabiuser
chown cabiuser /home/nfs/cabi
add bansr02-I53529:/home/nfs/cabi /home/nfs/cabi nfs defaults 0 0 to /etc/fstab
mount -a
mount
su -cabiuser
cd /home/nfs/cabi
touch a
rm a
ls -alrt
cd /opt/CA/SharedComponents/CommonReporting3/bobje
./stopservers
cd data/frsinput
cp -r * /home/nfs/cabi/frsinput
cd ../frsoutput
cp -r * /home/nfs/cabi/frsoutput
cd ../..
./startservers
./ccm.sh -disable all -username Administrator -password adminpassword
After completing the preceding steps on any system, perform the following steps:
System 5
Perform the following steps to configure nodes in the cluster environment on the load balancer server (System5) as a root user. Be sure that the Apache httpd server is installed.
LoadModule jk_module /etc/httpd/modules/mod_jk.so
JkWorkersFile "/etc/httpd/conf/workers.properties"
JkMountFile conf/uriworkermap.properties
JkMount /servlet/* balancer
JkMount /*.jsp balancer
JkMount /jkmanager/* jkstatus
worker.list=balancer,jkstatus
worker.jkstatus.type=status

worker.worker1.port=8009
worker.worker1.host=System3
worker.worker1.type=ajp13
worker.worker1.lbfactor=1

worker.worker2.port=8009
worker.worker2.host=System4
worker.worker2.type=ajp13
worker.worker2.lbfactor=1

worker.balancer.type=lb
worker.balancer.balance_workers=worker1,worker2
worker.balancer.sticky_session=true
/jmx-console=balancer
/jmx-console/*=balancer
/web-console=balancer
/web-console/*=balancer
/*=balancer
/=balancer
/etc/init.d/httpd stop
/etc/init.d/httpd start
Load balancing configuration on both CA Business Intelligence systems:
Configure both nodes in the cluster to accept requests from the load balancer server. Perform the following steps in CA Business Intelligence servers (System3 and System4).
Open /opt/CA/SharedComponents/CommonReporting3/bobje/tomcat/conf/server.xml.
<Connector port="8009" enableLookups="false" redirectPort="8443" tomcatAuthentication="false" maxThreads="400" minSpareThreads="25" maxSpareThreads="100" protocol="AJP/1.3" />
An Engine tag exists below this line. Append the extra attribute jvmRoute="worker1" to this tag. (In the second CABI server, make the value"worker2").
Now you can access CMC using the following URL:
http://system5/CmcApp
You can also access Infoview using the following URL:
http://system5/InfoViewApp
|
Copyright © 2014 CA.
All rights reserved.
|
|