

This section contains the following topics:
Run the XOG from the Command Line
You can run the XOG in the following ways:
You can type in the parameters required to import and export data directly on the command line or you can store the parameters in a .properties file and call the file from the command line.
To run the XOG from the client using command-line parameters
Basic operations:
bin\xog -?
bin\xog -servername <host> -portnumber CA Portal -username <adminuser> -password <password> -input xml/biz_companies_read.xml
bin\xog -servername
By default, output is saved to the bin directory.
The XOG client command line uses the following parameters:
Indicates the name of the server running CA Clarity PPM.
Indicates the port number used on the server.
Default: 80. The typical value for an SSL-enabled server is 443.
Indicates if the server is an SSL-enabled server.
Default: False
Identifies the path to a file where the output of the operation should be written. Any existing file is overwritten.
Indicates the path to the file that contains the XOG request.
Indicates the username required for authentication. This user must have XOG administration access rights.
Indicates the user password.
Optional. The properties file that contains any or all of the above parameters.
Indicates that the client needs to operate in a FIPS 140-2 compliant mode.
Default: False
You can pass command-line parameters to the XOG client from a .properties file. You can create your own .properties file from the example file provided with the XOG client's bin directory. The advantage of this method is that you can store the parameters for common XOG requests in multiple .properties files and reuse them. This saves the effort of writing out the parameters on the command line each time you want to use them.
For example, if you are using the XOG to import users, companies, resources, and content items, you might create .properties files like the ones shown here:
In the example .properties files listed, each file would contain different input and output property values that are appropriate for the type of data it is being used to import.
The parameters needed to read project data is contained in the following .properties file example. The bolded text shows the values provided for the parameters.
# --- server host name you want to test against
servername=localhost
portnumber=80
sslenabled=false
input=../xml/prj_projects_read.xml
output=../xml/prj_projects_write.xml
username=admin
password=xogrocks
Make a copy of the example test.properties file located in the XOG client's bin directory and modify the copy to create a new .properties file that you can use to import or export the specific data that you need.
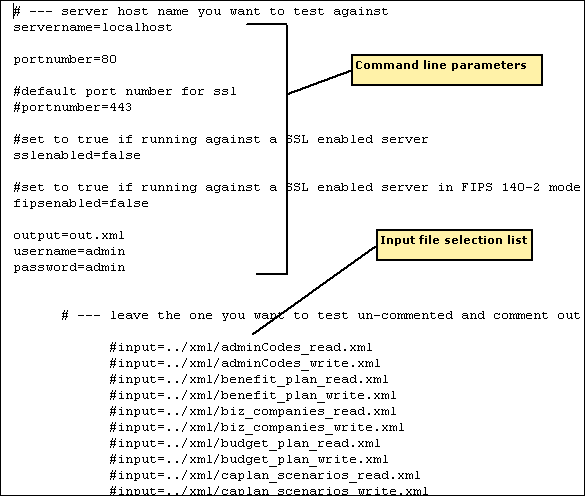
As you modify the file, note the following:
The following figure shows the test.properties file with the default values for parameters.
To run the XOG using the .properties file
bin\xog -propertyfile bin/test.properties
Typically the XOG client is used as a non-interactive command-line tool. When you are developing integrations or testing XOG requests, you may want to run the XOG client as a shell. The shell lets you log in once and execute multiple requests before logging out.
To run the XOG client as a shell
xog
The shell comes up and the usage list displays.
Use the XOG client shell commands when you are developing integrations or testing XOG requests. The XOG client shell uses the following commands:
Displays the command usage screen.
Retrieves a new session ID by logging into one of the CA Clarity servers. The login command string is variable.
Example:
> login admin/mypassword@myserver:80
Closes any active sessions.
Sets the path and file name where the results of the xog call will be captured.
Example:
> output c:\xog\xml\out.xml
Invokes a XOG request file. The file path may be absolute or relative to the working directory.
Example:
> call xml/biz_companies_read.xml
> call D:/Integrations/CA Clarity/write.xml
Logs out of active sessions and quits the shell.
The XOG is a web service interface to CA Clarity. The XOG provides a SOAP API for communication with CA Clarity over the web. The XOG SOAP API is documented in the WSDL and the XSD files. Any client tool, not only the XOG client, can send and receive SOAP messages using the XOG.
The following steps describe the general process for invoking XOG directly using SOAP:
<SOAP-ENV:Envelope xmlns:SOAP-ENV="http://schemas.xmlsoap.org/soap/envelope/">
   <SOAP-ENV:Header/>
   <SOAP-ENV:Body>
      <Login xmlns="http://www.niku.com/xog">
         <Username>admin</Username>
         <Password>admin</Password>
      </Login>
   </SOAP-ENV:Body>
</SOAP-ENV:Envelope>
where Login Input elements are:
The log in request main body element. Login returns a SessionID that you may use in subsequent requests.
The name of the user doing the work.
The password for the user.
<SOAP-ENV:Envelope xmlns:SOAP-ENV="http://schemas.xmlsoap.org/soap/envelope/"
   xmlns:xog="http://www.niku.com/xog">
   <SOAP-ENV:Header>
      <xog:Auth><xog:SessionID>[session id]</xog:SessionID></xog:Auth>
   </SOAP-ENV:Header>
   <SOAP-ENV:Body>
   <obj:WriteChange xmlns:obj="http://www.niku.com/xog/Object">
      <NikuDataBus
         xmlns:xsi="http://www.w3.org/2001/XMLSchema-instance"
         xsi:noNamespaceSchemaLocation="../xsd/nikuxog_change.xsd">
            <Header version="12.0.0.5028"
               externalSource="ORACLE-FINANCIAL"/
                  <changeRequests>
                     <changeRequest
                        benefits="change request for xog test"
                        code="change request for xog test"
                        description="change request for xog test"
                        impactBaseline="change request for xog test"
                        impactDescription="change request for xog test"
                        name="change request for xog test"
                        ownerCode="admin" priorityCode="LOW"
                        projectCode="riskIssueProject"
                        reasons="change request for xog test"
                        targetResolutionDate="2004-10-15"
                        statusCode="OPEN">
      </NikuDataBus>
   </obj:WriteChange>
   </SOAP-ENV:Body>
</SOAP-ENV:Envelope>
where RequestSessionAL Input Elements are:
The authentication string.
The Write Object request's main body element.
When making multiple requests with the same SessionID (such as when an external process wakes up at defined intervals) the SessionID may time out. This is the equivalent of a Logout request. To establish a new SessionID, log in again. The session timeout duration is the same as that set for web browser user sessions; you can configure this setting from the System Options in the Administrator Tool.
<SOAP-ENV:Envelope xmlns:SOAP-ENV="http://schemas.xmlsoap.org/soap/envelope/"
   xmlns:xog="http://www.niku.com/xog">
   <SOAP-ENV:Header>
      <xog:SessionID>[session id]</xog:SessionID>
   </SOAP-ENV:Header>
   <SOAP-ENV:Body>
      <xog:Logout/>
   </SOAP-ENV:Body>
</SOAP-ENV:Envelope>
where Logout Input elements are:
The authentication string that identifies the session to be invalidated.
The Logout request main body element.
|
Copyright © 2013 CA.
All rights reserved.
|
|