

This section contains the following topics:
GEL Script Validation and Execution
Important! Before you use GEL, read the Customization Policy. See your CA account representative.
GEL (Generic Execution Language) is a tool you can use to turn XML into executable code. It is based on Jelly, a jakarta.apache.org Commons project. It has been extended and embedded into CA Clarity PPM to enable custom logic to solve business problems. GEL is the basis for the enterprise application integration framework within CA Clarity PPM.
GEL also provides a collection of standard integrations that provide connectors to enterprise applications such as Remedy® Help Desk.
With GEL you can invoke and process a variety of data sources:
GEL can read or write to any SOAP-based web service. This includes the XOG web services.
GEL can read or write to any delimited file including those on local disks, network disks or disk arrays.
GEL can upload or download to FTP servers.
GEL uses JDBC to access RDBMS to read or write data.
For more information about Jelly and the Jakarta Commons Project, see http://jakarta.apache.org/commons.
The GEL run-time is packaged with XOG in the XOG client. Once the client is installed, you can use the GEL command in the bin directory of the XOG client to validate and execute GEL scripts.
Make sure that JRE is installed on your computer.
The GEL validator reads scripts, confirms that the scripts are well-formed XML, and determines that all referenced tags and tag libraries are valid and available in the runtime environment. The validator does not execute scripts.
In the following example the hello.xml script is first validated, and then the hello.xml script, located in the XOG client home directory, is executed.
E:\XOG>bin\gel -script hello.xml -validate
File geltest.xml validated.

E:\XOG>bin\gel -script hello.xml
Hello World 1!
Hello World 2!
Hello World 3!
The following sections explain the basic rules for using GEL.
The following figure shows the basic structure for a GEL script.
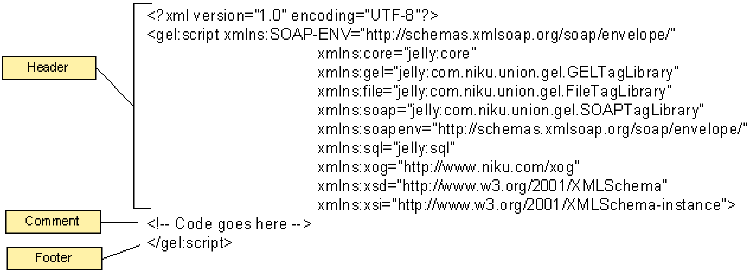
Note that you can add a comment anywhere in a GEL script by using the structure <!-- comment -->.
A GEL script is an executable XML file that is built from qualified elements bound to Java code called tags. Using namespace declarations, tags are organized into tag libraries which are made available in a script.
In the following Hello World example, two tag libraries are defined for the script: Core and GELTagLibrary as seen in tag pairs such as: <core:???></core:???> and <gel:???></gel:???>.
Note: An entire script always resides within the GEL script tag.
<gel:script xmlns:core="jelly:core"
  xmlns:gel="jelly:com.niku.union.gel.GELTagLibrary">
    <core:forEach indexVar='i' begin='1' end='3'>
      <gel:out>Hello World ${i}!</gel:out>
    </core:forEach>
</gel:script>
Variables are used extensively throughout GEL scripts. Many tags can set variables. An example of a tag that can set variables is core:set. You can use the common syntax ${variable_name} to reference variables. In the Hello World example, 'i' is a variable which is set by the forEach tag and is incremented with each loop.
Core is a built-in Jelly library that contains general-purpose tags (such as forEach that is used in the previous example). GELTagLibrary is the primary GEL library; it contains general-purpose tags not found in core and tags that are particular to CA Clarity PPM.
GEL contains the following tags for performing conditional processing:
<core:if test="${hasDocs}">
	…
</core:if>
<core:choose>
<core:when test="${row[6].equals("")}">
…
</core:when>
<core:otherwise>
…
</core:otherwise>
</core:choose>
<core:switch on="${caseType}">
   <core:case fallThru="true" value="Incident"/>
   <core:case value="Problem">
       …
   </core:case>
   <core:case fallThru="true" value="Question"/>
   <core:default>
       …
   </core:default>
</core:switch>
<core:forEach trim="true" items="${queryResult.rowsByIndex}" var="row">
       …
</core:forEach>
Variables in GEL scripts are declared at the time of use. There are no declaration blocks, like the ones you might find in other languages. GEL provides the following ways to store a variable value:
This tag allows values to be passed into a GEL script from a CA Clarity process. Inside the GEL script, you can refer to the parameter as you would any other variable (that is, using the ${variablename} syntax). The optional attribute secure="true" causes CA Clarity to hide the actual value in the user interface with asterisks (*).
<gel:parameter var="XOGUsername" default="admin"/>
<gel:parameter var="XOGPassword" default="password" secure="true"/>
This tag is used to set basic variables; that is, ones that do not need to be extracted from an XML document. Refer to the variable using the ${variablename} syntax.
<core:set value="1" var="yes"/>
<gel:out>${yes}</gel:out>
You can do some basic math on the variable:
<gel:out>${yes+2}</gel:out>
Use this tag when it is necessary to extract the value of the variable from an XML document. This tag differs from the <core:set> tag in that it takes a select attribute which in turn requires an XPath statement. If you are unfamiliar with XPath, think of it as a hierarchy mapping of the XML document. In the example below, the select statement points the way to the Statistics node of a XOG output file.
<gel:set asString="false"
select="$XOGresult/SOAP-ENV:Envelope/SOAP-ENV:Body/NikuDataBus/XOGOutput/Statistics"
var="stats"/>
This tag allows you to set variables with a scope that extends beyond the current script.
The <gel:parse> tag is used to create an XML document in memory. This is how you will build XOG requests. The tag can be used to generate an entire XML document, or specific nodes that can later be attached into an existing XML document.
<gel:parse var="loadContent">
  <NikuDataBus xmlns:xsi=http://www.w3.org/2001/XMLSchema-instance
  xsi:noNamespaceSchemaLocation="../xsd/nikuxog_resource.xsd">
    <Header version="12.0.0.5028" action="write" objectType="resource" externalSource="ORACLE-FINANCIAL"/>
      <Resources>
        <Resource resourceId="abc" isActive="true">
          <PersonalInformation lastName="doe" firstName="john" emailAddress="jdoe@ca.com"/>
        </Resource>
      </Resources>
  </NikuDataBus>
</gel:parse>
Custom Action GEL scripts associated with processes have the following parameters available to them:
If no object is associated with the process, the ID is -1. Otherwise the ${gel_objectInstanceId} parameter contains the object instance ID.
${gel_processId} is the process identifier; all instances of this process share this identifier.
${gel_processInstanceId} is the process instance identifier; all instances have a unique value.
All built-in parameters have a "gel_" prefix and are of data type - numeric.
Note the following:
When interacting with SOAP services in GEL, you might need to take additional steps when using the secure sockets layer (SSL) with web services. If the SSL certificate in use by the web service host has been issued by a well-known certificate authority (for example, Verisign or Thawte), no additional steps might be needed provided the appropriate certificate already exists in the cacerts keystore in the Java SDK running the GEL script.
However, you might need to take additional steps to ensure the proper trust is established between the GEL script and web service host when:
This process explains how to set up a self-signed SSL certificate on a web-service host.
For the setup, identify the Java SDKs that will be running GEL scripts. Here is how:
To set up a self-signed SSL certificate
For example, C:\jdk1.5.0_17.
For example, mycert.cer.
cd c:\jdk1.5.0_17\jre\lib\security
This directory is where the cacerts Java keystore resides. The keystore holds certificate-authority certificates used for establishing trust. The keystore password for this keystore is always changeit.
keytool -keystore cacerts -storepass changeit -import -file c:\temp\mycert.cer -trustcacerts -alias mycert
Assign the alias value to a value not currently in use in the keystore.
You may be prompted on whether you want to trust this certificate. If so, answer Yes.
The keystore is loaded one time when the CA Clarity services are started.
Use the following commands to control GEL tag restriction:
Sets the value of the gelTagRestriction property to on.
Sets the value of the gelTagRestriction property to off.
The property gelTagRestriction is referenced to determine if gel tags are restricted. The property is on the system element. It is an optional element.
Use the values on or off to set GEL tag restrictions for the environment. Specifying any value other than off enables GEL tag restriction. GEL tag restrictions are off by default.
Examples
Properties.xml file with no GEL tag restriction:
<system online="true" multiCurrency="false" licenseTypes="old" singleTenantMode="true"/>
or
<system online="true" multiCurrency="false" licenseTypes="old" singleTenantMode="true" gelTagRestriction="off"/>
Properties.xml file with GEL tags restricted:
<system online="true" multiCurrency="false" licenseTypes="old" singleTenantMode="false" gelTagRestriction="on"/>
By including the SOAP and XOG namespaces in GEL scripts, you give GEL the ability to communicate with the XOG web service. You must package each invocation in a proper SOAP envelope.
The following example logs into CA Clarity and runs the XOG to read the list of resources. The script performs each of these actions as individual calls to the XOG server.
<gel:script xmlns:SOAP-ENV="http://schemas.xmlsoap.org/soap/envelope/"
    xmlns:core="jelly:core"
    xmlns:gel="jelly:com.niku.union.gel.GELTagLibrary"
    xmlns:soap="jelly:com.niku.union.gel.SOAPTagLibrary"
    xmlns:soapenv="http://schemas.xmlsoap.org/soap/envelope/"
    xmlns:sql="jelly:sql"
    xmlns:xog="http://www.niku.com/xog"
    xmlns:xsd="http://www.w3.org/2001/XMLSchema"
    xmlns:xsi="http://www.w3.org/2001/XMLSchema-instance">

  <gel:parameter default="http://nikuvm:80" var="XOGURL"/>
  <gel:parameter default="svong" var="XOGUsername"/>
  <gel:parameter default="svong" secure="true" var="XOGPassword"/>

  <!-- Log into XOG and get a session ID -->
  <soap:invoke endpoint="${XOGURL}/niku/xog" var="auth">
    <soap:message>
      <soapenv:Envelope 	xmlns:soapenv="http://schemas.xmlsoap.org/soap/envelope/"
                           xmlns:xog="http://www.niku.com/xog">
        <soapenv:Header/>
        <soapenv:Body>
          <xog:Login>
            <xog:Username>${XOGUsername}</xog:Username>
            <xog:Password>${XOGPassword}</xog:Password>
          </xog:Login>
        </soapenv:Body>
      </soapenv:Envelope>
    </soap:message>
  </soap:invoke>

  <!-- Checking whether a sessionID is returned.  If not, it means that Login was unsuccessful -->
  <gel:set asString="true" select="$auth/SOAP-ENV:Envelope/SOAP-ENV:Body/xog:SessionID/text()" var="sessionID"/>
  <core:choose>
    <core:when test="${sessionID == null}">
      <gel:out>Couldn't Log in.  Check the username/password.</gel:out>
    </core:when>
    <core:otherwise></core:otherwise>
  </core:choose>

  <!--Run XOG and attach an input file...alternatively the Body section can be the NikuDatabus section of an input file-->
  <soap:invoke endpoint="${XOGURL}/niku/xog" var="runresult">
    <soap:message>
      <soapenv:Envelope 	xmlns:soapenv="http://schemas.xmlsoap.org/soap/envelope/"
                            xmlns:xog="http://www.niku.com/xog">
        <soapenv:Header>
           <xog:Auth>
            <xog:SessionID>${sessionID}</xog:SessionID>
          </xog:Auth>
        </soapenv:Header>
        <soapenv:Body>
          <gel:parse var="xmlindoc" file="C:\Clarity\XOG\xml\rsm_resources_read.xml"/>
          <gel:include select="$xmlindoc"/>
        </soapenv:Body>
      </soapenv:Envelope>
    </soap:message>
  </soap:invoke>


<!-- Read the output and extract some information from it -->
  <gel:set asString="true" select="$runresult/SOAP-ENV:Envelope/SOAP-ENV:Body/NikuDataBus/XOGOutput/Status/@state" var="XOGoutcome"/>
  <core:switch on="${XOGoutcome}">
    <core:case value="SUCCESS">
      <gel:forEach select="$runresult/SOAP-ENV:Envelope/SOAP-ENV:Body/NikuDataBus/Resources/Resource" var="outputnode">
        <gel:out><gel:expr select="$outputnode/PersonalInformation/@displayName"/></gel:out>
      </gel:forEach>
      <gel:set asString="false" select="$runresult/SOAP-ENV:Envelope/SOAP-ENV:Body/NikuDataBus/XOGOutput/Statistics" var="stats"/>
      <gel:out>Success!  Total number of records: <gel:expr select="$stats/@totalNumberOfRecords"/></gel:out>
    </core:case>
    <core:case value="FAILURE">
      <gel:set asString="false" select="$runresult/SOAP-ENV:Envelope/SOAP-ENV:Body/NikuDataBus/XOGOutput/Statistics" var="stats"/>
      <gel:out>XOG failed.  Out of <gel:expr select="$stats/@totalNumberOfRecords"/> records, <gel:expr select="$stats/@failureRecords"/> failed.</gel:out>
    </core:case>
    <core:default>
      <gel:out>Couldn't find XOG output summary.  Please check the output file manually.</gel:out>
    </core:default>
  </core:switch>

  <!-- Log out of the XOG -->
  <soap:invoke endpoint="${XOGURL}/niku/xog" var="logoutresult">
    <soap:message>
      <soapenv:Envelope 	xmlns:soapenv="http://schemas.xmlsoap.org/soap/envelope/"
                           xmlns:xog="http://www.niku.com/xog">
        <soapenv:Header>
          <xog:Auth>
            <xog:SessionID>${sessionID}</xog:SessionID>
          </xog:Auth>
        </soapenv:Header>
        <soapenv:Body>
          <xog:Logout/>
        </soapenv:Body>
      </soapenv:Envelope>
    </soap:message>
  </soap:invoke>

</gel:script>
In this example, the script logs in and makes a XOG request in a single invocation. The XOG request is also included inline, which means it is included in the script instead of being retrieved from a file.
<gel:script xmlns:x="jelly:xml"
  xmlns:gel="jelly:com.niku.union.gel.GELTagLibrary"
  xmlns:soap="jelly:com.niku.union.gel.SOAPTagLibrary"
  xmlns:soap-env="http://schemas.xmlsoap.org/soap/envelope/"
  xmlns:xog="http://pmo.sec.samsung.net/niku/xog">

  <gel:parameter var="XOGusername" default="admin"/>
  <gel:parameter var="XOGpassword" default="admin"/>

  <soap:invoke endpoint="http://pmo.sec.samsung.net/niku/xog" var="result">
    <soap:message>
      <soap-env:Envelope  xmlns:soapenv="http://schemas.xmlsoap.org/soap/envelope/"
                          xmlns:xog="http://www.niku.com/xog">
        <soap-env:Body>
          <xog:Login xmlns="http://www.niku.com/xog">
            <xog:Username>${XOGusername}</xog:Username>
            <xog:Password>${XOGpassword}</xog:Password>
          </xog:Login>
          <NikuDataBus xmlns:xsi="http://www.w3.org/2001/XMLSchema-instance"
                             xsi:noNamespaceSchemaLocation="../xsd/nikuxog_read.xsd">
            <Header version="12.0.0.5028" action="read" objectType="resource" externalSource="NIKU">
              <args name="include_contact" value="false"/>
              <args name="include_management" value="false"/>
              <args name="include_custom" value="false"/>
              <args name="include_financial" value="false"/>
            </Header>
            <Query>
              <Filter name="isActive" criteria="EQUALS">true</Filter>
            </Query>
          </NikuDataBus>
        </soap-env:Body>
      </soap-env:Envelope>
    </soap:message>
  </soap:invoke>

  <gel:out><gel:expr select="$result"/></gel:out>
</gel:script>
GEL can connect to one or more databases, and it is not limited to CA Clarity PPM databases. Both Oracle and SQL Server are supported. See the following examples.
Most connection problems stem from either login errors or JDBC issues. The following example shows a JDBC error.
E:\Clarity\XOG\bin>gel -script gelsqlexample.xml
ERROR 2005-08-31 16:45:40,549 [main] sql.SetDataSourceTag Could not load driver class:
java.lang.ClassNotFoundException: oracle.jdbc.driver.OracleDriver
java.lang.ClassNotFoundException: oracle.jdbc.driver.OracleDriver…
If you see an error like this, find the necessary JDBC classes and copy them to the GEL classpath.
Note that the GEL engine does not search the environment path for these files. GEL only looks in the lib folder (and the CA Clarity PPM server classpath, if it has been installed on the local computer). For Oracle, ojdbc14.jar should be copied to the lib folder. For SQLServer, Microsoft’s JDBC drivers must be made available to the GEL engine. Copy the files msbase.jar, mssqlserver.jar, and msutil.jar to the lib directory (after you have installed the latest JDBC driver from Microsoft, or copy the files from the CA Clarity PPM\lib directory).
The following example connects to a CA Clarity database and prints out the results of a basic query.
<gel:script	xmlns:core="jelly:core"
		xmlns:gel="jelly:com.niku.union.gel.GELTagLibrary"
		xmlns:sql="jelly:sql">

  <gel:parameter default="svong" var="ClarityUser"/>
  <gel:parameter default="svong" secure="true" var="ClarityPassword"/>

  <sql:setDataSource url="jdbc:oracle:thin:@localhost:1521:NIKU" driver="oracle.jdbc.driver.OracleDriver"
  user="${ClarityUser}" password="${ClarityPassword}"/>

  <sql:query var="result">
    select name, unique_name from srm_projects
  </sql:query>
  <core:forEach trim="true" items="${result.rowsByIndex}" var="row">
    <core:forEach var="field" items="${row}">
      <gel:out>${field}</gel:out>
    </core:forEach>
  </core:forEach>

  <!--core:forEach trim="true" items="${result.rowsByIndex}" var="row">
    <core:forEach var="columnName" items="${result.columnNames}" indexVar="i">
      <field column="${columnName}">${row[i]}</field>
      <gel:out>${row[i]}</gel:out>
    </core:forEach>
  </core:forEach-->

</gel:script>
The sql:setDataSource statement makes the connection to the database. Note the use of parameters for the login credentials. Using gel:parameter allows the UserID and Password to be set from within CA Clarity PPM (furthermore, the secure="true" declaration masks the password in the UI) if this script is called from a CA Clarity PPM process.
sql:query encloses the actual query, and the two core:forEach loops cycle through the result. The first core:forEach loop runs through the rows; the embedded core:forEach reads the columns in each row.
The results set for this code prints out one field per line. The output would look similar to the following example.
Project ABC
P001
Consumer Confidence Project
P002
John’s Super Special Project
P003
.
One way around this issue is to programmatically create rows of data. The following example is for a query that returns three columns per row. By using step="3", you can process one logical row at a time. Each item is referred to by using an index offset.
<core:forEach trim="true" items="${queryResult.rowsByIndex}" var="row">

  <!-- 3 fields per row, so jump by 3 to build the next row -->
    <core:forEach var="field" items="${queryResult.columnNames}" indexVar="i" step="3">

    <file:line>
      <file:column value="${row[i]}"/>
      <file:column value="${row[i+1]}"/>
      <file:column value="${row[i+2]}"/>
      </file:line>

  </core:forEach>

</core:forEach>
GEL can open a file (and if it is an XML file or a comma-delimited file, parse out all the nodes and attributes), read the file, and write to it. It can also perform FTP operations on files. It cannot, however, create a directory to put files in, move files around, or delete files after it is done with them. This can be a problem when working with the Documents XOG.
The example code below creates a rate matrix XOG file. The file opens a tab-delimited text file as input, and creates a matrixRow node for each row of input data.
<gel:script xmlns:core="jelly:core" xmlns:gel="jelly:com.niku.union.gel.GELTagLibrary" xmlns:file="jelly:com.niku.union.gel.FileTagLibrary">
<gel:parameter default="niku" var="clarityUser"/>
<gel:parameter default="nikuadmin" secure="true" var="clarityPassword"/>
<gel:parameter default="E:\Clarity\XOG\bin" var="infolder"/>
<gel:parameter default="E:\clarity\xog\bin\rateMatrixLoadFile.xml" var="XOGloadfile"/>
<gel:parameter default="${infolder}\rateMatrix.tab" var="infile"/>
<gel:formatDate format="yyyyMMdd" stringVar="today"/>
<!-- Open up the input file -->
<file:readFile fileName="${infile}" delimiter="\t" var="infileParsed" embedded="false"/>
<!-- The GEL parse statement can be given the name of an XML file, or, as shown below, an XML node structure. -->
<!-- Use it to create the main XML shell and add in non-repetitive sections like the columns section below -->
<gel:parse var="loadContent">
<NikuDataBus xmlns:xsi="http://www.w3.org/2001/XMLSchema-instance"
xsi:noNamespaceSchemaLocation="../xsd/nikuxog_matrix.xsd">
<Header action="write" externalSource="NIKU" objectType="matrix" version="12.0.0.5028"/>
<matrices>
<matrix defaultCurrencyCode="USD" name="D&B COST/RATE MATRIX" type="Cost/Rate">
<columns>
<column name="entity"/>
<column name="department"/>
<column name="resourceClass"/>
<column name="transactionClass"/>
<column name="resourceRole"/>
<column name="resource"/>
<column name="inputTypeCode"/>
</columns>
<matrixRows>
</matrixRows>
</matrix>
</matrices>
</NikuDataBus>
</gel:parse>
<!-- Build the sections. Skip the headers on the first line -->
<core:forEach items="${infileParsed.rows}" var="row" indexVar="i" begin="1" step="1">
<!-- This GEL:parse statement creates the node in memory -->
<gel:parse var="matrixRowNode">
<matrixRow actualCost="${row[11]}" currencyCode="${row[12]}" entity="${row[2]}" department="${row[3]}"
fromDate="${row[0]}" rate="${row[9]}" transactionClass="${row[5]}" resourceClass="${row[4]}"
resourceRole="${row[6]}" inputTypeCode="${row[8]}" resource="${row[7]}" standardCost="${row[10]}"
toDate="${row[1]}"/>
</gel:parse>
<!-- GEL:set below adds the node in memory to the main XML file we’re building -->
<gel:set value="${matrixRowNode}" select="$loadContent/NikuDataBus/matrices/matrix/matrixRows" insert="true"/>
</core:forEach>
<!-- Now write it all to a file -->
<gel:serialize fileName="${XOGloadfile}" var="${loadContent}"/>
</gel:script>
This example shows how to output delimited files using GEL.
  <!-- Open up the output file -->
  <file:writeFile fileName="${doclistfile}" delimiter=",">
The following example creates a file to write in documents for a number of projects. It takes a projects XOG file as input, extracting each project ID in turn and creating a parent node for the Documents XOG.
However, note the following:
Additionally, this example illustrates another way of building the XML file using the GEL:set tag.
<gel:script	xmlns:core="jelly:core"
              xmlns:gel="jelly:com.niku.union.gel.GELTagLibrary"
              xmlns:file="jelly:com.niku.union.gel.FileTagLibrary"
              xmlns:sql="jelly:sql">

  <gel:parameter default="jdbc:microsoft:sqlserver://myserver:1433;DatabaseName=pmodev;SelectMethod=cursor" var="clarityURL"/>
  <gel:parameter default="niku" var="clarityUser"/>
  <gel:parameter default="niku" secure="true" var="clarityPassword"/>
  <gel:parameter default="D:\App\pmo\xog\xml" var="infolder"/>
  <gel:parameter default="${infolder}\prj_projectswrite.xml" var="infile"/>
  <gel:parameter default="D:\App\pmo\xog\xml" var="XOGlogFolder"/>
  <gel:parameter default="${infolder}\DocumentsXOGLoad.xml" var="docXOGloadfile"/>
  <gel:parameter default="${infolder}\docslist.gel" var="doclistfile"/>

  <gel:formatDate format="yyyyMMdd" stringVar="today"/>

  <!-- Get a DB Connection to Clarity -->
  <sql:setDataSource url="${clarityURL}" driver="com.microsoft.jdbc.sqlserver.SQLServerDriver" user="${clarityUser}"
    password="${clarityPassword}" var="clarityDS"/>

  <!-- Open up the Project Plans input file -->
  <gel:parse var="projectsParsed" file="${infile}"/>

  <!-- Open up the output file -->
  <file:writeFile fileName="${doclistfile}" delimiter=",">

  <!-- set up the document XOG shell -->
  <gel:parse var="docsParsed">
    <NikuDataBus xmlns:xsi="http://www.w3.org/2001/XMLSchema-instance"
                       xsi:noNamespaceSchemaLocation="../xsd/nikuxog_document.xsd">
    <Header action="write" externalSource="OS" objectType="document" version="12.0.0.5028"/>
    <Documents>
    </Documents>
    </NikuDataBus>
  </gel:parse>

  <!-- Define a variable for the Documents node -->
  <gel:set select="$docsParsed/NikuDataBus/Documents" var="docnode"/>

  <!-- set up a template Parent node -->
  <gel:parse var="parentNode"><Parent documentLocation="" parentObjectId="" parentObjectType="Projects"/></gel:parse>

  <!-- Loop thru each project ID in the input file -->
  <gel:forEach select="$projectsParsed/NikuDataBus/Projects/Project" var="currentPrj">
    <gel:set asString="true" select="$currentPrj/@projectID" var="currentPrjID"/>
    <!-- reset the test flag -->
    <core:set value="false" var="hasDocs"/>

    <!-- Build the XOG file for the documents. The process is to insert a copy of the node -->
    <!-- currently in memory, then modify the attributes as necessary.  After that, the -->
    <!-- node in memory is reset to the current one. Also note that the Documents XOG   -->
    <!-- requires the DBID of the project ...so we have to connect to Clarity first. -->
    <core:if test="${hasDocs}">

      <sql:query var="prjIDquery" dataSource="${clarityDS}">
        SELECT ID FROM niku.SRM_PROJECTS WHERE UNIQUE_NAME = ?
          <sql:param value="${row[i]}"/>
      </sql:query>

      <!-- there should only be one result value... -->
      <core:forEach trim="true" items="${prjIDquery.rowsByIndex}" var="idrow">
        <core:forEach var="idfield" items="${prjIDquery.columnNames}" indexVar="j">
        <gel:set value="${parentNode}" select="$docsParsed/NikuDataBus/Documents" insert="true"/>
          <gel:set value="${infolder}\docimporttemp\${currentPrjID}"
            select="$docnode/Parent/@documentLocation"/>
          <gel:set value="${idrow[i]}" select="$docnode/Parent/@parentObjectId"/>
          <gel:set var="parentNode" select="$docnode/Parent"/>
        </core:forEach>
      </core:forEach>

    </core:if>

  </gel:forEach>

  <!-- Write the XOG file for documents -->
  <gel:serialize fileName="${docXOGloadfile}" var="${docsParsed}"/>

  <!-- Close the output file -->
  </file:writeFile>

</gel:script>
A process is a way to automate repetitive steps that would otherwise be performed manually through the CA Clarity user interface. A process can act on any object type. The process includes a series of steps that result in a completed end point. A process has a start step (required), an end step (required), and one or more intermediate steps. Each step included in the process performs one or more actions that moves the process toward its completion. The following actions are available:
Performed by a user in the user interface.
Completed by a CA Clarity system action.
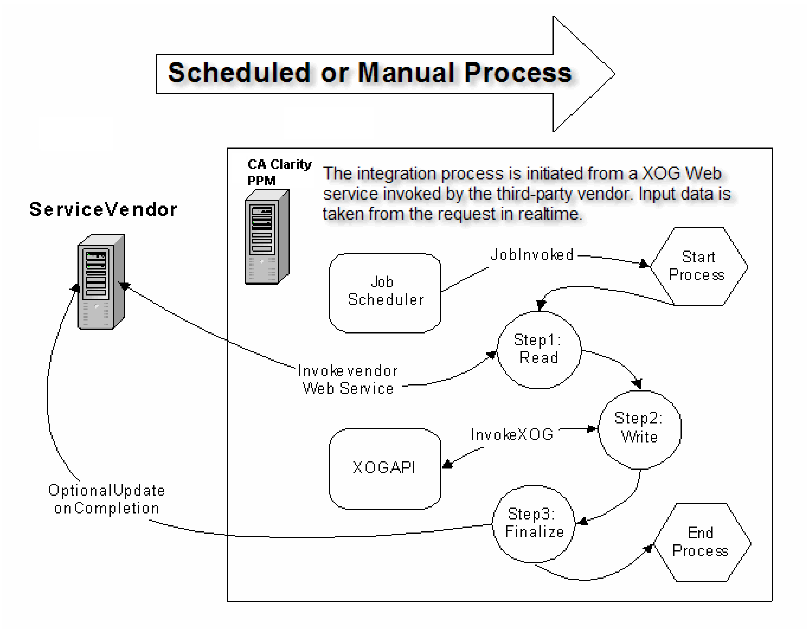
Completed by running a job either scheduled or started manually from the user interface.
Available for normal process steps that include custom GEL code. These GEL snippets use tag libraries to interact with various data sources and data destinations.
You can disconnect integration processes from any specific object. This fact allows you to:
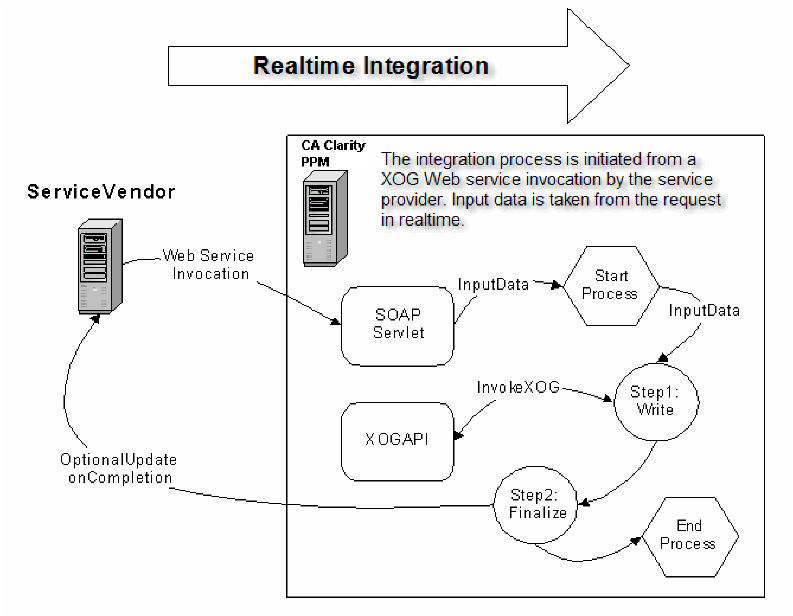
From a background job, real time integrations enable external applications to send data proactively. The request starts an integration process and then passes the incoming data.
Note: For performance reasons, the XOG web service request does not initiate integration processes for all objects. The objects that can have integration processes initiated by the XOG web service are projects and incidents.
Use the following checklist to set up and run integration processes:
For more information, see the Administration Guide.
Note: Web service requests need not conform to any product API. They need only be valid SOAP requests.
The external application maps incoming SOAP message with a process.
The SOAP listener servlet responds to incoming web service requests.
Note: The Catalog Listener and the Ad-Hoc Query listener are built-in listeners. You can register subsequent listeners in the database using an XPath expression, a target namespace, or both to match the listener to an incoming service request.
|
Copyright © 2013 CA.
All rights reserved.
|
|