

|
|
|
You can review changes to installed add-in items and review new add-in items using the Add-In Details page in Studio. If you have configured views when you install the add-in, these configurations remain and are not overwritten. You can decide which views to apply. If you are upgrading to the current add-in version, use this page to choose which new or modified items you want to apply and apply them. Applying a view overwrites the configuration of the view.
This page lists all of the items that are included with the add-in. The following columns display on this page:
Indicates if the add-in item is applied or not in CA Clarity PPM.
Values:
Important! Consider the configurations you have made to items before applying them. Applying modified items overwrites your configurations.
Indicates the item type.
Values: Object, Lookup, Tab, Query, Portlet, Page, Custom View, Group, Menu, Project, Process, Role, and Report/Job
Displays the add-in item's code, which becomes the ID of the applied add-in item.
To apply add-in items
The Administration Home page appears.
The Add-Ins page appears.
The Add-In Details page appears.
Note: By default, when you upgrade to the current add-in version, only the items that are new or modified are selected.
Note: See the CA Clarity PPM Administration Guide for more information on how to manage processes and process instances.
Note: If a selected item has dependencies on other items, these dependencies are also updated.
A list of updated items displays in the Confirm Add-In Update or Install page.
If a user has previously changed an item listed on the Confirm Add-In Update or Install page, you must publish the item before the update is displayed for users.
Note: See the Studio Developer's Guide for more information on how to publish configured items, such as portlets, pages, and views.
For these releases, use the Niku System Administration (NSA) application to install the Connector: Unicenter Service Desk/Harvest add-in. The Clarity application is used to set administrative configurations, such as Clarity resource names and IDs.
Note: If you are installing the add-in for the first time on CA Clarity 7.5.3, first install 7.5.3, and then apply the appropriate fix pack (FP01 or higher). The fix pack installation instructions are included in the fix pack‘s readme file.
If you deployed the add-in prior to applying the 7.5.3_FP01 or higher fix pack, then you will need to re-install the add-in.
You must log in to NSA to deploy the Connector: Unicenter Service Desk/Harvest add-in.
To log in to NSA
The Overview page appears.
You must stop the Niku Application (app) service prior to deploying the add-in, and re-start the service after the add-in is deployed. Do this from NSA.
To install the add-in
The All Services page appears.
The Install and Upgrade: Pre-Upgrade page appears.
The Install: Add-Ins page appears.
By default, this add-in check box is cleared. Select the check box.
The All Services page appears.
The following steps show you how to configure the connector for CA Clarity PPM. You will use the Administration Tool to configure the connector in CA Clarity PPM, such as resource names and IDs.
You must log in to CA Clarity PPM as the CA Clarity PPM administrator. This resource has the access rights to the Administration Tool, which includes the rights to install and configure the connector.
To log in to CA Clarity PPM as the CA Clarity PPM administrator
The Administration Home page appears.
After you have installed the add-in from CA Clarity System Administration, you must change the CAIAdmin user password. The CAIAdmin user is the CA Clarity PPM resource used by the CAI processes included with the Connector: Unicenter Service Desk/Harvest add-in, it is not the CA Clarity PPM administrator user.
Note: If you decide to change the password to something other than caiadmin, make sure you use the changed password throughout the connector's configuration and setup.
To change the password for the CA Clarity PPM administrator
The Administration Home page appears.
The Resources page appears.
Enter cai.
The Resource: Properties page for that resource appears.
caiadmin.
caiadmin.
Verify that this check box is cleared.
The Resources page appears.
If you are integrating CA Clarity PPM with AllFusion Harvest Change Manager, you must grant Harvest Project global access rights to each CA Clarity PPM resource that will be creating Harvest Projects in CA Clarity PPM. There are four global access rights that you must grant to CA Clarity PPM resources for the resource to view the Harvest Project custom object in CA Clarity PPM, and to create Harvest Projects in CA Clarity PPM.
Note: If the CA Clarity PPM user is not associated to a CA Clarity PPM resource, first create the resource.
Note: Contact your CA Clarity PPM administrator or see the Administration Guide for more information..
To grant Harvest Project global access rights to resources
The Resources page appears.
The Resource: Properties page appears.
The Resource: Global Access Rights page appears.
The Select Access Rights page appears.
The Resource: Global Access Rights page appears.
The Resources page appears.
If you are integrating CA Clarity PPM with AllFusion Harvest Change Manager and Unicenter Service Desk, you must do the following:
Note: If Service Desk was not installed in the ITIL mode, Service Desk users will see assets instead of project CIs.
To create the Harvest Project in CA Clarity PPM
Important! Before creating the Harvest Project in CA Clarity PPM, make sure the Harvest project exists in Harvest. Gather information on the Harvest project-such as the project name, ID, and description-from the Harvest administrator.
Note: To see the Custom Objects menu, it may be necessary for you to use the scroll bar to navigate to this area of the main menu.
The Create Harvest Project page appears.
Enter the name of the Harvest project. This value must be the same as the name of the associated project in Harvest.
Note: This value is case-sensitive when matched with the Service Desk project CI.
Enter the name of the Harvest project in Harvest. This value must be the same as the name of the associated project in Harvest.
Note: This value is case-sensitive when matched with the Service Desk project CI.
Enter the description for the Harvest Project in CA Clarity PPM.
The Harvest Project List page appears listing the newly created Harvest project.
Several CA Clarity PPM processes are included with the Connector: Unicenter Service Desk/Harvest add-in. These CAI processes are the connection processes included with the connector.
Note: Contact your CA Clarity PPM administrator or see the Administration Guide for more information.
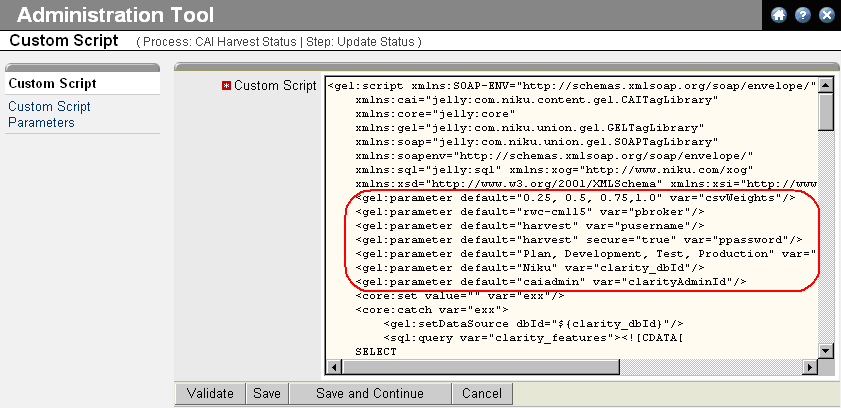
You must edit the GEL script parameters for each of the process steps to set the values for user names, passwords, and URLs. Edit the process step scripts, and not the custom script parameters listed on the Custom Script Parameters page. The Custom Script page contains a text box where you can configure the parameters.
Note: After editing the GEL scripts for each of the process steps, you must validate and activate the CAI processes before they can be used.
The following table lists the process steps for the connector. You must configure the process steps based on the products you have installed for your integrated systems. Use the table to determine which process step you need to configure. After you have made the configurations, validate and activate the CAI process.
Note: You only need to activate the processes associated with the product(s) you have installed and connected.
|
Process |
Step |
Configure and Activate CA Clarity PPM - Service Desk only |
Configure and Activate CA Clarity PPM - Harvest only |
Configure and Activate all |
|---|---|---|---|---|
|
CAI Harvest |
Create |
No |
Yes |
Yes |
|
CAI Harvest Status |
Update Status |
No |
Yes |
Yes |
|
CAI Project Post Create |
|
Yes |
No |
Yes |
|
CAI Project Update |
|
Yes |
No |
Yes |
|
CAI SDCO Task Update |
|
Yes |
No |
Yes |
|
CAI Service Desk Create |
|
Yes |
No |
Yes |
|
CAI Service Desk Task Create Post |
|
Activate only |
No |
Activate only |
|
CAI Harvest Status ED |
|
No |
No |
No |
To edit the process step GEL script parameter
The Administration Home page appears.
The Available Processes page appears.
The Process Definition: Properties page appears.
The Process Definition: Steps page appears.
The Custom Script page appears. Following is an example of the custom scripts:
The following table lists the variables, their default settings and descriptions for the CAI Harvest Feature Create process for Create Harvest Feature step:
|
Variable Name |
Default Setting |
Description/Action |
|---|---|---|
|
pbroker |
harvest |
Enter the name of the Harvest broker. |
|
pusername |
harvest |
Enter the name of the Harvest user. |
|
ppassword |
harvest |
Enter the password of the Harvest user. |
|
pcreatePkgProc |
Create RFC |
Enter the name of the Harvest process associated to the Service Desk Clarity Connector lifecycle template. Note: The default process is Create RFC. If the name of this process is changed in Harvest, this parameter must be changed to match that new name. |
|
pdevState |
Plan |
Enter the first default state of the Harvest package. It should be Plan. |
|
clarity_dbId |
niku |
Enter the CA Clarity PPM data source. |
|
SDURL |
http://localhost:8080/axis/services/USD_R11_WebService |
Enter your Service Desk server name and port. |
|
SDUserName |
ServiceDesk |
Enter the name of the Service Desk user. CA recommends entering a Service Desk user other than ServiceDesk, as this user is typically the administrator. |
|
SDPassword |
ServiceDesk |
Enter your Service Desk password. |
|
locale |
en |
Enter the locale value of your Service Desk server. |
The following table lists the variables and their default settings for CAI Harvest Status process for Update Status step:
|
Variable Name |
Default Setting |
Description/Action |
|---|---|---|
|
clarityAdminId |
caiadmin |
Enter the username of the CAI administrator. |
|
clarity_dbId |
niku |
Enter the CA Clarity PPM data source. |
|
csvStates |
Plan, Development, Test, Production |
Enter all four states. |
|
csvWeights |
0.25, 0.5, 0.75, 1.0 |
Enter the values of the weights associated with the four Harvest lifecycle states that are included with CA Clarity PPM out-of-the-box. The weights you assign to each state are the weights used to calculate the Overall % Complete field. |
|
dateFormat |
yyy-MM-dd HH:mm:ss |
Enter the format for the date and timestamp. It should be the default. |
|
pbroker |
harvest |
Enter the name of the Harvest broker. |
|
pusername |
harvest |
Enter the name of the Harvest user. |
|
ppassword |
harvest |
Enter the password for the Harvest user. |
The following table lists the variables and their default settings for the CAI Project Post Create process for Set SD CO InProgress Status step:
|
Variable Name |
Default Setting |
Description/Action |
|---|---|---|
|
clarity_dbId |
niku |
Enter the CA Clarity PPM data source. |
|
SDURL |
http://localhost:8080/axis/services/USD_R11_WebService |
Enter the URL-including the name and port-of the Service Desk server. |
|
SDUserName |
ServiceDesk |
Enter the name of the Service Desk user. CA recommends entering a Service Desk user other than ServiceDesk, as this user is typically the administrator. |
|
SDPassword |
ServiceDesk |
Enter the password for the Service Desk user. |
|
locale |
en |
Enter the locale for the Service Desk server. |
The following table lists the variables and their default settings for the CAI Project Update process for Send Project Complete Message step:
|
Variable Name |
Default Setting |
Description/Action |
|---|---|---|
|
clarity_dbId |
niku |
Enter the CA Clarity PPM data source. |
|
SDURL |
http://localhost:8080/axis/services/USD_R11_WebService |
Enter the URL-including the name and port-of the Service Desk server. |
|
SDUserName |
ServiceDesk |
Enter the name of the Service Desk user. CA recommends entering a Service Desk user other than ServiceDesk, as this user is typically the administrator. |
|
SDPassword |
ServiceDesk |
Enter the password for the Service Desk user. |
|
locale |
en |
Enter the locale for the Service Desk server. |
The following table lists the variables and their default settings for the CAI SDCO Task Update process for Update Service Desk step:
|
Variable Name |
Default Setting |
Description/Action |
|---|---|---|
|
clarity_dbId |
niku |
Enter the CA Clarity PPM data source. |
|
SDURL |
http://localhost:8080/axis/services/USD_R11_WebService |
Enter the URL-including the name and port-of the Service Desk server. |
|
SDUserName |
ServiceDesk |
Enter the name of the Service Desk user. CA recommends entering a Service Desk user other than ServiceDesk, as this user is typically the administrator. |
|
SDPassword |
ServiceDesk |
Enter the password for the Service Desk user. |
|
Locale |
en |
Enter the locale for the Service Desk server. |
The following table lists the variables and their default settings for the CAI Service Desk Create process for Create Object step:
|
Variable Name |
Default Setting |
Description/Action |
|---|---|---|
|
XOGUsername |
caiadmin |
Enter the CAI administrator username, or the username of a user with XOG rights. |
|
XOGPassword |
caiadmin |
Enter the CAI administrator password or the password of a user with XOG rights. |
|
XOGURL |
http://localhost:80 |
Enter the URL-including the name and port-of the CA Clarity PPM server. |
|
clarity_dbId |
niku |
Enter the CA Clarity PPM data source. |
|
clarity_sd_resource |
caiadmin |
Enter the ID of the Service Desk user who can create or update an idea, incident, or project. |
|
SDURL |
http://localhost:8080/axis/services/USD_R11_WebService |
Enter the URL-including the name and port-of the Service Desk server. |
|
sDUserName |
ServiceDesk |
Enter the name of the Service Desk user. CA recommends entering a Service Desk user other than ServiceDesk, as this user is typically the administrator. |
|
sDPassword |
ServiceDesk |
Enter the password for the Service Desk server. |
|
locale |
en |
Enter the locale for the Service Desk server. |
After you finish editing the GEL script parameters for the processes included with the Connector: Unicenter Service Desk/Harvest add-in, you must activate all of the processes for your integrated product except the CAI Harvest Status ED process, and not just the ones that you configured.
Before you can start a process, it must be valid and active.
Note: Contact your CA Clarity PPM administrator or see the Administration Guide for more information.
To validate a process
The Process Definition: Properties page appears.
The Process Definition: Validation page appears.
Note: If errors display, correct them and validate the process again.
The Process Definition: Properties page appears.
To activate a process
After you set up CA Clarity PPM and Harvest, schedule the CAI Harvest Status process to run at regular intervals. You do this by running the Execute a Process job in CA Clarity PPM. While running the CAI Harvest status process, if the process fails with error message ‘Could not initialize class com.harvest.JCAHarvest’ do the following : Copy the jar file JHSDK.jar from the %HARVESTHOME% directory to %CLARITY-HOME%\lib folder and restart the CA Clarity Application (app) and CA Clarity Background (bg) service.
Note: Contact your CA Clarity PPM administrator or see the Administration Guide for more information.
This section describes the steps required to integrate CA Clarity PPM with Service Desk. You must complete these steps on your Service Desk application server.
In addition to completing the steps discussed in the following sections, the Service Desk Administrator must complete the steps discussed in the chapter "Installing and Configuring the Connector with Harvest." The steps described in the chapter are needed for integrating Service Desk with both CA Clarity PPM and Harvest.
For Windows, UNIX servers, and LINUX servers, you must download the CA Technologies Clarity XML Open Gateway (XOG) client from CA Clarity PPM before setting XOG up on the Service Desk application server. You must download the XOG even when Service Desk is installed on the same server as CA Clarity PPM.
XOG is the CA Clarity PPM's Web service interface. Using XOG, you can read and write data objects from CA Clarity PPM. You can also use this interface to import data from external systems in to CA Clarity PPM.
Note: Contact your CA Clarity PPM administrator or see the Integration Guide for more information.
To download the XOG client from CA Clarity PPM
The Administration Home page appears.
The Client Downloads page appears.
Note: To see the General Settings section, you may need to use the scroll bar to navigate to this area.
The File Download window opens. The cross-platform ZIP file contains the XOG client.
The xogclient.zip file is saved to a local folder on the Service Desk application server.
The following steps show you how to set up the XML Open Gateway (XOG) when Service Desk is installed on a Windows application server.
After you have downloaded the XOG client from CA Clarity PPM, extract the XOG files on the Windows Service Desk application server. To extract the ZIP file, open any file compression utility and extract the xogclient.zip file to a folder (for e.g., C:\CA Clarity PPM\XOG) on your Windows Service Desk application server.
If you are setting up the add-in on CA Clarity PPM 12.0 or CA Clarity 8.1, copy the files shown in the following table to the XOG client. The <cai add-in> value in the table represents the location of the extracted Clarity Connector: Unicenter Service Desk/Harvest add-in files.
|
Extracted file |
Copy to this location |
|---|---|
|
<cai add-in>\package\xogclient\bin\* |
<xogclient>\bin |
|
<cai add-in>\package\xogclient\lib\cai-client.jar |
<xogclient>\lib\ |
Edit the test.properties file to specify the CA Clarity PPM server name, port number, CAIAdmin user, and password information. This information must be defined for each Service Desk Server that will be connecting to a CA Clarity PPM server instance. The XOG client uses this information to send the Service Desk change order information to the predefined CAIAdmin user on the CA Clarity PPM server.
To edit the test.properties file
Note: If you changed the default caiadmin password to something other than caiadmin, set this value to the new password setting.
Create a Windows operating system environment variable-XOG_HOME-and define it to point to the home directory of the XOG client. After you have added the new XOG_HOME system environment variable, you must reboot the Service Desk server for it to be registered to the new system environment variable.
To create the XOG_HOME system environment variable
The System Properties window opens.
The Environment Variables window appears.
The New System Variable window appears.
The new variable is saved.
The following steps show how to set up the XML Open Gateway (XOG) on UNIX, Sun Solaris, IBM AIX, and HPUX Service Desk application servers.
Make sure you download the XOG client from CA Clarity PPM before extracting XOG on the UNIX Service Desk application server.
To extract the ZIP file
chmod 555 cai.sh
If you are setting up the add-in on CA Clarity PPM or CA Clarity 8.1, copy the files shown in the following table to the XOG client. The <cai add-in> value in the table represents the location of the extracted Clarity Connector: Unicenter Service Desk/Harvest add-in files.
|
Extracted file |
Copy to this location |
|---|---|
|
<cai add-in>/package/xogclient/bin/* |
<xogclient>/bin |
|
<cai add-in>/package/xogclient/lib/cai-client.jar |
<xogclient>/lib/ |
|
|
|
Edit the test.properties file to specify the CA Clarity PPM server name, port number, CAIAdmin user, and password information. This information needs to be defined for each Service Desk Server that will connect to a CA Clarity PPM server instance. The XOG client uses this information to send the Service Desk change order information to the predefined CAIAdmin user on the CA Clarity PPM server.
To edit the test.properties file
Note: If you changed the default caiadmin password to something other than caiadmin, set this value to your new password setting.
Create a UNIX operating system environment variable-XOG_HOME-and define it to point to the home directory of the XOG client. After you have added the new XOG_HOME system environment variable, you must restart the Service Desk daemons for it to be registered to the Service Desk application.
To create the XOG_HOME System Environment Variable
pdm_halt
XOG_HOME =/<path>/Clarity/XOG
export XOG_HOME
JAVA_HOME=<java installed path up to, but not including, /bin>
export JAVA_HOME
setenv XOG_HOME <path>/Clarity/XOG
setenv JAVA_HOME <java installed path up to, but not including, /bin>
setenv XOG_HOME <path>/Clarity/XOG
env
pdm_init
The following steps show you how to set up XOG on LINUX Service Desk application servers. CA Clarity PPM XOG allows you to export data from CA Clarity PPM into external systems (in this case, Service Desk or Harvest) as well as import data from these external systems into CA Clarity PPM.
Make sure you download the XML Open Gateway (XOG) client from CA Clarity PPM before extracting XOG on the LINUX Service Desk application server.
To extract the ZIP file
chmod 555 cai.sh
If you are setting up the add-in on CA Clarity PPM 12.0 or CA Clarity 8.1, copy the files shown in the following table to the XOG client. The <cai add-in> value in the table represents the location of the extracted Clarity Connector: Unicenter Service Desk/Harvest add-in files.
|
Extracted file |
Copy to this location |
|---|---|
|
<cai add-in>/package/xogclient/bin/* |
<xogclient>/bin |
|
<cai add-in>/package/xogclient/lib/cai-client.jar |
<xogclient>/lib/ |
Edit the test.properties file to specify the CA Clarity PPM server name, port number, CAIAdmin user, and password information. This information needs to be defined for each Service Desk server that will be connecting to a CA Clarity PPM server instance. The XOG client uses this information to send the Service Desk change order information to the predefined CAIAdmin user on the CA Clarity PPM server.
To edit the test.properties file
Note: If you changed the default caiadmin password to something other than caiadmin, set this value to your new password setting.
Create a LINUX operating system environment variable-XOG_HOME-and define it to point to the home directory of the XOG client. After you have added the new XOG_HOME system environment variable, you must restart the Service Desk daemons for it to be registered to the Service Desk application.
To create the XOG_HOME System Environment Variable
pdm_halt
XOG_HOME=/<path>/Clarity/XOG;
export XOG_HOME;
JAVA_HOME=<java installed path up to, but not including, /bin>;
export JAVA_HOME;
setenv XOG_HOME /<path>/Clarity/XOG
env
pdm_init
This section describes the steps required to integrate CA Clarity PPM with Harvest. You must have operating system user skills to install the Harvest server and client (Command Line Utilities). If necessary, consult your Harvest administrator for assistance.
Before completing the following procedures, make sure you have installed and configured Harvest r7.1 on the Harvest server as described in the AllFusion Harvest Change Manager r7.1 Installation Guide.
Important! Before completing the steps in this section, check the Harvest Readme (especially the Installation Considerations section) for any last-minute information that you may need to install and use Harvest successfully.
The following steps show you how to install and configure the connector when CA Clarity PPM is installed on a Windows server.
Create a Harvest project using the Service Desk Clarity Connector lifecycle template on the Harvest-Windows server. This project template provides the necessary forms and processes to integrate Harvest with Service Desk and CA Clarity PPM.
If the CA Clarity PPM and Harvest are installed on different servers, install the Harvest client on the CA Clarity PPM server. The Harvest client software provides the required command line utilities used by the connector.
Note: For detailed information about installing the Harvest client on the CA Clarity PPM server that is running on Windows, see the Harvest 7.1 Installation Guide.
Verify that the following entries are in the PATH environment variable:
Note: Some versions of Windows will truncate the PATH value if there are more than 1023 characters in the total length of the PATH variable. If your PATH is too long, you can either move the Harvest-related PATH entries to the front of the PATH or you can use 8.3 file naming notation to shorten the overall length of the PATH variable.
Note: If you modify Windows environment variables, you must reboot the server for the Service Desk service to recognize your changes.
Extract the CMI_WINDOWS_B7.0.zip file on the CA Clarity PPM application server. Then, copy the following files from the extract folder to the %HARVESTHOME%\FORMS folder (for e.g., C:\Program Files\CA\AllFusion Harvest Change Manager\Forms) on your CA Clarity PPM application server:
Harvest administrators must make the SD-Clarity Connector form files available to all Harvest CM Workbench users through email, a shared network location, or some other method. Users can then copy the files to their local folders.
To use the Service Desk Clarity Connector lifecycle template and the Service Desk Clarity Connector Request for Change form, Harvest CM Workbench users must copy the following files to the Harvest Forms folder on their local computer:
Note: By default, the Harvest Forms folder is C:\Program Files\CA\AllFusion Harvest Change Manager\Forms.
The following steps tell you how to install and configure the connector when CA Clarity PPM is on a UNIX or LINUX server.
Create a Harvest project using the Service Desk Clarity Connector lifecycle template. This project template provides the necessary forms and processes to integrate Harvest with Service Desk and CA Clarity PPM.
For more information on how to create a Harvest project in Harvest, see the chapter “Installing and Configuring the Connector with Harvest.” Select the section for your environment-specific installation and configuration procedures.
If the CA Clarity PPM and Harvest are installed on different servers, install the Harvest command line utilities on the CA Clarity PPM server. The Harvest client software provides the required command line utilities used by the connector.
Note: For detailed information about installing the Harvest client on the CA Clarity PPM server that is running on UNIX or LINUX, see the Harvest 7.1 Installation Guide.
The following environment variables must be set in the .profile file of the user who installed the CA Clarity PPM server:
#Set HARVESTHOME environment variable
#Add HARVESTHOME/bin to PATH
HARVESTHOME=/home/harvest/R71GA/harvest
PATH="${HARVESTHOME}"/bin:"${PATH}"

# Update CA shared component path for harvest
#library variable varies depending on OS. For example:LD_LIBRARY_PATH for Linux/Solaris, and LIBPATH for AIX.
LD_LIBRARY_PATH=$HARVESTHOME/lib:"${LD_LIBRARY_PATH}"

# Update CA shared component path for CAcrypto
LD_LIBRARY_PATH=/home/harvest/R71GA/CAcrypto:"${LD_LIBRARY_PATH}"
CACRYPTINI=/home/harvest/R71GA/CAcrypto/cacrypt.ini

# Update CA shared component path for lic
LD_LIBRARY_PATH=/opt/CA/CAlib:"${LD_LIBRARY_PATH}"

#Set RTHOME
RTHOME=/home/harvest/R71GA/pec
. $RTHOME/bin/rtinit.sh

CLASSPATH=/home/harvest/R71GA/harvest/JHSDK/lib/jhsdk.jar:$CLASSPATH

export HARVESTHOME PATH LD_LIBRARY_PATH CACRYPTINI CLASSPATH
Note: The values of all the above environment variables are just examples; your values will vary according to the installation path. Another way to accomplish this task is to add all the above environment variables into file.sh and execute the file.sh command from the .profile file.
Log out and log in to register the environment variables. If the CA Clarity PPM server is already running, restart the CA Technologies Clarity Application (app) and the CA Technologies Clarity Background (bg) services. Do this from CA Clarity System Administration.
You must make the SD-Clarity Connector form files available to all Harvest CM Workbench users through email, a shared network location, or some other method. Users can then copy the files to their local folders.
To use the Service Desk Clarity Connector lifecycle template and the Service Desk Clarity Connector Request for Change form, Harvest CM Workbench users must copy the following files to the Harvest Forms folder on their local computer:
Note: By default, the Harvest Forms folder is C:\Program Files\CA\AllFusion Harvest Change Manager\Forms.
In addition to these Harvest setup procedures, complete the following tasks on Harvest:
Following are the administrative tasks in CA Clarity PPM that you need to complete to integrate CA Clarity PPM with Harvest and Service Desk.
If you are integrating CA Clarity PPM with AllFusion Harvest Change Manager, you must grant Harvest Project global access rights to each CA Clarity PPM resource that will be creating Harvest projects in CA Clarity PPM. There are four global access rights that you must grant to CA Clarity PPM resources for the resource to view the Harvest Project custom object in CA Clarity PPM, and to create Harvest projects in CA Clarity PPM.
You have already granted the necessary access rights for the initial CA Clarity PPM resources. As you add new CA Clarity PPM resources to CA Clarity PPM, you must grant them access rights to the Harvest Project custom object in CA Clarity PPM.
Note: If the CA Clarity PPM user is not associated to a CA Clarity PPM resource, first create the resource.
Note: Contact your CA Clarity PPM administrator or see the Administration Guide for more information.
To grant Harvest Project global access rights to resources
The Home page appears.
The Administration Home page appears.
The Resources page appears.
The Resource: Properties page appears.
The Resource: Global Access Rights page appears.
The Select Access Rights page appears.
The Resource: Global Access Rights page appears.
If you add new change order categories associated with the Create Clarity Work Request workflow to Service Desk, you must also add a matching incident category in CA Clarity PPM. The name of the CA Clarity PPM incident category must be the same as the name of the change order category in Service Desk.
Creating CA Clarity PPM incident categories is basic CA Clarity PPM administration functionality.
Note: There is no intended association between CA Clarity PPM incidents and Service Desk incidents.
Note: Contact your CA Clarity PPM administrator or see the Administration Guide for more information.
As resources are added to Service Desk and Harvest that need to be used by all products in the connector, you must add a matching resource in CA Clarity PPM. The CA Clarity PPM resource identification code (ID) must be the same as the ID of the resource in Service Desk and Harvest.
Note: For each CA Technologies product that you have connected using the connector, the resource and user IDs controlled by each product must use the same values. These values allow the products to correctly pass resource and user information. Consult with CA Technology Services if you require an automated synchronization process for resource and user IDs.
Note: Contact your CA Clarity PPM administrator or see the Administration Guide for more information.
The following CA Clarity PPM add-ins both interface to Unicenter Service Desk as part of their functionality:
The interface depends on the CA Clarity PPM process engine and/or job scheduler. If you are using either of the add-ins and CA Clarity PPM is being run as a J2EE packaged application on WebLogic or WebSphere servers, configure both the CA Clarity PPM process engine and the job scheduler to run on the CA Clarity PPM background server.
| Copyright © 2012 CA. All rights reserved. | Tell Technical Publications how we can improve this information |