

|
|
|
You can install and configure AllFusion Harvest Change Manager to support the connector among Service Desk, CA Clarity PPM, and Harvest. You can install the connector on Windows, UNIX, and Linux servers.
Important! All UNIX references refer to both UNIX and Linux, unless noted otherwise.
This section contains the following topics:
Choose the Section for Your Environment
How to Install and Configure Harvest and Service Desk on Windows
How to Install and Configure Harvest and Service Desk on UNIX
How to Install and Configure Harvest on Windows and Service Desk on UNIX
How to Install and Configure Harvest on UNIX and Service Desk on Windows
How to Create the Harvest Project from Lifecycle Template
How to Load the Form in to the Harvest Database
How the Form is Loaded in to Harweb
hcrypt, the Harvest Encryption Utility
hidmgr, the Harvest ID File Manager Utility
For instructions on how to install the connector, see the section for your environment:
The following process describes how to install and configure the connector when Harvest and Service Desk are installed on Windows servers.
Each step specifies whether the task applies to the Harvest‑Windows server only or to the Service Desk‑Windows server only. When a task mentions neither server specifically, the task applies to both servers.
Before you start, complete the installation prerequisites for your environment.
Before you install the connector on Harvest, be sure to complete the following installation prerequisites.
Note: If you modify Windows environment variables, you must reboot the server for the Service Desk service to recognize your changes.
Note: For information about Harvest and Service Desk installation requirements, including third party components, see your Harvest and Service Desk documentation.
Note: If Service Desk is on a Windows server separate from the Harvest server, then perform this step on both servers.
Perform the following to install and configure the connector's files:
Important! When Harvest and Service Desk are installed on two different Windows servers, ensure that you specify the same name for the connector's key file on both servers.
Extract the connector's files from the CMI_WINDOWS.zip file to your server program files\CA folder, for example, C: \Program Files\CA).
After creating the connector's Windows system environment variable, you must reboot the Service Desk-Windows server for the Service Desk service to recognize your changes.
To create the connector's Windows system environment variable
Note: For instructions on how to create a Windows system environment variable, see your Windows documentation.
For example, if you extracted the CMI_WINDOWS.zip file in C:\Program Files\CA, then the value of SD_CL_CNCTR_HOME is C:\Program Files\CA\CMI.
Important! Perform this step every time you re-install or reconfigure CA Change Management Integration.
Search %HARVESTHOME% for the hid.dfo file. If this file exists, delete it.
Use the hcrypt utility to create the connector's key file. This utility encrypts and decrypts information.
Use the hidmgr to add, read, modify, and delete entries in the connector's key file. After you create this key file, add the required entries for Harvest and Service Desk to the file, once for Harvest and once for Service Desk.
The bso.xml file is the connector's configuration file. Customize this file for your environment on both the Harvest-Windows and Service Desk-Windows servers.
Important! This section applies to the Harvest-Windows server only.
Create a Harvest project using the Service Desk Clarity Connector lifecycle template. This project template provides the necessary forms and processes to integrate Harvest with Service Desk and CA Clarity PPM.
Load the SD-Clarity Connector form into the Harvest database and verify that it appears in the list of available forms in the Harvest Administrator application.
To use the Service Desk Clarity Connector lifecycle template and the Service Desk Clarity Connector Request for Change form, Harvest CM Workbench users must copy the following files to the Harvest Forms folder on their local computer:
Note: The Harvest CM Workbench is provided for Harvest clients on Windows servers only.
By default, the Harvest Forms folder is C:\Program Files\CA\AllFusion Harvest Change Manager\Forms.
Harvest administrators must make these files available to all Harvest CM Workbench users through email, a shared network location, or some other method. Users can then copy the files to their local folders.
Important! If your environment uses Harweb, do the following on the Harweb server; otherwise, skip this step.
To use the Service Desk Clarity Connector lifecycle template and the Service Desk Clarity Connector Request for Change form, you must load the SD-Clarity Connector form into Harweb.
The following procedures show you how to install and configure the connector when Harvest and Service Desk are on UNIX servers. This section applies whether Harvest and Service Desk are installed on the same UNIX server or on two different UNIX servers; differences between the two procedures are explained when necessary.
Each step specifies whether the task applies to the Harvest‑UNIX server only or to the Service Desk‑UNIX server only. When a task mentions neither server specifically, the task applies to both servers.
Before you start, complete the installation prerequisites for your environment.
Before you install the connector on Harvest, be sure to complete the following installation prerequisites.
Note: For information about Harvest and Service Desk installation requirements, including third party components, see your Harvest and Service Desk documentation.
Perform the following to install and configure the connector's files:
To extract the connector files
The CMI directory is created in that location.
chmod -R 755 CMI
Important! If Harvest and Service Desk are installed on the same UNIX server, perform these steps. However, if Harvest and Service Desk are installed on two different UNIX servers, perform these steps on the Service Desk-UNIX server only.
To update the system profile (/etc/profile)
SD_CL_CNCTR_HOME=<complete path name of the CMI directory>
Add $SD_CL_CNCTR_HOME/bin to the PATH environment variable
Export PATH, SD_CL_CNCTR_HOME
For example, if you installed CMI_UNIX.tar to the /home directory, add the following lines to the system profile:
SD_CL_CNCTR_HOME= /home/CMI
PATH=”${PATH}”:$SD_CL_CNCTR_HOME/bin
export PATH SD_CL_CNCTR_HOME
setenv SD_CL_CNCTR_HOME <complete path name of the CMI directory>
. /etc/profile
Important! If Harvest and Service Desk are installed on the same UNIX server, perform these steps. However, if Harvest and Service Desk are installed on two different UNIX servers, perform these steps on the Service Desk-UNIX server only.
Set the environment variables that are described in $SD_CL_CNCTR_HOME/bin/env.sh. For help, see the $SD_CL_CNCTR_HOME/bin/env_template.sh file.
Important! If Harvest and Service Desk are installed on the same UNIX server, perform these steps. However, if Harvest and Service Desk are installed on two different UNIX servers, perform these steps on the Service Desk-UNIX server only.
You must restart the Service Desk daemons for the Service Desk service to recognize your environment variable changes.
To restart the Service Desk daemons on the Service Desk-UNIX server
env SD_CL_CNCTR_HOME.
pdm_halt
pdm_init
Important! If Harvest and Service Desk are installed on the same UNIX server, perform this step. However, if Harvest and Service Desk are installed on two different UNIX servers, perform these steps on the Harvest-UNIX server only.
To update the user profile (.profile file)
Note: If Harvest and Service Desk are running on the same server and the Harvest broker is running in root, then skip this step.
SD_CL_CNCTR_HOME=<complete path name of the CMI directory>
Add $SD_CL_CNCTR_HOME/bin to the PATH environment variable
Export PATH,SD_CL_CNCTR_HOME
For example, if you installed CMI_UNIX.tar to the /home directory, add the following lines to the system profile:
SD_CL_CNCTR_HOME= /home/CMI
PATH=”${PATH}”:$SD_CL_CNCTR_HOME/bin
export PATH SD_CL_CNCTR_HOME
. ~/.profile
Important! If Harvest and Service Desk are installed on the same UNIX server, perform this step. However, if Harvest and Service Desk are installed on two different UNIX servers, perform these steps on the Harvest-UNIX server only.
You must restart the Harvest broker for the environment variable changes to be recognized by Harvest.
To restart the Harvest broker on the Harvest-UNIX server
bkrd -shutdown
bkrd
Important! Perform this step every time you re-install or reconfigure CA Change Management Integration.
Search $HARVESTHOME for the hid.dfo file. If this file exists, delete it.
Use the hcrypt utility to create the connector's key file. This utility encrypts and decrypts information.
Use the hidmgr to add, read, modify, and delete entries in the connector's key file. After creating this key file, add the required entries for Harvest and Service Desk to the file, by following these steps, once for Harvest and once for Service Desk.
The bso.xml file is the connector's configuration file. Customize this file for your environment on both the Harvest-UNIX and Service Desk-UNIX servers.
Important! Perform this step on the Harvest‑UNIX server only.
Create a Harvest project using the Service Desk Clarity Connector lifecycle template. This project template provides the necessary forms and processes to integrate Harvest with Service Desk and CA Clarity PPM.
Important! Perform this step on the Harvest‑UNIX server only.
Load the SD-Clarity Connector form into the Harvest database and verify that it appears in the list of available forms in the Harvest Administrator application.
To use the Service Desk Clarity Connector lifecycle template and the Service Desk Clarity Connector Request for Change form, Harvest CM Workbench users must copy the following files to the Harvest Forms folder on their local computer:
Note: The Harvest CM Workbench is provided for Harvest clients on Windows servers only.
By default, the Harvest Forms folder is C:\Program Files\CA\AllFusion Harvest Change Manager\Forms.
Harvest administrators must make these files available to all Harvest CM Workbench users through email, a shared network location, or some other method. Users can then copy the files to their local folders.
Important! If your environment uses Harweb, do the following on the Harweb server; otherwise, skip this step.
To use the Service Desk Clarity Connector lifecycle template and the Service Desk Clarity Connector Request for Change form, you must load the SD-Clarity Connector form into Harweb.
The following procedures show you how to install and configure the connector when Harvest is on a Windows server and Service Desk is on a UNIX server.
Each step specifies whether the task applies to the Harvest‑Windows server only or to the Service Desk‑UNIX server only. When a task mentions neither server specifically, the task applies to both servers.
Before you start, complete the installation prerequisites for your environment.
Before you install the connector on Harvest, be sure to complete the following installation prerequisites.
On the Harvest‑Windows server
On the Service Desk‑UNIX server
Note: For information about Harvest and Service Desk installation requirements, including third party components, see your Harvest and Service Desk documentation.
Perform the following procedures to install and configure the connector's files:
To extract the connector's files on the Harvest‑Windows server
Extract the files from the CMI_WINDOWS.zip file to the program files\CA folder on your server. For example, C:\Program Files\CA.
To extract the connector's files on the Service Desk‑UNIX server
The CMI directory is created in that location.
Change to the /home directory in the shell.
chmod -R 755 CMI
Important! Perform this step on the Harvest‑Windows server only.
To create the connector's Windows system environment variable
Note: For instructions on how to create a Windows system environment variable, see your Windows documentation.
For example, if you extracted the CMI_WINDOWS.zip file in C:\Program Files\CA, then the value of SD_CL_CNCTR_HOME is C:\Program Files\CA\CMI.
Important! Perform this step on the Service Desk‑UNIX server only.
To update the system profile (/etc/profile)
SD_CL_CNCTR_HOME=<complete path name of the CMI directory>
Add $SD_CL_CNCTR_HOME/bin to the PATH environment variable
Export PATH, SD_CL_CNCTR_HOME
For example, if you installed CMI_UNIX.tar to the /home directory, add the following lines to the system profile:
SD_CL_CNCTR_HOME= /home/CMI
PATH=”${PATH}”:$SD_CL_CNCTR_HOME/bin
export PATH SD_CL_CNCTR_HOME
setenv SD_CL_CNCTR_HOME <complete path name of the CMI directory>
. /etc/profile
Important! Perform this step on the Service Desk‑UNIX server only.
Set the environment variables that are described in $SD_CL_CNCTR_HOME/bin/env.sh. For help, see the $SD_CL_CNCTR_HOME/bin/env_template.sh file.
After setting the connector's Windows system environment variable, you must restart the Service Desk daemons for the Service Desk service to recognize the environment variable changes.
Important! Perform this step on the Service Desk‑UNIX server only.
To restart the Service Desk daemons on the Service Desk-UNIX server
env SD_CL_CNCTR_HOME.
pdm_halt
pdm_init
Important! Perform this step every time you re-install or reconfigure CA Change Management Integration.
Search the HARVESTHOME directory for the hid.dfo file. If this file exists, delete it.
Important! You must specify the same name for the key file on both the Harvest and Service Desk servers.
On both the Harvest-Windows and Service Desk-UNIX servers, use hcrypt to create the connector's key file. This utility encrypts and decrypts information.
Use the hidmgr to add, read, modify, and delete entries in the connector's key file. On both the Harvest and Service Desk servers, after creating this key file, add the required entries for Harvest and Service Desk to the file, once for Harvest and once for Service Desk.
The bso.xml file is the CA Change Management Integration configuration file. Customize this file for your environment on both the Harvest and Service Desk servers.
Important! Perform this step on the Harvest-Windows server only.
Create a Harvest project using the Service Desk Clarity Connector lifecycle template. This project template provides the necessary forms and processes to integrate Harvest with Service Desk and CA Clarity PPM.
Important! Perform this step on the Harvest-Windows server only.
Load the SD-Clarity Connector form into the Harvest database and verify that it appears in the list of available forms in the Harvest Administrator application.
To use the Service Desk Clarity Connector lifecycle template and the Service Desk Clarity Connector Request for Change form, Harvest CM Workbench users must copy the following files to the Harvest Forms folder on their local computer:
Note: The Harvest CM Workbench is provided for Harvest clients on Windows servers only.
By default, the Harvest Forms folder is C:\Program Files\CA\AllFusion Harvest Change Manager\Forms.
Harvest administrators must make these files available to all Harvest CM Workbench users through email, a shared network location, or some other method. Users can then copy the files to their local folders.
Important! If your environment uses Harweb, do the following on the Harweb server; otherwise, skip this step.
To use the Service Desk Clarity Connector lifecycle template and the Service Desk Clarity Connector Request for Change form, you must load the SD-Clarity Connector form into Harweb.
The following procedures show you how to install and configure the connector when Harvest is on a Windows server and Service Desk is on a UNIX server.
Each step specifies whether the task applies to the Service Desk‑Windows server only or to the Harvest‑UNIX server only. When a task mentions neither server specifically, the task applies to both servers.
Before you start, complete the installation prerequisites for your environment.
Before you install the connector on Harvest, be sure to complete the installation prerequisites.
On the Service Desk‑Windows server
On the Harvest‑UNIX server
Note: For information about Harvest and Service Desk installation requirements, including third party components, see your Harvest and Service Desk documentation.
Perform the following procedures to install and configure the connector's files:
Important! You must specify the same name for the key file on both the Harvest and Service Desk servers.
To extract the connector's files on the Service Desk-Windows server
Extract the files from the CMI_WINDOWS.zip file to the program files\CA folder on your server, for example, C: \Program Files\CA.
To extract the connector's files on the Harvest‑UNIX server
The CMI directory is created in that location.
chmod -R 755 CMI
Important! Perform the following on the Service Desk‑Windows server only.
You must reboot the Service Desk-Windows server after you create the connector's Windows system environment variable for the Service Desk service to recognize the changes.
To create the connector's Windows system environment variable
Note: For instructions on how to create a Windows system environment variable, see your Windows documentation.
For example, if you extracted the CMI_WINDOWS.zip file in C:\Program Files\CA, then the value of SD_CL_CNCTR_HOME is C:\Program Files\CA\CMI.
Important! Perform the following on the Harvest-UNIX server only.
To update the user profile (.profile file)
SD_CL_CNCTR_HOME=<complete pathname of the CMI directory>
Add $SD_CL_CNCTR_HOME/bin to the PATH environment variable
Export PATH,SD_CL_CNCTR_HOME
For example, if you installed CMI_UNIX.tar to the /home directory, add the following lines to the system profile:
SD_CL_CNCTR_HOME= /home/CMI
PATH=”${PATH}”:$SD_CL_CNCTR_HOME/bin
export PATH SD_CL_CNCTR_HOME
. ~/.profile
Important! Do the following on the Harvest‑UNIX server only.
You must restart the Harvest broker for the environment variable changes to be recognized by Harvest.
To restart the Harvest broker on the Harvest-UNIX server
bkrd -shutdown
bkrd
Important! Perform this step every time you re-install or reconfigure CA Change Management Integration.
Search the HARVESTHOME directory for the hid.dfo file. If this file exists, delete it.
On both the Harvest and Service Desk servers, use hcrypt to create the connector's key file. This utility encrypts and decrypts information.
Use the hidmgr to add, read, modify, and delete entries in the connector's key file. After you create this key file, on both the Harvest-UNIX server and the Service Desk-Windows server, add the required entries for Harvest and Service Desk to the file, once for Harvest and once for Service Desk.
The bso.xml file is the CA Change Management Integration configuration file. Customize this file for your environment on both the Harvest and Service Desk servers.
Important! Perform this step on the Harvest‑UNIX server only.
Create a Harvest project using the Service Desk Clarity Connector lifecycle template. This project template provides the necessary forms and processes to integrate Harvest with Service Desk and CA Clarity PPM.
Important! Perform this step on the Harvest‑UNIX server only.
Load the SD-Clarity Connector form into the Harvest database and verify that it appears in the list of available forms in the Harvest Administrator application.
To use the Service Desk Clarity Connector lifecycle template and the Service Desk Clarity Connector Request for Change form, Harvest CM Workbench users must copy the following files to the Harvest Forms folder on their local computer:
Note: The Harvest CM Workbench is provided for Harvest clients on Windows servers only.
By default, the Harvest Forms folder is C:\Program Files\CA\AllFusion Harvest Change Manager\Forms.
Harvest administrators must make these files available to all Harvest CM Workbench users through email, a shared network location, or some other method. Users can then copy the files to their local folders.
Important! If your environment uses Harweb, do the following on the Harweb server; otherwise, skip this step.
To use the Service Desk Clarity Connector lifecycle template and the Service Desk Clarity Connector Request for Change form, you must load the SD-Clarity Connector form into Harweb.
Use the hcrypt utility to create the connector's key file. This utility encrypts and decrypts information.
To create and store the connector's key file
hcrypt -g -k <complete pathname>
Example:
hcrypt -g -k sd_cl_cnctr.key
Use the hidmgr to add, read, modify, and delete entries in the connector's key file. Add the required entries for Harvest and Service Desk to the file, once for Harvest and once for Service Desk.
To add entries to the connector's key file
hidmgr <key file>
Windows Example:
hidmgr c:\program files\ca\cmi\key\sd_cl_cnctr.key
UNIX Example:
hidmgr /home/CMI/key/sd_cl_cnctr.key
The hidmgr menu options appear.
Important! For Service Desk, specify the computer name in URL format: http://<computer name>:< port>; for example, http://computer55:8080.
Note: Record these values so that you can supply them correctly when customizing the bso.xml file.
The bso.xml file is the connector's configuration file. To customize this file for your environment, follow these steps on both the Harvest and Service Desk servers.
To customize the bso.xml file for your environment
“C:\PROGRA~1\CA\CMI”
Specify the complete path of the connector's key file.
Windows Example:
<sti:keyfile>
C:\PROGRA~1\CA\CMI\key\allfusion.key
</sti:keyfile>
UNIX Example:
<sti:keyfile>
/home/CMI/key/allfusion.key
</sti:keyfile>
Specify the complete path of the hidmgr.
On Windows, this file is typically located in the %SD_CL_CNCTR_HOME%\bin folder.
On UNIX, this file is typically located in the $SD_CL_CNCTR_HOME/bin directory.
Windows Example:
<sti:idmanagerpgm>
c:\PROGRA~1\CA\CMI\bin\hidmgr.exe
</sti:idmanagerpgm>
UNIX Example:
<sti:idmanagerpgm>
/home/CMI/bin/hidmgr
</sti:idmanagerpgm>
Example:
If the time zone is GMT+5:30, specify the following:
<sti:timezone>GMT+5:30</sti:timezone>
Specify the date format; the default value is dd/MM/yyyy HH:mm:ss aaa.
The following table contains examples of other date and time formats:
|
Date and Time Pattern |
Example |
|---|---|
|
“yyyy.MM.dd G ‘at’ HH:mm:ss z” |
2001.07.04 AD at 12:08:56 PDT |
|
“EEE, MM dd, ‘ ’ yy” |
Wed, Jul 4, ‘01 |
|
“h:mm a” |
12:08 PM |
|
“hh ‘o’ ‘clock’ a, zzzz” |
12 o’clock PM, Pacific Daylight Time |
|
“K:mm a, z” |
0:08 PM, PDT |
|
“yyyyy.MMMMM.dd GGG hh:mm aaa” |
02001.July.04 AD 12:08 PM |
|
“EEE, d MMM yyyy HH:mm:s Z” |
Wed, 4 Jul 2001 1208:56 -0700 |
|
“yyMMddHHmmssZ” |
010704120856-0700 |
Example:
<sti:dateformat>dd/MM/yyyy HH:mm:ss aaa</sti:dateformat>
Specify the product name. The default is HARVEST. Specify the same product name used in the connector's key file for the Harvest broker.
Example:
<sti:product>HARVEST</sti:product>
Specify the initial lifecycle state of the Harvest project.
Example:
<sti:state>Plan</sti:state>
Specify the process name (harvest).
Example:
<sti:process>Create RFC</sti:process>
Specify the harvest user name.
Example:
<sti:user>harvest</sti:user>
Example:
<sti:product>USPSD</sti:product>
Example:
<sti:server> http://localhost:8080 </sti:server>
Example:
<sti:wsdl> http://localhost:8080/axis/services/USD_R11_WebService?wsdl
</sti:wsdl>
Example:
<sti:osuser>ServiceDesk</sti:osuser>
Example:
<sti:chgobj>chg</sti:chgobj>
Example:
<sti:cntobj>cnt</sti:cntobj>
Example:
<sti:workflowobj>wf</sti:workflowobj>
Example:
<sti:chgstatusobj>chgstat</sti:chgstatusobj>
Example:
<sti:taskstatusobj>tskstat</sti:taskstatusobj>
Example:
<sti:createpackage>Y</sti:createpackage>
Example:
<sti:createform>Y</sti:createform>
Example:
<sti:packageprefix>pck</sti:packageprefix>
Example:
<sti:packagesuffix>pck</sti:packagesuffix>
Example:
<sti:harvest>
	<sti:product>HARVEST</sti:product>
	<sti:state>Plan</sti:state>
	<sti:process>Create RFC</sti:process>
	<sti:user>harvest</sti:user>
</sti:harvest>
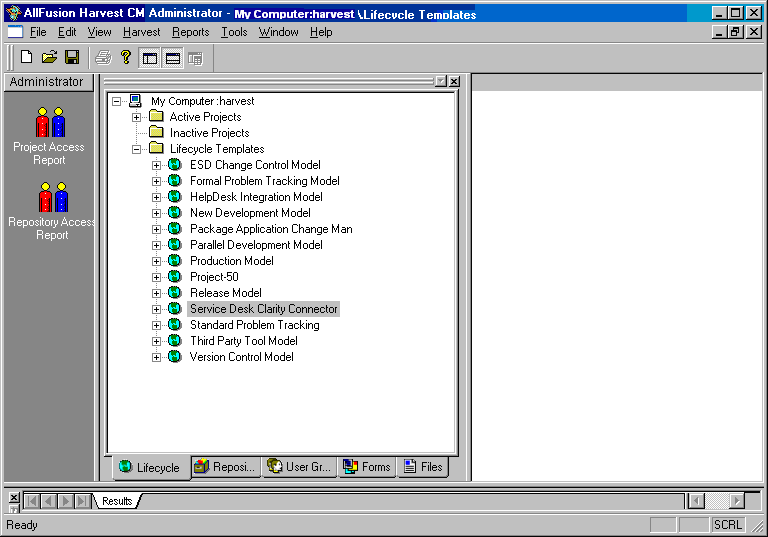
Create the Harvest project using the Service Desk Clarity Connector lifecycle template. This project template provides the necessary forms and processes to integrate Harvest with Service Desk and CA Clarity PPM. You can do this from your Harvest server or from the Harvest client application.
To create the Harvest project from the Service Desk Clarity Connector lifecycle template on a Harvest client/server
himpenv -b [broker name] -usr [harvest user name]
   -pw [harvest password] -f  sd_cl_connector.har  -oa test.log -wts
Example:
himpenv -b hqatest5-2003 -usr harvest -pw harvest -f
   sd_cl_connector.har -oa  test.log -wts
To create the Harvest project from the Service Desk Clarity Connector lifecycle template on a Harvest client application
The Harvest Administrator application GUI appears.
All lifecycle templates display as follows:
The Copy Project dialog appears.
On the Copy Project dialog, ensure that:
The new project appears in Active Project list.
This section explains how to perform the following on UNIX and Windows platforms:
To load the form into the Harvest database on the Harvest-UNIX server
Run the SD_CL_CONNECTOR_ORACLE.sql script file by entering the following command:
sqlplus <harvest db user name>/<harvest db password>@<SID>
   @<file name>
Example:
sqlplus harvest/harvest@orcl @
   “/opt/CA/CMI/config/SD_CL_CONNECTOR_ORACLE.sql”
Run the SD_CL_CONNECTOR_INGRES.sql script file by entering the following command at the command prompt:
Sql -u<user> -G<group name> <database name> <'sqlfile'>
Example:
If the database user is harvest and the group is harvest, execute the following command:
Sql -uharvest -Gharvest_group mdb <“/opt/CA/CMI/config/SD_CL_CONNECTOR_INGRES.sql”
To verify that the form was loaded into the Harvest database correctly
To load the form into the Harvest database on the Harvest-Windows server
Run the SD_CL_CONNECTOR_ORACLE.sql script file by executing the following command at the command prompt:
sqlplus <harvest db user name>/<harvest db password>@<SID>
   @<file name>
Example:
sqlplus harvest/harvest@orcl @
   “C:\Program Files\CA\CMI\config\SD_CL_CONNECTOR_ORACLE.sql”
Run the SD_CL_CONNECTOR_SQLSERVER.sql script file by executing the following command at the command prompt:
osql -E -d mdb -i <file name> -o output.log
Example:
osql -E -d mdb -i
   “C:\Program Files\CA\CMI \config\SD_CL_CONNECTOR_SQLSERVER.sql”
-o output.log
To see whether the script executed successfully, check the log file.
Note: The SD_CL_CONNECTOR_SQLSERVER.sql file is located in the %SD_CL_CNCTR_HOME%\config folder.
Execute the following command at the command prompt:
osql -E -S <instance name> -d mdb -i <file name> -o output.log
Example:
osql -E -S  computer55 -d mdb -i
“C:\Program Files\CA\CMI \config\SD_CL_CONNECTOR_SQLSERVER.sql”
   -o output.log
Run the SD_CL_CONNECTOR_INGRES.sql script file by entering the following command at the command prompt:
Sql -u<user> -G<group name> <database name> <'sqlfile'>
Example:
If the database user is harvest and the group is harvest, execute the following command:
Sql -uharvest -Gharvest_group mdb <“C:\Program Files\CA\CMI \config\
   SD_CL_CONNECTOR_INGRES.sql”
To verify that the form was loaded into the Harvest database correctly
Important! If your environment uses Harweb, do the following on the Harweb server; otherwise, skip this step.
To use the Service Desk Clarity Connector lifecycle template and the Service Desk Clarity Connector Request for Change form, you must load the SD-Clarity Connector form into Harweb.
To load the form into the Harweb-UNIX server
For example, if Harweb is deployed in /home/Apache Software Foundation/Tomcat 5.5/webapps, then HARWEBHOME is /home/Apache Software Foundation/Tomcat 5.5/webapps/harweb.
The Generate Form window appears.
To load the form into the Harweb-Windows server
For example, if Harweb is deployed in C:\Program Files\Apache Software Foundation\Tomcat 5.5\webapps, then HARWEBHOME is C:\Program Files\Apache Software Foundation\Tomcat 5.5\webapps\harweb.
The Generate Form window appears.
Using hcrypt, the Harvest encryption utility, you can create the connector's key file. This utility encrypts and decrypts information.
Instructions for running hcrypt appear in context. This section provides additional details about the utility for your information.
The command syntax is:
hcrypt <OPTION> -f <Encrypted File> -i <Input File> -m
   <Message to Encrypt> -o <Output File> -k <Key File>
   -p <Encryption Key>
Options
-e = Encrypt the file
-d = Decrypt the file
-g = Generate a new key file (Requires the option -k followed by file name)
-h = Help
-v = Display version
-f = Final encrypted file
-i = Input file that needs to be encrypted
-m = One line message to encrypt
-o = File name to write the decrypted value. Works only with -d option (Optional)
-k = Encryption key file (Optional)
-p = Encryption key (Optional)
Rules
Examples:
hcrypt -e -f "Encrypted.enc" -i "Input File"
hcrypt -e -f "Encrypted.enc" -m "Hello World" -k "privatekey.key"
hcrypt -e -f "Encrypted.enc" -m "Hello World" -p "My Key"
hcrypt -d -f "Encrypted.enc"
Note: The decrypted message is printed back to the console.
Decrypt a file
hcrypt -d -f "Encrypted.enc" -o "Results.txt"
Note: The decrypted message is written to Results.txt.
hcrypt -g -k "NewKey.key"
hcrypt -d -f "Encrypted.enc" -m "Hello World" -p "My Key"
Use the Harvest ID File Manager utility (hidmgr) to add, read, modify, and delete the connector's key file entries. After creating this key file, add the required entries for Harvest and Service Desk to it.
Note: Instructions for running the hidmgr appear in context. This section provides additional details about the utility for your information.
When prompted, enter values for the following:
Important! For Service Desk, specify the computer name in URL format: http://<computer name>:< port>; for example, http://computer55:8080.
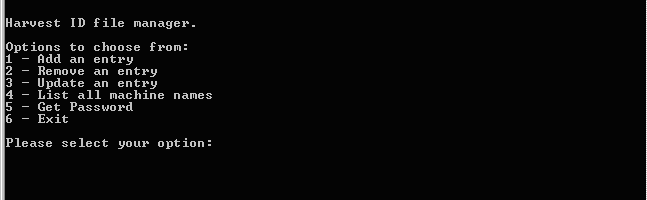
The hidmgr utility provides the following options to maintain the connector's key file:
When you select Options 1 to 5, the utility prompts you to enter required information.
When you start the hidmgr, the following screen appears:
If you select Option 1, hidmgr prompts you to supply the information shown on the following sample screen:
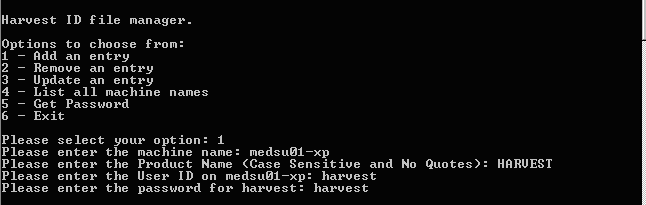
After you answer the prompts shown, the information that you entered is added to the key file.
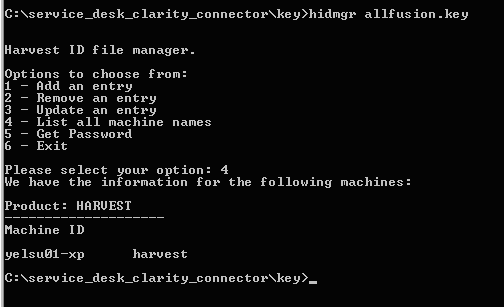
To view the product information, select Option 4, as shown on the following screen:
The bso.xml file is the connector's configuration file. All scripts read configuration information from this script.
Note: Instructions for configuring bso.xml appear in context. This section provides additional details about the file for your information.
In the bso.xml file, you must specify configuration information in xml format, as follows:
<element - name>value of the element </element>
The following rules apply:
For example, a sample entry is:
<product>HARVEST</product>
In this example:
The structure of the bso.xml file follows:
<?xml version="1.0" encoding="UTF-8"?>
<sti:bso xmlns:sti="http://www.ca.com/sti#" xmlns:xsi="http://www.w3.org/2001/XMLSchema-instance" xsi:schemaLocation="bso.xsd" >
   <sti:general>
      <sti:keyfile>  </sti:keyfile>
      <sti:idmanagerpgm> </sti:idmanagerpgm>
      <sti:timezone> </sti:timezone>
      <sti:dateformat> </sti:dateformat>
   </sti:general>
 <sti:harvest>
<sti:product> </sti:product>
      <sti:state>Plan</sti:state>
      <sti:process></sti:process>
      <sti:user></sti:user>
</sti:harvest>
   <sti:uspsd>
      <sti:product> </sti:product>
      <sti:server> </sti:server>
      <sti:wsdl> </sti:wsdl>
      <sti:osuser> </sti:osuser>
<sti:chgobj>chg</sti:chgobj>
 <sti:cntobj>cnt</sti:cntobj>
<sti:workflowobj> </sti:workflowobj>
      <sti:chgstatusobj>chgstat</sti:chgstatusobj>
      <sti:taskstatusobj> </sti:taskstatusobj>
         </sti:uspsd>
   <sti:workflow>
      <sti:createpackage>Y</sti:createpackage>
      <sti:createform>Y</sti:createform>
      <sti:packageprefix></sti:packageprefix>
      <sti:packagesuffix></sti:packagesuffix>
   </sti:workflow>
   <sti:harvestform>
      <sti:tablename> </sti:tablename>
      <sti:changeordernumbercolumn> </sti:changeordernumbercolumn>
      <sti:datereportedcolumn> </sti:datereportedcolumn>
      <sti:fixbycolumn> </sti:fixbycolumn>
      <sti:prioritycolumn> </sti:prioritycolumn>
      <sti:descriptioncolumn> </sti:descriptioncolumn>
      <sti:categorycolumn> </sti:categorycolumn>
      <sti:reportedbycolumn> </sti:reportedbycolumn>
      <sti:formprefix></sti:formprefix>
      <sti:formsuffix></sti:formsuffix>
   </sti:harvestform>
</sti:bso>
| Copyright © 2012 CA. All rights reserved. | Tell Technical Publications how we can improve this information |