

Requirements › How to Set up Requirement Change Management
How to Set up Requirement Change Management
Requirement Change Management (RCM) provides the ability for the product owner to manage an approval process for drafting and updating product requirements. The users who submit requirements are called Requirement Owners. As the system administrator, you can set up the approval process for requirement drafts and enable change management for requirements.
The following diagram describes how a system administrator can set up Requirement Change Management.
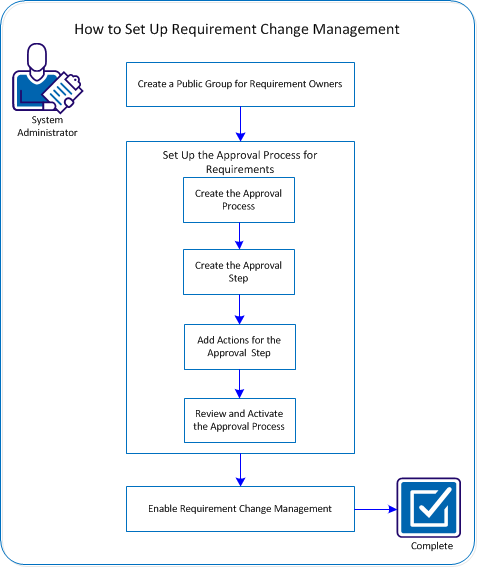
To set up RCM, perform these steps:
- Create a public group of requirement owners.
- Set up the approval process for requirements.
- Enable Requirement Change Management.
Create a Public Group of Requirement Owners
Create a group to include the users who can participate in the RCM process and can submit the requirements. This group is called a public group. For example, include all the product users in the public group so that they can submit new requirements for approval. Users that are not included in the group cannot submit the requirement for approval.
Follow these steps:
- Log in to Salesforce.com as the system administrator, and click Setup.
- Expand Manage Users from the Administration Setup, and click Public Groups.
- Click New to create a new public group.
- Enter AllInternalSubmitters in the Label field.
The Group Name field is automatically populated.
Important! Ensure that the group name is AllInternalSubmitters. CA Clarity™ Agile is set up so that each time you add a user, they are automatically added to this group. If you provide a different name, the new users are not automatically added to the group.
- Select all existing users from the Available Members list.
- Click Add to move the user names to the Selected list.
- Save your changes.
You have created the public group of users who can submit requirement approval requests.
Set Up the Approval Process for Requirements
In RCM, the requirement owners follow a process to get their requirement requests approved. The process defines what happens when requirement owners submit requirements. For example, set up an approval process in Salesforce.com containing one defined step with two actions, to approve or reject the requirement.
To set up the approval process, perform these steps:
- Create the Approval Process.
- Create the Approval Step.
- Add Actions for the Approval Step.
- Review and Activate the Approval Process.
Create the Approval Process
You can create an approval process to define the steps that the requirement requests go through before getting approved or rejected.
Important! Configure all of the fields and options that are listed in these steps. Retain the default values for the other fields that appear in these steps.
Follow these steps:
- Log in to Salesforce.com as the system administrator, and click Setup.
The Salesforce.com setup page opens.
- Expand App Setup, Create, Workflows & Approvals, Approval Process.
- Select Requirement as the object for which you are creating the approval process.
- Click Create New Approval Process.
- Select Use Standard Setup Wizard from the drop-down list.
- Enter the Change Management Process in the Process Name field.
- Click Next.
- Click Next again to skip the step for setting criteria because all of the requirements follow the same process.
- Navigate to Record Editability Properties, and select Administrators OR the currently assigned approver can edit records during the approval process.
- Click Next and then click the Lookup icon in the Email Template section.
- Select Scrum Templates from the pull-down list.
- Click RequirementsApprovalEmailTemplate from the Search Results and click Next.
- Select the fields in the following list and click Add.
- Actual Cost
- Actual Effort (in hours)
- Age
- Category
- Closed Date
- Complexity
- Confidence Level
- Created By
- Current Version Number
- Description
- Financial Benefits
- Parent Requirement (Select the first of two fields with this name)
- Planned Cost
- Planned Effort (in hours)
- Planned vs Actual Cost
- Planned vs Actual Effort (in hours)
- Priority
- Problem
- Remaining Cost
- Remaining Effort (in hours)
- State
- Version Status
- The fields appear in the Selected Fields list indicating which fields appear on the approval page. The Title and Owner field names are already in the Selected Fields list.
- Click Next.
- Select Public Groups from the Search drop-down list to specify the submitter type.
- Select Public Group: All Internal Users from the Available Submitters list and click Add.
- Click Save.
The What Would You Like To Do Now? page appears.
- Select Yes, I'd like to create an approval step now.
- Click Go! to open the New Approval Step page.
The approval process is created. In the next step, you create the approval steps.
Create the Approval Step
After the approval process is created, create the approval steps and specify the details. For example, specify the approval and rejection steps and configure how many approvers can be specified.
Important! Configure all the fields and options that are listed in these steps. Retain the default values for the other fields and the options that appear in these steps.
Follow these steps:
- Enter Final Version Review in the Name field of the New Approval Step page and press the Tab key.
The Unique Name field is automatically set to Final_Version_Review and the Step field is set to 1.
- Click Next.
- Select All records should enter this step.
This is the default step criteria for the Approval Process step.
- Click Next.
- Perform the following steps and specify up to ten default approvers:
- Select Automatically assign to approver(s).
- Select Related User from the drop-down list.
- Select Default Approver 1 as the related user.
You can add up to ten approvers to the list.
- Click Add Row and select Related User.
- Select Default Approver 2 to add a second default approver.
You can repeat these steps to add Default Approver 3 to 10.
- Select Approve or Reject based on the FIRST response.
- Click Save.
The What Would You Like To Do Now? page opens.
- Select No, I'll do this later. Take me to the approval process detail page to review what I've just created.
- Click Go! to continue.
The Requirement: Change Management Process page opens and shows the entire approval process that is defined until now.
Add Actions for the Approval Step
After the approval process step is created, specify the actions for each step. For example, consider the following scenarios:
- The requirement owner clicks Submit for Approval on the Requirement Details page
- The approver clicks either Approve or Reject for the draft on the pop-up dialog
The Requirement: Change Management Process page shows the entire approval process, and has sections that let you define the submission and approval step actions.
Important! All the fields and options defined in these steps are mandatory.
Follow these steps:
- Click Add Existing in the Initial Submission Actions section.
- Select Field Update: Draft Submitted from the Search drop-down list.
- Click Add.
- Save your changes.
The Requirement: Change Management Process page opens.
- Scroll to the Final Approval Actions section.
- Click Edit for the Record Lock action.
- Select Unlock the record for editing and click Save.
- Click Add Existing and select Field Update from the Search drop-down list.
- Select Field Update: Draft Approved from the Available Actions list.
- Click Add.
- Save your changes.
- Scroll to the Final Rejection Actions section.
- Click Add Existing and select Field Update from the Search drop-down list.
- Select Field Update: Draft Rejected from the Available Actions list.
- Click Add.
- Save your changes.
The approval process for requirements is now ready for review and activation.
Review and Activate the Approval Process
After actions are added to the approval steps, review and activate the approval process. Review the steps and actions, and modify them if necessary. After you activate the approval process, you cannot modify the steps or actions.
Follow these steps:
- Click View Diagram on the Requirement: Change Management Process page and review the work flow diagram of the approval process.
- To modify the approval step or actions, complete these steps:
- Close the diagram and return to the Requirement:Change Management Process page.
- Click Edit and make the necessary changes.
- Save your changes.
- Click Activate to enable the process.
The approval process is now active.
Enable Requirement Change Management
After you set up the approval process for requirements and activate it, enable Requirement Change Management so that the users can participate in it.
Follow these steps:
- Click Administration, and from Configuration, click Global Configuration.
- Select the Requirement Change Management check box.
- Save your changes.
You have successfully set up Requirement Change Management. The first time that you enable change management, existing requirements are migrated to change management. The status of all the existing requirements changes to draft and the version number of the requirements displays as 0.0.
Copyright © 2013 CA.
All rights reserved.
|
|