Previous Topic: How to Address an Issue in the Metrics PanelNext Topic: Managing Users


How to Create a Batch Reporting Job

This scenario explains how and why a database administrator creates a batch reporting job.

As a DBA, you are involved in capacity planning. You are responsible for monitoring table spaces so that you know when more DASD is needed. The CA Chorus Investigator lets you easily search for all table spaces in a database and save the search query to a JCL batch job. This batch job, when executed, generates a report. After you create the JCL, you can run the report every week. You can also add the batch job to a job scheduler so that it executes at predetermined intervals, providing updated reports on the table space sizes.

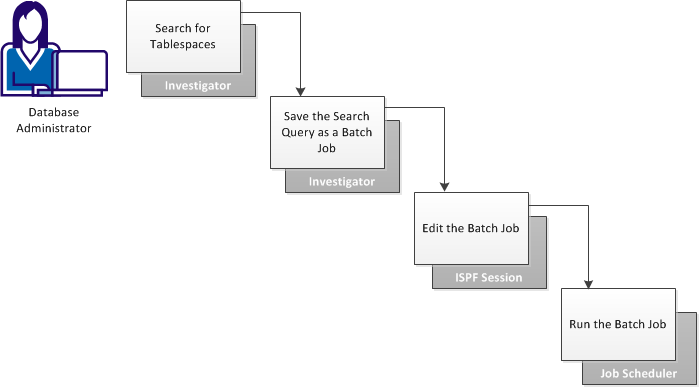
The following illustration shows how a DBA creates and runs a job to monitor table space sizes:

This diagram shows the workflow to create a batch job to generate reports using the Investigator to search for tablespaces and save the queries as a batch job, edit the job in an ISPF session, and then add the job to a scheduler for regular execution.

The DBA performs the following steps:

  1. Search for tablespaces:
    1. Add the Investigation Launcher module to a dashboard, and click Start New Investigation.
    2. Select the DBA for the DB2 discipline, navigate to the desired subsystem, and select Catalog, Table Space.
    3. Search for the table spaces by using DBNAME = PAYROLL as the filter.

    The Investigator displays all table spaces in the PAYROLL database.

  2. (Optional) Add or remove columns from the Investigator by clicking the wrench icon and editing the All Selected Columns in the Current View box.

    In this scenario, the DBA removes all columns except DBNAME, NAME, PARTITIONS, NACTIVE, and SPACEF.

    Click Save.

    The column settings are saved for this view.

  3. Click the up arrow in the SPACEF column heading.

    The column sorts in descending order, showing the largest table space at the top.

  4. (Optional) View the query that was used to search for and display the table spaces by clicking the View SQL icon.
  5. Save the search query as a JCL batch job:
    1. Click the Save search queries icon, and select Save JCL from the pop-up menu.
    2. Enter the following information:
      • (Optional) The name of the data set and member containing the JCL template to apply to the job. This step is performed only when more than one template is available. The default is chorus_runtime_hlq.CETJEZTR(EZTMPL01).
      • The name of a data set and member name in which to save the JCL batch job.
      • A description of the batch job being saved (for example, "Payroll Table Spaces").

      Click Save.

    3. Click OK in response to the successful save message.

    Note: You can also save the search query as an Investigator query by clicking the Save search queries icon and selecting Save Query. This feature saves you from creating the query each time you want to view the information in the Investigator. Also, you can export the list of table spaces that currently appear in Investigator by clicking the Export icon.

  6. Open an ISPF session and display the data set member containing the saved JCL job.
  7. Edit the job according to the comments provided in the JCL, and then save the JCL.
  8. Add the job to a scheduler, specifying how often to execute the job and where to direct the generated report output.

By using the Investigator to create batch jobs that can be run on a schedule, you can monitor table space sizes.