Previous Topic: Communication Protocols OverviewNext Topic: Install the MS Word Add-on


How to Install the CA Business Service Insight Database on a Linux Platform

As a system administrator, you are responsible for preparing a database for CA Business Service Insight. This scenario describes a standard Oracle server configuration. For specific configurations, such as RAC, this scenario provides an example. For more information, see the Oracle documentation or contact Oracle for assistance.

Use this procedure to guide you through the process:

Shows the steps to install the database on a Linux platform.

  1. Add an Active Listener
  2. Configure the TNS Name
  3. Prepare for the Installation
  4. Install the Database

Add an Active Listener

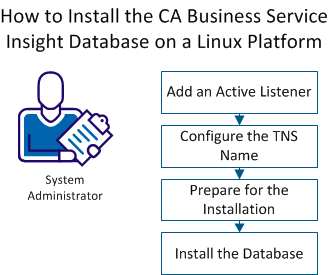
If there is not active listener, create and configure a listener.

Follow these steps:

  1. Start the Oracle Net Configuration Assistant.
  2. Select Listener configuration.
  3. Select Add, and click Next.
  4. Type LISTENER, and click Next.
  5. Move TCP to Selected Protocols, and click Next.
  6. Select Use the standard port number of 1521, and click Next.

    The active listener is created.

  7. Verify that the listener is active in the Oracle Net Manager.

Configure the TNS Name

To enable the creation of the CA Business Service Insight database, configure the local Net Service Name.

Follow these steps:

  1. Start the Oracle Net Configuration Assistant.
  2. Select Local Net Service Name configuration, and click Next.
  3. Select Add, and click Next.
  4. In Service Name, type oblicore, and click Next.
  5. Select TCP for the communication, and click Next.
  6. In Host name, specify the name of the Oracle server, select Use the standard port number of 1521, and click Next.
  7. Select No, do not test, and click Next.
  8. In Net Service Name, type oblicore, and click Next.
  9. Click Next.

    TNSname.ora is created under /opt/oracle/product/11.2/DB_1/network/admin.

  10. To verify that the TNS Name is active, run the following command:
    TNSping Oblicore
    

    The following example shows the expected return:

    TNS Ping Utility for Linux: Version 11.2.0.1.0 - Production on 21 - AUG - 2013 15:31:07
    
    Copyright (c) 1997, 2009, Oracle. All rights reserved.
    
    Used parameter files:
    /opt/oracle/product/11.2/DB_1/network/admin/sqlnet.ora
    
    
    Used TNSNAMES adapter to resolve the alias
    Attempting to contact (SESCRIPTION = (ADDRESS = (Protocol = TCP) (HOST = 6201 - lab350- sp) (PORT = 1521))) (CONNECT_DATA = (SERVICE_NAME = oblicore)))
    OK (10 msec)
    oracle@6201 - LAB350- SP:/Download/Setup/InstallDB>
    

Prepare for the Installation

To prepare the directory for installation, perform the following tasks.

Follow these steps:

  1. Copy the directory SetupDB from \Server\program files\CA\Cloud insight\ on the installation CD to the Linux File System:/Software.
  2. Execute the following commands:
  3. Convert the file from dOS format to UNIX:
    1. Create BSI-conv.sh in /InstallDB.
    2. Copy the following code
      #!/bin/bash
      dos2unix_recursive()
      {
      for file in "$1"/*; do
         if [ ! -d "$file" ] ; then 
           if [ ! -L "$file" ] ; then
             echo Convert $file to Unix format...
             dos2unix $file $file
           fi
         else
           if [ ! -L "$file" ] ; then
             dos2unix_recursive $file
           fi
         fi
      done
      }
      
      dos2unix_recursive "$PWD"
      chmod -R +rx *.sh
      
    3. Run the bat file.
  4. Verify that the directory /oracle/oblicore exists. If it does not exist, create it.
  5. Edit start_parameters.ini in /Software/SetupDB/InstallDB/.

    Example:

    [DataBaseDetailes]
    OBLICORE_ROOT=/oracle/Oblicore
    DB_NAME=oblicore
    ORACLE_HOME=/opt/oracle/product/11.2/DB_1
    ORACLE_VERSION =11
    DB_SIZE= large
    SYS_PASS=sys
    OBLICORE_USER=oblicore
    OBLICORE_PASS=oblicore
    OBLIDBADMIN_PASS=oblidbadmin
    DB_CHARSET=utf8
    DB_SYNONYM=public
    

Install the Database

To provide a database for CA Business Service Insight, install the database.

Follow these steps:

  1. Change to the directory with SetupDB\InstallDB, and execute the script file with the following command:
    sh Main.sh
    

    The Command Line Terminal opens.

  2. Follow the instructions in the terminal. We recommend the following settings:
  3. Verify the parameters of the database, continue with the creation of the database.

    The creation of the TNSNAME and the Database oblicore begins. This process may take more than 10 minutes.

  4. (Optional) To view the creation log, locate the files under /Softwar/SetupDB/InstallDB/Log.

    The database is ready for use.