

As an operator, you can migrate an application instance from one grid to another. Migration is the process of moving an application from one grid to another. Migration requires a source grid and a target grid, unlike import and export, which require only one grid at any given point.
You migrate an application for the following reasons:
You can either migrate an application from a remote grid or a URL to an existing grid, or from an existing grid to a remote grid.
Notes:
Important! Stop the application before you start the migration process.
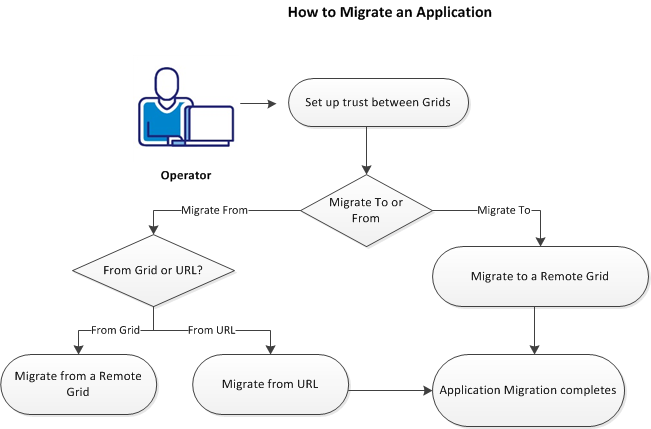
To migrate an application, perform the following steps:
Establish a two-way trust between the target and the source grids before you migrate an application, so that the grids trust each other implicitly.
Follow these steps:
The command retrieves the value of the grid public SSH key.
user create targetgrid@yourcompany.net pwd=somepwd sshkey="sshkey"
Note: The SSH parameter of this grid is the public SSH key retrieved in Step # 1.
grid modify_acl local:user:targetgrid@yourcompany.net=app_developer
The app_developer access allows the new user to migrate an application.
app modify_acl myapp local:user:targetgrid@yourcompany.net=configure
To migrate an application to a remote grid, go to the source grid, select the Applications tab, and click the Migrate To icon.
Note: To initiate the migration process, you can also right click and select Migrate From or Migrate To.
As an operator, you can migrate an application from a remote grid to an existing grid.
Follow these steps:
The Migrate wizard appears.
Includes general information to migrate an application. The tab contains the following fields:
Specifies the DNS name or IP address of the remote grid from which you migrate the application (for example, mygrid.ca.net).
Specifies the name of the application that you want to migrate.
(Optional) Specifies a new name for the migrated application.
Note: Migrate from Grid option is similar to executing the application migrate command from the grid shell.
Includes parameter for connection to external interfaces. The tab contains the following fields:
Specifies the interface name.
To edit this field, click the cell.
Specifies the network resource. For example, VLAN 3029.
To select a network, click the cell and open the drop-down list. Alternatively, you can select the blank from the drop-down list and can enter an IP address as typed text.
Specifies the IP address for the interface.
To select an IP address, click the cell and open the drop-down list.
Limit: 256 IP addresses.
Note: If a selected network has more than 256 IP addresses, this field becomes a text field. Use Info tooltip to display the available ranges of IP addresses for the selected network. You can view the available ranges of the IP addresses in the dashboard.
Displays information about the selected interface, such as the prefix, gateway, and name servers.
Allows you to set values for application properties, which lets you modify an instance of the application. Property values are useful for configuring location-specific parameters, such as IP addresses, and for configuring tuning parameters, such as cache sizes.
Note: Property values explicitly configured for this application are in bold. Mandatory property values that have not yet been configured are highlighted in red.
For information about the property, its type, and allowed values, click Info. To restore the default value of a property, click Restore. Click Reset All to reset property values to their defaults.
Allows you to select the following options:
Disables compression when transferring volumes for the application.
Note: This option speeds up the operation if the application contains large volumes.
Skips cleanup of the imported application in case of failure or completion.
The Migrating dialog of the wizard displays the overall progress for the application import operation.
Note: You can configure the application using the Application Configuration after the migration completes.
As an Operator, you can migrate an application from a URL.
Follow these steps:
Specifies URL of the application archive directory. Must be in the form: http://path.
Specifies the name of the imported application.
(Optional) Specifies the user name to access to the HTTP server.
(Optional) Specifies the password to access to the HTTP server.
Note: The Import from URL option is similar to executing the application import command from the Grid Shell and specifying a URL for the exchange directory.
The Migrating dialog of the wizard displays the overall progress for the application import operation.
Note: You can configure the application using the Application Configuration after the migration completes.
You can migrate your application to a remote grid to upgrade the existing grid. You may also periodically migrate a production application to a separate test grid for maintenance upgrade verification.
Follow these steps:
Includes general information to migrate an application. The tab contains the following fields:
Specifies the DNS name or IP address of the remote grid to which you move the application (for example, mygrid.ca.net).
(Optional) New name for the migrated application. If you do not specify a new name, the application name will remain the same.
Includes parameter for connection to external interfaces. The tab contains the following fields:
Specifies the interface name.
To edit this field, click the cell.
Specifies the network resource. For example, VLAN 3029.
To select a network, click the cell and open the drop-down list. Alternatively, you can select the blank from the drop-down list and can enter an IP address as typed text.
Specifies the IP address for the interface.
To select an IP address, click the cell and open the drop-down list.
Limit: 256 IP addresses.
Note: If a selected network has more than 256 IP addresses, this field becomes a text field. Use Info tooltip to display the available ranges of IP addresses for the selected network. You can view the available ranges of the IP addresses in the dashboard.
Displays information about the selected interface, such as the prefix, gateway, and name servers.
Allows you to set values for properties of the application, which lets you modify an instance of the application. Property values are useful for configuring location-specific parameters, such as IP addresses, and for configuring tuning parameters, such as cache sizes.
Note: Property values explicitly configured for this application are in bold. Mandatory property values that have not yet been configured are highlighted in red.
For information about the property, its type, and allowed values, click Info. To restore the default value of a property, click Restore. Click Reset All to reset property values to their defaults.
Allows you to select the following options:
Disables compression when transferring volumes for the application.
Note: This option speeds up the operation if the application contains large volumes.
Skips cleanup of the imported application in case of failure or completion.
The Migrating dialog of the wizard displays the overall progress for the application import operation.
Note: You can configure the application using the Application Configuration after the migration completes.
Migrate a catalog from or to a remote grid.
cat migrate <remote_grid> <cat> [.name=<new name>][.store=<store>] [<option>]*
Name of catalog to migrate. It may a global or application local catalog.
New name for the migrated catalog. It may be a global or application local catalog.
Specifies the volume store where volumes are created. May be set to one of the following values:
local - store volumes on local server storage
san - store volumes on a SAN
Migrate the catalog to the remote grid. This requires bi-directional trust between the two grids.
Migrate the catalog from the remote grid.
Do not compress volumes when migrating the catalog.
Skip cleanup upon failure or completion (troubleshooting).
Show debug information during migration (troubleshooting)
Preserve the global catalog ACL if it is present.
Preserve local principals in the global catalog ACL.
Preserve global principals in the global catalog ACL.
cat migrate myoldgrid.3tera.net /mycat
Migrate a global catalog from a remote grid to the local grid.
cat migrate myoldgrid.3tera.net /mycat .name=/mynewcat
Migrate a global catalog from a remote grid and rename it in the process.
cat migrate mynewgrid.3tera.net myapp/local .name=/newlocal
Migrate an application local catalog from a remote grid as a global catalog on the local grid.
Migrate a class from/to a remote grid.
class migrate <remote_grid> <class> [ .name=<new name>] [.store=<store>] [<option>]*
Name of remote grid
Name of the class to migrate. The class may be in a global or local catalog or may be a singleton.
New name for the migrated class. The name may refer to a global or local catalog or may refer to a singleton.
Specifies the volume store where volumes are created. May be set to one of the following values:
local - store volumes on local server storage
san - store volumes on a SAN
Note: the .store option is not available on AppLogic® for System z.
Migrate the class TO the remote grid.
Migrate the class FROM the remote grid.
Do not compress class volumes during migration.
skip cleanup upon failure or completion (troubleshooting)
show debug information during migration (troubleshooting)
class migrate myoldgrid.3tera.net /mycat:myclass
migrate catalog class to the current grid.
class migrate myoldgrid.3tera.net /mycat:myclass .name=myapp:myclass
migrate catalog class to the current grid as an application singleton.
class migrate mynewgrid.3tera.net /myapp/local:myclass .name=/mycat:myclass --export
migrate local catalog class to the remote grid as a global catalog class.
Notes:
|
Copyright © 2013 CA Technologies.
All rights reserved.
|
|