

Overview
The Instance Settings property sheet allows you to specialize an appliance instance for its role in the application.
The instance settings apply only to one appliance instance. They override any defaults specified in the class of the appliance.
Most instance settings have their default values defined in the appliance class. When you change these values, they display in the property sheet in bold.
In addition, you can redirect a setting to allow its value to obtained from the settings of the containing assembly. The redirected settings display in blue.
To access the Instance Settings property sheet, double-click an appliance or right-click on the appliance shape and click Attributes, Resources, User Volumes, Property Values or Notes from the menu.
The instance settings are:
Notes:
Attributes
You can set the general and advanced instance attributes, such as name and start order.
These attributes are defined on all instances:
The name of the instance is automatically generated when you drag the icon on the canvas. You can change the instance name. The name is a single word, case sensitive, consisting of alphanumeric characters and underscore ([A-Za-z0-9_]); the name must be unique within the containing assembly.
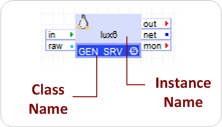
Unlike the class name, the instance should name the role of the appliance. For example, in the catalog, the TomCat Application Server has an instance name of srv. In addition, the instance name should not have numbers or attributes, such as srv64. The name should be the role, not the class.
The name and instance name template display on the icon as shown below:
The first instance of the appliance uses the specified value, while subsequent instances use the name defined here, plus a numeric suffix. If no instance name is specified, the class name is used as the prefix for all appliances.
The appliance hostname is derived from the instance name. For information on disabling the default behavior of changing the hostname to a string derived from the instance name of the appliance, refer to the Customize Linux Appliance Behavior or Customize Windows Appliance Behavior.
Class name of the appliance. This name is read-only and indicates the name of the appliance class to which this instance belongs. Typically, this field also shows the catalog where the class comes from (catalog:class), uniquely identifying the class.
The class name is shown in the bottom left of each appliance shape on the editor canvas.
If the standby option is selected, the appliance will not start automatically when the application starts (the appliance can be started manually later). The standby option may be convenient for appliances that are used in development/diagnostics, or for appliances that are planned "in reserve". This attribute is valid only for simple appliances; it is ignored on assemblies. The Standby attribute can be redirected by selecting the standby button.
Defines the order of starting this instance, relative to the other instances in the containing assembly. Lower numbers are started first. Appliances with a higher number are not started until all those with lower numbers have started successfully. Appliances with the same start order number can be started in any order and may have their startups overlap in time. The start order is local to the containing assembly and the same start order numbers can be reused in different assemblies. The relative order of starting subordinates in different assemblies depends on the start order numbers assigned to those assemblies. Appliance instances with the start order attribute not set are started last.
If the ignore failed start option is selected and the appliance fails to start, this will not result in the application failing to start as a whole. This option may be convenient for appliances that are under development and have not been fully tested.
Defines the desired HA behavior of the appliance in the event the appliance fails. The only allowed value is 'self', which means that if the applicance fails, the appliance is restarted by AppLogic.
The following attributes modify the scheduling and other behavior of this appliance. In this advanced capabilities section, all fields should use the defaults.
When specified, it defines the name of the server where the appliance will start. Typically, the servers are automatically assigned by the scheduler. In most cases, the server override is used together with the unchecked Migrateable attribute to pin an appliance to a specific server.
Note:
This field, when enabled, defines a failover group name for the appliance. Appliances belonging to the same group will not be scheduled to run on the same server, providing an easy way to help ensure that if a server fails, at least one of several appliances in the group will remain running. The group name is user-defined, global for an application; it is a single word, case-sensitive, alphanumeric ([A-Za-z0-9_]). This attribute can be redirected and it is recommended that it is redirected all the way up to the application properties.
Note: Look here for details on how to best set up mandatory and optional failover groups.
Time, in seconds, given to the appliance to complete its startup. If not set, CA AppLogic® uses a default value specified in CA AppLogic®'s configuration files (usually 2-5 minutes). One use of this attribute is to help diagnose why an appliance is not starting (see Debugging Appliance Start on how to do that).
The time specified here is how long the appliance has from start of OS boot to running the VM agent (vmad) that tells CA AppLogic® that the appliance has started successfully. For more details, see the Appliance Creation Guide.
Time, in seconds, given to the appliance to complete its shutdown. If not set, CA AppLogic® uses a default value specified in CA AppLogic®'s configuration files (usually 2-5 minutes).
This is a numeric value that enables diagnostic or other special features of CA AppLogic® for this appliance instance. For a list of available codes and precautions when using them, see Field Engineering Codes in the Class Editor Property Sheet Quick Reference. In short, do not enable this option unless directed by a support engineer.
The VLAN identification number for the appliance. The VLAN ID must be within the range of VLAN IDs you specified when you created the grid in the Backbone Fabric Controller. For information about specifying the VLAN ID ranges, see the BFC User Guide. This field is dimmed if the appliance does not have an external interface.
Resources
The Resources tab allows you to specify the amount of hardware resources that are needed for each instance of this appliance. You can select amount of CPU (percentage of a full CPU), memory and bandwidth needed by the appliance.
The following resource types can be specified:
Portion of a CPU to be allocated for each instance. Portions can be specified as a percentage of 1 CPU (for example, 10%) or as a decimal number (0.10).
See the corresponding appliance topic in the Appliance Catalog Reference Guide for the appliance Minimum, Maximum, and Default values.
Amount of memory to be allocated for each instance. The amount can be specified as an integer value in Megabytes (for example, 128M) or in Gigabytes (for example, 2G). For 32-bit Linux appliances, the memory should be at least 32M and no more than 3G.
Amount of network bandwidth to be allocated for each instance. The amount can be specified as an integer value in Megabits/sec (for example, 10M) or in Gigabits/sec (for example, 1G). The maximum amount of bandwidth for a simple appliance is 2G (a full duplex Gigabit Ethernet port).
As an administrator, you can enable the oversubscription of network bandwidth on a grid for the backbone or internal network. If enabled, appliances can use more bandwidth than their configured network bandwidth.
If disabled, the maximum network bandwidth for each appliance is based on its configured network bandwidth . When the appliance closely approaches the configured bandwidth, network packets are randomly dropped for that appliance. As long as the used appliance bandwidth exceeds the configured bandwidth, all network packets are dropped for that appliance.
The enabled state of the resource oversubscription for bandwidth is displays on the dashboard. For additional information on setting oversubscription, refer to the Command Line Shell Reference Guide,
You can specify a range for each resource type. The range defines the normal operating parameters desired for the appliance, and minimum resource requirements for sandbox use.
The absolute minimum amount of a resource that the appliance needs to work at all. This is useful to allow running the appliance in functional testing environments, where the appliance is not expected to run under production load and can run with much less resources. Contrast this with the Default below, which is amount of resources needed for production use.
The maximum amount of a resource that the appliance will be allowed to take. Typically this is the maximum that an appliance can use (that is, giving it more resources will not increase performance). The appliance will not be allocated more than the specified maximum amount, helping ensure that the appliance will not be able to take resources away from other appliances -- think of it as a quota.
The minimum amount of a resource that the appliance requires for normal operation in production environments. The appliance will not be started unless at least that much can be allocated for it (likely failing the start of the application as a whole). Specifying a minimum helps ensure that the appliance will work within certain "guaranteed" resource amount -- think of it as a service level agreement (SLA) for that resource.
User Volumes
You can configure volumes for the appliance instance. Typically, appliances that contain application-specific persistent data have user volumes. If the volume list on this tab is empty, the appliance instance does not need volumes.
You only configure the placeholder volumes through the instance settings. The appliance class automatically provides other volumes, such as its boot volume, which don't require explicit configuration.
Each placeholder volume can contain an application volume used for this appliance or be redirected to the volume selection of the containing assembly.
For additional information, such as volume requirements, for specific appliances in the catalog, refer to the Appliance Catalog Reference Guide.
Property Values
Use the Property Values tab to set values for properties of the appliance instance. The appliance class determines the existing properties for an instance and their defaults are by (see Simple Class Editor Reference).
The default values of the properties are shown in normal font weight. Property values explicitly configured for this application are in bold. Property values that are redirected to the values of the containing assembly properties display in blue.
Click the info icon to display information about the property, its type and allowed values. To restore the default value of a property, click the restore icon. Click Reset All to reset the values of all properties to their defaults.
To redirect a property, click the redirect icon and click the name of the assembly property to which you would like to redirect its value. For details on property redirection, see Redirected Properties.
Some properties may not have defaults and require explicit (or redirected) values. Those properties are described as "Mandatory" in the info button section. Not setting a value or redirection for a mandatory property will prevent the appliance from starting.
The values for properties whose definition includes the hidden attribute are protected and the actual value does not display.
Note: See the appliance class data sheet for details on the property values. The data sheets for the global catalog appliances are in the Catalog Reference.
Notes
The Notes tab shows free-form notes that are set on the instance. You can edit the notes by double clicking on the text window.
The Note editor/viewer is based upon TinyMCE, a platform independent web-based Javascript HTML WYSIWYG editor control released as Open Source under LGPL by Moxiecode Systems AB.
The following text formatting options are available from the toolbar:
Bold text that is selected or text to be typed.
Italicize text that is selected or text to be typed.
Create numbered list.
Create unordered bulleted list.
Insert or modify a hyperlink. To insert a hyperlink, type and highlight the text that is to comprise the hyperlink and then click on the Insert/edit Link button. A dialog is displayed where you can enter the URL to which the link is to refer and optional text This option is also available from the right-click menu.
Remove a hyperlink leaving the text. This option is also available from the right-click menu.
Note: In some browsers, the cut, copy, and paste operations from the right-click menu are not available. Text may be cut, copied and pasted using CTRL-X, CTRL-C, and CTRL-V respectively.
|
Copyright © 2012 CA.
All rights reserved.
|
|