

|
|
|
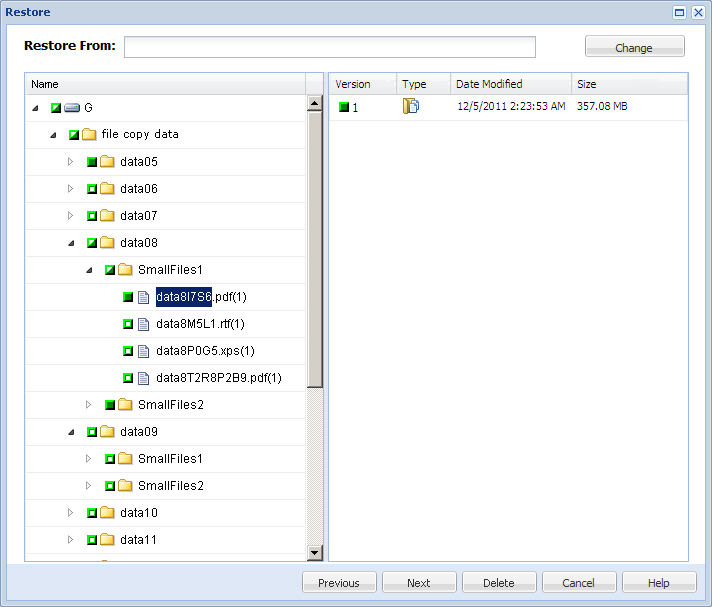
Each time CA ARCserve D2D On Demand performs a successful file copy job, it backs up all files that have changed since the last successful file copy job. This restore method allows you to browse the file copied data and specify exactly which file you want to restore.
|
|
|
|
CA Support: |
|
|
YouTube: |
|
Restore from a File Copy
The restore methods selection dialog opens.
The Restore dialog opens. The destination that is currently showing in the Restore From field is the configured default destination. The file copy data for that destination is displayed in the left pane.
Note: If you specified any filter policies prior to performing the file copy job, then the displayed file copy data to be restored will be only show the filtered objects.
A dialog opens displaying the available alternate destination options.
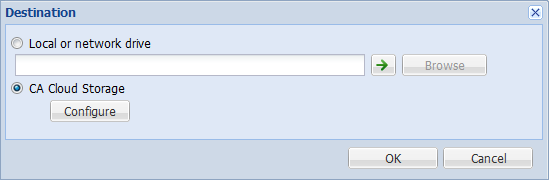
The Select File Destination dialog opens, allowing you to browse to and select an alternate local or network drive location.
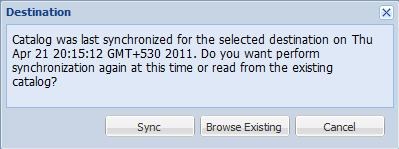
The CA Cloud Configuration dialog opens, allowing you to access and select an alternate cloud location. For more information about this dialog, see Specify CA Cloud Configuration for Restore.
When you select an individual file to be restored, all file copied versions of that file are displayed in the right pane. If multiple versions are available, you must select which file copied version you want to restore.
The Delete Summary dialog opens. For more information, see Delete a File from the File Copy Destination.
The Restore Options dialog opens.
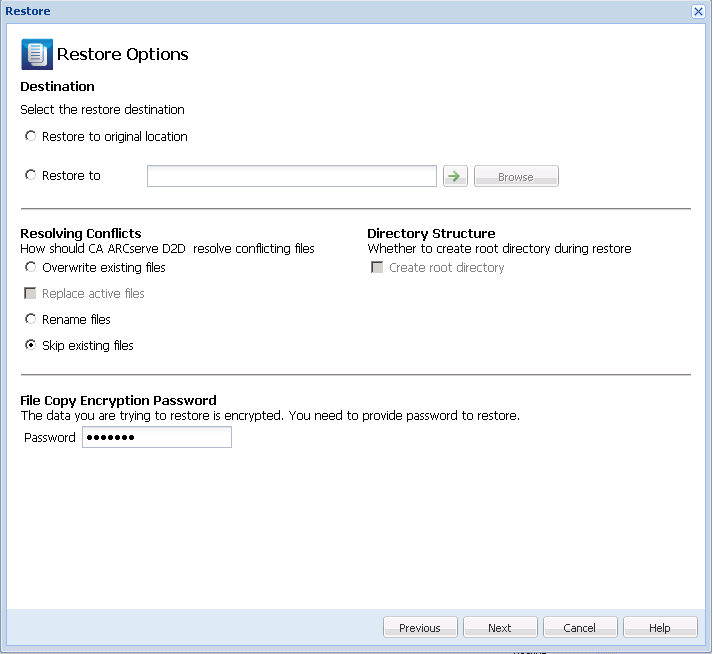
The available options are to restore to the original location of the backup or restore to a different location.
Restores to the original location from where the backup image was captured.
You can either specify a location or browse to the location where your backup images will be restored. You can click the green arrow icon button to verify the connection to the specified location.
If necessary, you may need to enter the User Name and Password credentials to gain access to that location.
The available options are to whether or not to overwrite the existing files and whether or not to replace any active files.
Overwrites (replaces) any existing files that are located at the restore destination. All objects are restored from the backup files regardless of their current presence on your machine.
Replaces any active files upon reboot. If during the restore attempt CA ARCserve D2D On Demand discovers that the existing file is currently in use or being accessed, it will not immediately replace that file, but instead to avoid any problems will delay the replacement of the active files until the next time the machine is rebooted. (The restore occurs immediately, but the replacement of any active files is done during the next reboot).
Note: If this option is not selected any active file is skipped from the restore.
Creates a new file if the file name already exists. Selecting this option copies the source file to the destination with the same filename but a different extension. Data is then restored to the new file.
Skips over and not overwrite (replace) any existing files that are located at the restore destination. Only objects that are not currently existing on your machine are restored from the backup files.
By default, this option is selected.
If selected, specifies that if a root directory structure exists in the captured backup image, CA ARCserve D2D On Demand recreates that same root directory structure on the restore destination path.
When the Create Root Directory option is not selected (unchecked), the file/folder to be restored is restored directly to the destination folder.
For example, if during the backup you captured the files "C:\Folder1\SubFolder2\A.txt" and "C:\Folder1\SubFolder2\B.txt" and during the restore you specified to the restore destination as "D:\Restore".
When the Create Root Directory option is selected (checked), the entire root directory path for the files/folders (including the volume name) is recreated to the destination folder. If the files/folders to be restored are from the same volume name, then the destination root directory path does not include that volume name. However, if the files/folders to be restored are from different volume names, then the destination root directory path does include the volume name.
For example, if during the backup you captured the files "C:\Folder1\SubFolder2\A.txt", "C:\Folder1\SubFolder2\B.txt", and also E:\Folder3\SubFolder4\C.txt" and during the restore you specified to the restore destination as "D:\Restore".
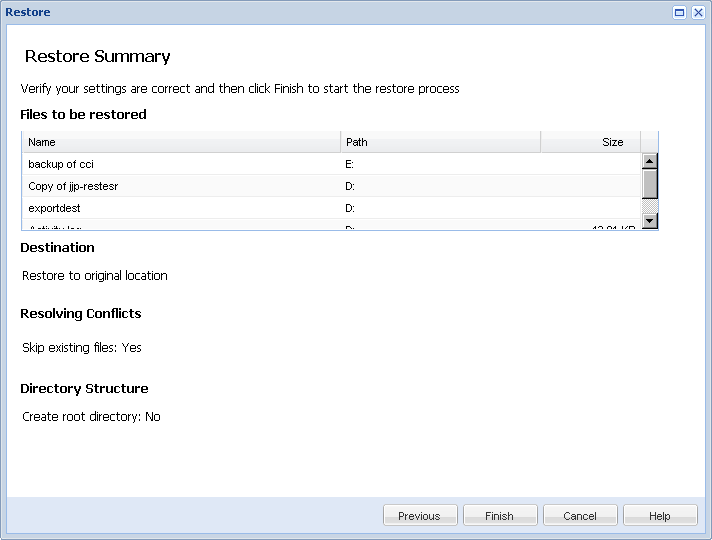
The Restore Summary dialog is displayed.
| Copyright © 2012 CA. All rights reserved. | Tell Technical Publications how we can improve this information |