

|
|
|
Each time CA ARCserve D2D On Demand performs a successful backup, a point-in-time snapshot image of your backup is also created. This collection of recovery points allows you to locate and specify exactly which backup image you want to copy. You can copy/export recovery point information to store it safely off-site in a catastrophe, or you can save your recovery points to multiple locations, or you may just want to consolidate your backups if your destination is getting full and you still want to preserve all your recovery points. When you select a recovery point to copy you are not only capturing the backup blocks that were created for that specified point-in-time, but also whatever previous backup blocks are needed to recreate a full and most recent backup image.
|
|
|
|
CA Support: |
|
|
YouTube: |
|
Follow these steps:
The Copy Recovery Point dialog opens.
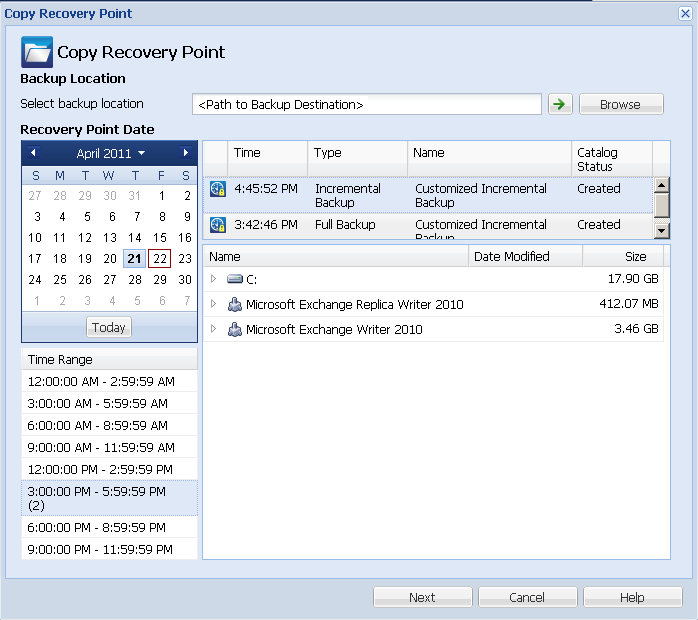
The calendar view highlights (in green) all dates during the displayed time period that contain recovery points for that backup source.
The corresponding recovery points for that date are displayed, with the time of the backup, the type of backup that was performed, and the name of the backup.
Note: A clock icon with a lock symbol indicates that the recovery point contains encrypted information and can require a password for the restore.
The corresponding backup content (including any applications) for that recovery point is displayed.
The Copy Options dialog opens.
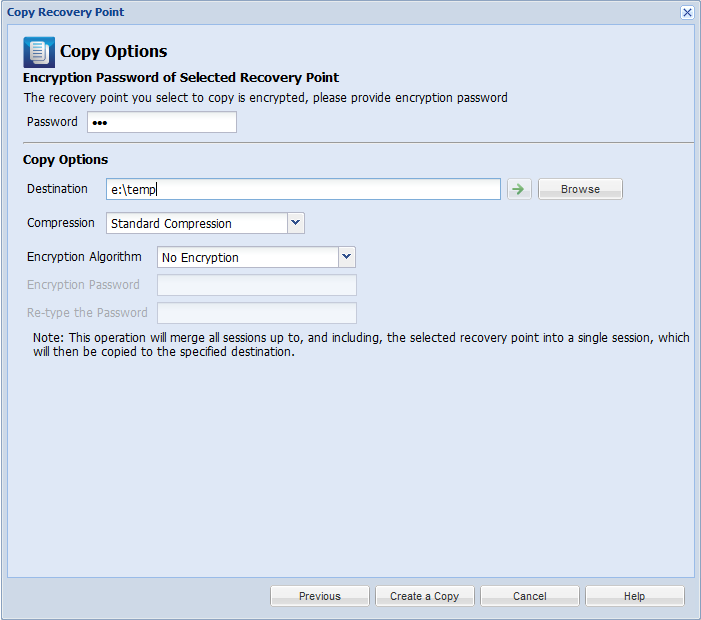
Note: Two password fields are in this dialog. The upper field is for the password to decrypt the source session, and the lower field is used to encrypt the destination session.
You can either specify a location or browse to the location where the copy of your selected recovery point is going to be stored. You can click the green arrow icon button to verify the connection to the specified location. If necessary, enter the Username and Password.
Note: The specified backup compression level has no relation with the copy compression level. For example, in backup destination the compression level can be set to Standard; however, when you submit the copy job, the compression can be changed to No Compression or Maximum Compression.
Compression is typically performed to decrease your disk space usage, but also has an inverse impact on your backup speed due to the increased CPU usage.
The available options are:
Note: If your backup image contains uncompressible data (such as JPG images, ZIP files, and so on), additional storage space can be allocated to handle such data. As a result, if you select any compression option and you have uncompressible data in your backup, it can actually result in an increase in your disk space usage.
Note: If you change the compression level from "No Compression" to either "Standard Compression" or "Maximum Compression", or if you change from either "Standard Compression" or "Maximum Compression" to "No Compression", the first backup that is performed after this compression level change is automatically a Full Backup. After the Full Backup is performed, all future backups (Full, Incremental, or Verify) will be performed as scheduled.
You can change, add, or remove encryption for the copied recovery point.
The available format options are No Encryption, AES-128, AES-192, and AES-256.
A status notification window appears and the copy process for the selected recovery point type is launched immediately.
Note: CA ARCserve D2D On Demand only allows one recovery point copy job to run at the same time. If you attempt to manually launch a recovery point copy job now and during that time another scheduled copy job is currently running, an alert message opens informing you that another job is running and requesting that you try again at a later time.
If necessary, you can then restore from this copied recovery point by accessing the Browse Recovery Point dialog and browse to the copy destination. For more information, see Restore from a Recovery Point.
| Copyright © 2012 CA. All rights reserved. | Tell Technical Publications how we can improve this information |