

|
At a Glance |
|
|
Catalog |
System |
|
Category |
Database Appliances |
|
User volumes |
yes |
|
Min. memory |
160 MB |
|
OS |
Linux |
|
Questions/Comments |
|
MYSQLR64 is a database appliance based on the MySQL database engine (http://www.mysql.org). It provides an easy way to add a database to any application. The appliances can also be used in complex MYSQL replication scenarios. The appliances are based on MYSQL5 (CentOS 5.5/MySQL 5) but also handle database replication.
Database replication enables data from one MySQL database server (known as master) to be replicated to one or more MySQL database servers (known as slaves). The MYSQLR64 appliances can be setup for master-slave as well as master-master replication and replication with more than two masters.
The replication setup, management and monitoring is done via a web interface. The web interface provides an easy way to start replication with close to zero downtime on the master. It can also be used to repair a replication in case of problems. The web interface can be used for copying databases from older database appliances like MYSQL and MYSQL5. MYSQLR64 also provide an easy way for managing and browsing your database (based on phpMyAdmin).
Replication is useful in several cases:
In its default configuration MYSQLR64 acts exactly as a MYSQL5 appliance with a web interface for management. To use it for replication scenarios, you need at least two MYSQLR64 appliances with an appropriate configuration (see Typical Usage).
MYSQLR64 stores the database on an application-defined volume that can be configured on each MYSQLR64 instance. MYSQLR64 automatically creates an empty database when it starts on an empty volume.
|
Name |
Latest Version |
OS |
!MySQL |
Notes |
|
MYSQLR |
2.0.3-1 |
CentOS 5.5 |
5.5.8 |
|
|
MYSQLR64 |
2.0.3-1 |
CentOS 5.5 (64 bit) |
5.5.8 |
|
Important! You should not mix 32-bit and 64-bit MYSQLR appliances when using replication as the database files are copied as is from the master to the slave. Also, data volumes from the 32-bit version of the appliance should not be used with a 64-bit version of the same appliance (and vice versa). To migrate a database between the 32-bit and 64-bit MYSQLR versions, dump the databases on one host and import them on the other as described here.
Resources
|
Resource |
Minimum |
Maximum |
Default |
|
CPU |
0.10 |
16 |
0.40 |
|
Memory |
160 MB |
32G |
512 MB |
|
Bandwidth |
1 Mbps |
2 Gbps |
250 Mbps |
Terminals
|
Name |
Dir |
Protocol |
Description |
|
in |
in |
MYSQL |
Receives MySQL database requests. |
|
rin |
in |
Any |
Slave MYSQLR64 appliances that use the appliance as a master connect to this terminal. |
|
ui |
in |
HTTP |
Provides access to the web interface of MYSQLR64. |
|
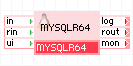
log |
out |
CIFS |
Connect to a NAS appliance for storing error logs. This terminal may be left unconnected if not used. |
|
rout |
out |
Any |
Connects to a master MYSQLR64 server. This terminal may be left unconnected and should be used only in replication scenarios. |
|
mon |
out |
CCE |
Sends performance and resource usage statistics. This terminal may be left unconnected. |
The default interface is enabled. It is intended for diagnostics and troubleshooting (over SSH). Future versions of this appliance may disable SSH access.
Important! The rin and rout terminals are used for both SSH (tcp 22) and MYSQL (tcp 3306) data. When gateways / VPN is used to connect those terminals, the firewalls should be configured to allow both ports.
User Volumes
|
Volume |
Description |
|
data |
Volume used for the database data storage. This volume is mandatory. |
|
binlogs |
Volume used for binary logs when running in replication mode (either as master or slave). This volume is not mandatory, but if you use the appliance in replication (set rpl_mode to be something other than none) and you don't provide a binlogs volume, the appliance will fail to start. |
The data volume can optionally contain a my.cnf file in its top directory, which includes MYSQL configuration options. See the Custom Configuration section for more details. This feature is available in MYSQLR64 1.6.1 or later.
Important!
To migrate a database from an old appliance (MYSQL, MYSQL5, MYSQL64), a database from a physical server or a database from MYSQLR (if migrating from 32 bit to 64 bit version of the appliance), see the 'Migrate database from another appliance' procedure.
Properties
|
Property Name |
Type |
Description |
|
auto_create |
Integer |
Whether to create the database if it doesn't exist. Possible values are 1 to create it and 0 to prevent auto creation (to avoid accidental overwrite in case of corrupted volumes). If set to 0 and a database doesn't exist on the data volume, the appliance starts in maintenance mode (appliance will start properly, but the MySQL deamon will not be started so that the user can check the problem). Default is 1. |
|
error_log_filename |
String |
Name for the error log file, relative to the log file system (for example, /mysql_logs/my.log). Directories in the path are auto created. If empty, error log is written to the data volume (/mnt/data/error.log). Default: (empty). |
|
error_log_level |
String |
Error logging level. Possible values are: error logs only errors, warn logs both warnings and errors. This property is not case sensitive. Default: error |
|
timezone |
String |
Specifies the time zone used in the appliance. If this property is empty, the timezone is not modified and left as-is. A list of supported time zones is available here. Default: empty |
As of MYSQLR64 1.6.8, the use_old_passwords property was removed. If you need to enable old_passwords, create a custom configuration as described below.
The MYSQLR appliance will fail to start if the error_log_filename is specified and the log terminal is not connected or the file system cannot be mounted.
Advanced Properties
|
Property name |
Type |
Description |
|
server_id |
Integer |
Server id. Possible values are from 1 to 10. This specifies the id of the server when doing replication. Help ensure you setup unique IDs for all your servers that are part of the replication. Default: 1 |
|
rpl_mode |
String |
Replication mode. Possible values are none (no replication), master, slave, and master_and_slave (for multi-master replication scenarios where a server is a master and a slave at the same time). Default: none |
|
web_pwd |
String |
Password for authentication to the web interface. This property is optional. If set, the appliance's http server is started and the web interface is exposed on both the ui terminal and the default interface where it is accessible through the Login (web) option in the CA 3Tera AppLogic editor. Default: (empty). |
Custom Configuration
This feature is available in MYSQLR64 1.6.1 or later.
MYSQLR64 allows the use of a custom MYSQL configuration file which can provide additional configuration options or overwrite existing configuration specified in /etc/my.cnf.
To use a custom configuration, create a file named my.cnf and place it in the top directory of the data volume. The format of the file should follow the MYSQL options file syntax as described in the MYSQL documentation.
For example, the following can be used to tune MYSQLR64 for better performance when using InnoDB? (the default MYSQLR64 configuration is optimized for MyISAM). The example is based on using 512M of memory (default for MYSQLR64).
[mysqld]
# Shrink down MyISAM buffers
key_buffer = 512K
myisam_sort_buffer_size = 512K

# Make InnoDB the default storage engine (optional)
default-storage-engine = INNODB

# Set InnoDB buffer size
innodb_buffer_pool_size=350M
innodb_log_file_size=128M
innodb_log_buffer_size=4M
innodb_thread_concurrency=8

# If you do not have too many tables use this option, so you will not have uncontrolled innodb main tablespace growth which you can’t reclaim.
innodb_file_per_table=1
Important! When used in replication mode, MYSQLR64 will also synchronize the my.cnf file on the data volume whenever you fix/initiate the replication, so your slave will have the same configuration as the master.
Web Interface
MYSQLR64 provides a web interface which can be accessed on both its ui terminal and its default interface through the Login (web) option in the CA 3Tera AppLogic editor. Using the web interface requires HTTP authentication. Leave the username blank and use the value of web_pwd as password. The interface has the following features:
browse and edit your databases using PhPMyAdmin
Replication Setup and Maintenance
Add Master-Slave Replications to MYSQLR64 Appliances
CA 3Tera AppLogic lets you add master-slave replications to existing MYSQLR64 appliances without losing any data.
To add master-slave replications to MYSQLR64 appliances
After replication is initiated, login to the web interface on both MYSQLR64 appliances and verify the replication status. Within 5 minutes or less, the replication should be running on both appliances.
Add MYSQLR64 Appliances to Master-Slave Replications
CA 3Tera AppLogic lets you add new MYSQLR64 appliances to existing master-master replications without losing any data.
To add MYSQLR64 appliances to master-slave replications
Log in on to web interface of all MYSQLR64 appliances and verify the replication status, in 5 minutes or less the replication should be running on all appliances.
Repair Replication in Master-Slave Configurations
CA 3Tera AppLogic lets you repair replication in a master-slave setup without losing any data.
To repair replication in master-slave configurations
After replication is initiated, log in to the web interface on the slave MYSQLR64 appliances and verify the replication status, within 5 minutes or less, the replication should be running.
Repair Replication in Master-Master Configurations
CA 3Tera AppLogic lets you repair replication in a master-master setup without losing any data.
Log in to the web interface of the appliance that reports the replication as failed and select initiate/fix replication. Logging takes time depending on the size of the database on the master. During the operation, mysql service on the appliance stops. No downtime is introduced on the master. The database will not be in sync among all masters until the end of the repair. The database updates may not be replicated on all other MYSQLR64 appliances for the duration of the repair.
All data on this appliance is initialized from the master. If there are any updates to the database on the current appliance since the replication is broken, they will be lost. In such cases, resolve the conflicts manually.
To repair replication in master-master configurations
Log in on to web interface of all MYSQLR64 appliances and review the replication status. Within 5 minutes or less, the replication should be running on all appliances.
There is a cron job that monitors the replication between MYSQLR64 appliances. In case the replication is enabled, the cron job runs every two minutes and sends alerts to the grid dashboard in the following cases:
In such cases, the user should solve the problem manually.
In case of failed replication, you can use the web interface to fix it as described in the section above.
The MYSQLR64 appliance reports the following custom counters through the mon terminal.
The following counters belong to the MySql counter group:
|
Counter Name |
Description |
|
Aborted Clients |
Number of clients aborted by the server |
|
Aborted Connections |
Number of connects aborted by the server |
|
Bytes Received |
Number of received bytes |
|
Bytes Sent |
Number of sent bytes |
|
Total Connections |
Number of connections |
|
Questions |
Total number of questions |
|
Slow Queries |
Number of slow queries |
|
Threads Created |
Number of threads created |
|
Threads Connected |
Number of threads connected |
|
Threads Running |
Number of threads running |
|
Max Used Connections |
Number of max connections used |
|
Open Files |
Number of open files |
|
Admin Commands |
Number of admin commands |
|
Alter Table Commands |
Number of alter table commands |
|
Analyze Commands |
Number of analyze commands |
|
Change DB Commands |
Number of change DB commands |
|
Change Master Commands |
Number of change master commands |
|
Check Commands |
Number of check commands |
|
Commit Commands |
Number of commit commands |
|
Create DB Commands |
Number of create DB commands |
|
Create Function Commands |
Number of create function commands |
|
Create Index Commands |
Number of create index commands |
|
Create Table Commands |
Number of create table commands |
|
Delete Commands |
Number of delete commands |
|
Drop DB Commands |
Number of drop DB commands |
|
Drop Function Commands |
Number of drop function commands |
|
Drop Index Commands |
Number of drop index commands |
|
Drop Table Commands |
Number of drop table commands |
|
Flush Commands |
Number of flush commands |
|
Grant Commands |
Number of grant commands |
|
Insert Commands |
Number of insert commands |
|
Insert Select Commands |
Number of insert select commands |
|
Kill Commands |
Number of kill commands |
|
Load Commands |
Number of load commands |
|
Lock Tables Commands |
Number of lock tables commands |
|
Optimize Commands |
Number of optimize commands |
|
Purge Commands |
Number of purge commands |
|
Rename Table Commands |
Number of rename table commands |
|
Repair Commands |
Number of repair commands |
|
Replace Commands |
Number of replace commands |
|
Replace Select Commands |
Number of replace select commands |
|
Reset Commands |
Number of reset commands |
|
Revoke Commands |
Number of revoke commands |
|
Rollback Commands |
Number of rollback commands |
|
Select Commands |
Number of select commands |
|
Set Option Commands |
Number of set option commands |
|
Truncate Commands |
Number of truncate commands |
|
Unlock Tables Commands |
Number of unlock tables commands |
|
Update Commands |
Number of update commands |
The following messages may appear in either the appliance log file or the system log of the grid controller when the appliance fails to start:
|
Error message |
Description |
|
Failed to set timezone! |
Failed to set the appliance timezone as configured by the timezone property. |
|
Appliance is running in [$rpl_mode] replication mode but binlogs volume is missing |
The appliance is configured to run either as master, slave or master_and_slave but no binlogs volume has been given. |
|
Appliance is running in [$rpl_mode] replication mode but the 'rout' terminal is not connected |
The appliance is configured to run either as slave or master_and_slave but the rout terminal is not connected. |
|
The 'rout' terminal is connected, but the [rpl_mode] property is set to 'none'. Either configure replication via the [rpl_mode] property or disconnect the 'rout' terminal |
The rout terminal is connected, but the [rpl_mode] property is set to none. Either configure replication via the [rpl_mode] property or disconnect the 'rout' terminal. |
|
Failed to start mysql due to error_log_filename set and log terminal not connected! |
The error_log_filename property is configured but the log terminal is not connected. |
|
Failed to mount share through log terminal! |
The appliance was configured to write logs on the log terminal, but it failed to mount the share on the log terminal. |
|
The share through the log terminal is not writeable! |
The share on the log terminal is not writable. |
|
Failed to create logdir [$logdir] on the log terminal! |
Failed to create logdir [$logdir] on the log terminal! |
|
The logdir [$logdir] is not writeable! |
The logdir [$logdir] on the log terminal is not writeable! |
|
The logfile [$error_log] is not writable! |
The logfile [$error_log] on the log terminal is not writable! |
|
Failed to create database! |
Appliance was started with no database and it failed to install mysql databases. |
|
Failed to setup replication! |
Appliance failed to configure replication. |
|
Failed to start mysql! |
The MySQL daemon could not be started. |
|
Insufficient permissions in the mysql database! |
Either the permissions for the 'root'@'%' are insufficient or if used in replication mode, the 'replication_user'@'%' does not have enough permissions to run MySQL replication. |
|
Web interface failed to start! |
Web interface failed to start! |
|
The data volume size should be at least 100Mb |
data volume should be bigger then 100 megabytes. See notes on volume requirements. |
Additionally, the following errors may appear on the grid dashboard while the appliance is running:
|
Error message |
Description |
|
Free space on the data volume is running low, please check! |
Free space on the data volume is below 20%. |
|
Replication of master server is not running, please check! |
Replication of master server is not running. |
|
Replication of slave is too much behind master, please check! |
Replication of slave is too much behind master. |
|
Free space on the binlogs volume is running low, please check! |
Free space on the binlogs volume is below 20%. |
Simple Two-tier Application (No Replication)
The following diagram shows a typical usage of the MYSQLR64 appliance in a two-tier web application:
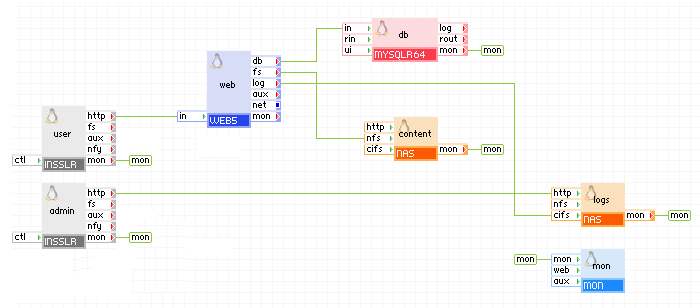
Appliances in use:
Client request arrives on the user gateway. The gateway forwards the requests to the web server, which serves the request. When scripts (for example, Perl or PHP) on web need to access persistent data, they use the db appliance through the out terminal of the web server. The db appliance is configured to store its log files within the root directory of the share exposed by logs.
Using a browser, administrators connect to the admin gateway to view the mysql or web server log files. The admin gateway forwards the requests to the logs NAS appliance.
Example property configuration (properties that are not listed should be left to their default values):
|
Property name |
Value |
Notes |
|
auto_create |
1 |
Create the database if the volumes are empty. |
|
error_log_filename |
db.error |
Name of error log file that is to be stored on the logs data volume. |
|
error_log_level |
error |
Error logging level |
Note: The data volume must also be configured on the db appliance as well as the logs, content and mon appliances. To create application volumes that can be used here, see the Grid Users Guide.
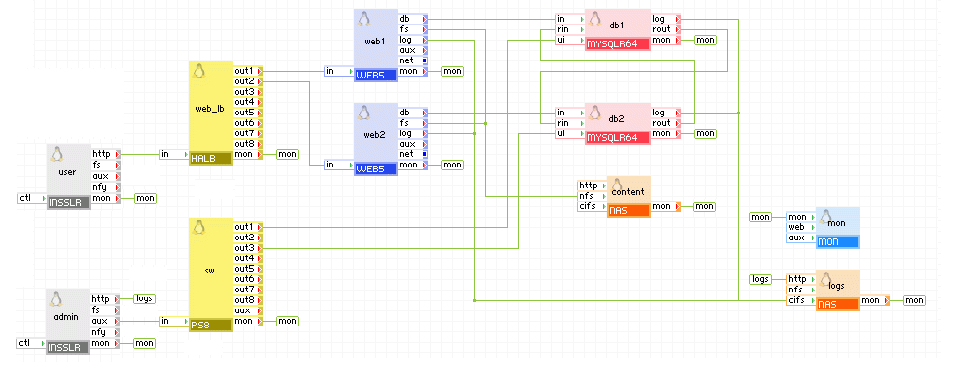
Scalable Two-tier Application (No Replication)
The following diagram shows a typical usage of the MYSQLR64 appliance in a two-tier web application in which the database is used to share state and data between multiple, load-balanced web servers. In addition, this example has a separate input for maintenance, through which an administrator can log in and access the database for maintenance and an input through which an administrator can log in and view the mysql error log.
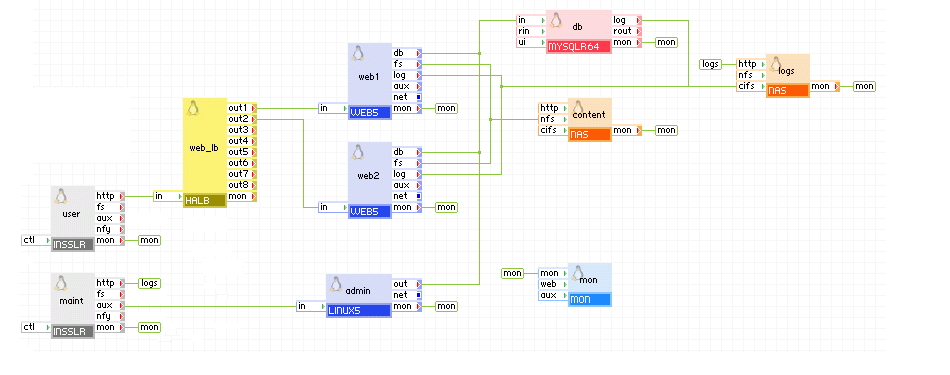
Appliances in use:
Client request arrives on the user gateway. The gateway forwards the requests to the web_lb load balancer, which directs the request to one of the web servers web1 and web2. The web servers access the db database.
The db database and web1 and web2 servers write their log files to the logs appliance through the log terminals. In addition, an administrator can log in through the maint gateway to the logs appliance and view the log files.
Additionally, an administrator can log in over SSH through the maint gateway to the admin server (public-private keys need to be setup). From the admin server, the administrator can access the db database for statistics or changing the database schema. The admin server can access the Internet through the gway gateway, for example, to download a newer version of libraries or the database schema.
Example property configuration (properties that are not listed should be left to their default values):
|
Property name |
Value |
Notes |
|
auto_create |
1 |
Create the database if the volumes are empty. |
|
error_log_filename |
db.error |
Name of error log file that is to be stored on the logs data volume. |
|
error_log_level |
error |
Error logging level |
Notes:
The maint, admin, gway, mon and log appliances are not required for the operation of the two-tier application. If present, the admin server may have cron jobs for database scrubbing, sending e-mail, and so on.
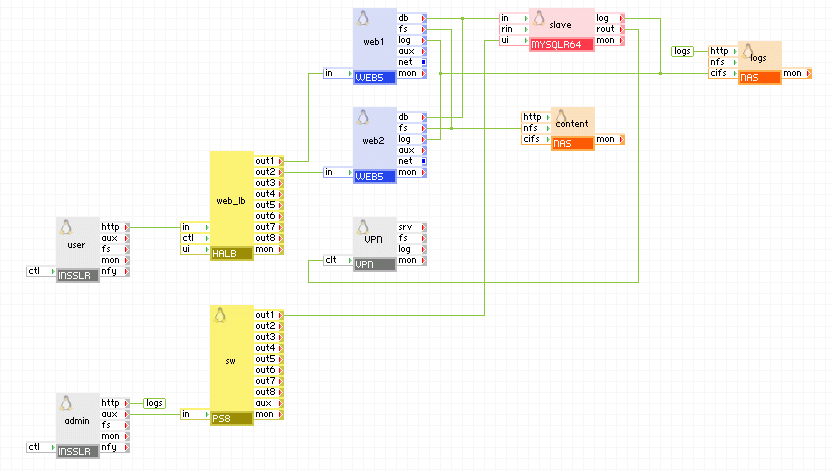
N-tier Application with Master-Slave Replication (Suitable for Backups)
The following diagram shows a typical usage of the MYSQL appliance in a web application in which the database is replicated to a slave server. The slave server can be used to make consistent backups of the data without stopping the master server, thus introducing zero downtime of the application.
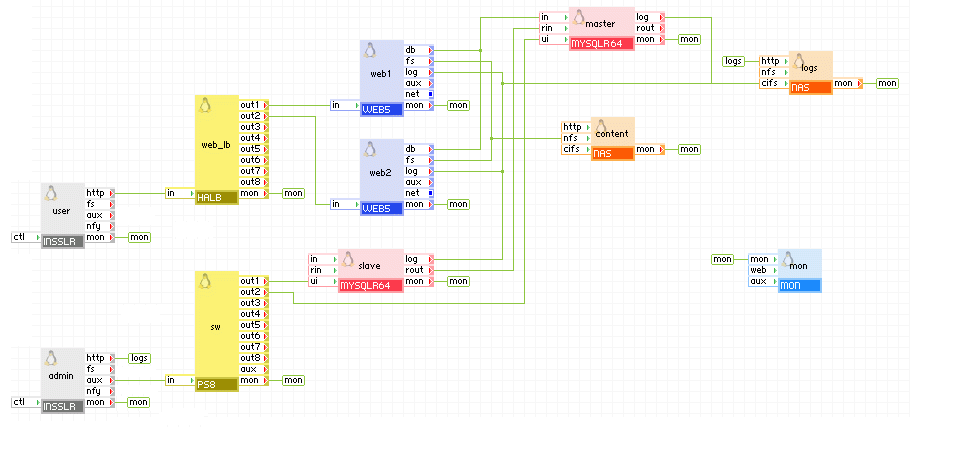
Appliances in use:
Client request arrives on the user gateway. The gateway forwards the requests to the web_lb load balancer, which directs the request to one of the web servers web1 and web2. The web servers access the master database.
The slave appliance is connected to the master appliance and replicates its data. Slave can be stopped at any time for doing consistent backups of the SQL data or heavy analytics without interfering with the performance of the master appliance and the rest of the application.
Web access to master and slave is available via admin gateway on port 8080 and 8081.
The master, slave, web1 and web2 appliances are configured to store their log files within the root directory of the share exposed by logs. In addition, an administrator can view log files through the admin gateway.
Example property configuration (properties that are not listed should be left to their default values):
master
|
Property name |
Value |
Notes |
|
auto_create |
1 |
Create the database if the volumes are empty. |
|
error_log_filename |
master-db.error |
Name of error log file that is to be stored on the logs data volume. |
|
error_log_level |
error |
Error logging level |
|
server_id |
1 |
Master server (not mandatory to be 1, should be different from server_id on the slave) |
|
rpl_mode |
master |
Write binary logs to have replication |
slave
|
Property name |
Value |
Notes |
|
auto_create |
1 |
Create the database if the volumes are empty. |
|
error_log_filename |
slave-db.error |
Name of error log file that is to be stored on the logs data volume. |
|
error_log_level |
error |
Error logging level |
|
server_id |
2 |
Slave server (not mandatory to be 2, should be different from server_id on the master) |
|
rpl_mode |
slave |
Connect to master |
Notes:
The admin, mon and log appliances are not required for the operation of the replication.
N-tier Application with Master-Master Replication (Suitable for Load Balancing)
The following diagram shows a typical usage of the MYSQLR64 appliance in a web application in which the database is replicated to two servers in a master-master replication scenario. In this use case, the application uses both WEB and MYSQLR64 servers during operation for load-balancing. Also, in the case where one of the WEB/MYSQLR64 instances fails, the other WEB/MYSQLR64 instance can be used to prevent application downtime.
Appliances in use:
Client request arrives on the user gateway. The gateway forwards the requests to the web_lb load balancer, which directs the request to one of the web servers web1 and web2. web1 uses the db1 database appliance, web2 uses the db2 database appliance. db1 and db2 are connected to replicate the updates that the web servers do to the database. Each MYSQLR64 appliance uses an offset (equal to its server_id) for its auto_increment columns so that no duplicate entries occur.
Web access to db1 and db2 is available via admin gateway on port 8080 and 8081.
The db1, db2, web1 and web2 appliances are configured to store their log files within the root directory of the share exposed by logs. In addition, an administrator can view log files through the admin gateway.
Example property configuration (properties that are not listed should be left to their default values):
db1
|
Property name |
Value |
Notes |
|
auto_create |
1 |
Create the database if the volumes are empty. |
|
error_log_filename |
db1.error |
Name of error log file that is to be stored on the logs data volume. |
|
error_log_level |
error |
Error logging level |
|
server_id |
1 |
Master server (not mandatory to be 1, should be different from server_id on the slave) |
|
rpl_mode |
master_and_slave |
master and slave |
db2
|
Property name |
Value |
Notes |
|
auto_create |
1 |
Create the database if the volumes are empty. |
|
error_log_filename |
db2.error |
Name of error log file that is to be stored on the logs data volume. |
|
error_log_level |
error |
Error logging level |
|
server_id |
2 |
Master server (not mandatory to be 1, should be different from server_id on the slave) |
|
rpl_mode |
master_and_slave |
master and slave |
Notes:
The admin, mon and log appliances are not required for the operation of the replication.
N-tier Application with Multi-node Master-Master Replication (Suitable for Load Balancing)
The following diagram shows a typical usage of the MYSQLR64 appliance in a web application in which the database is replicated to four servers in a master-master replication scenario. In this use case, the application uses all of the WEB and MYSQLR64 servers during operation for load-balancing. Also, in the case where one of the WEB/MYSQLR64 instances fails, the other WEB/MYSQLR64 instances can be used to prevent application downtime(MYSQLR64 does not take care of failures).
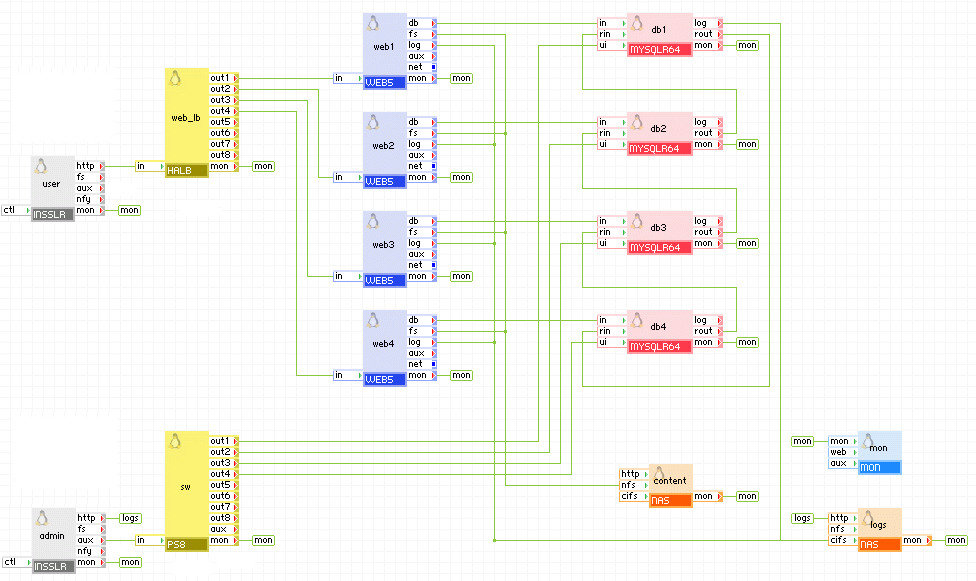
Appliances in use:
Client request arrives on the user gateway. The gateway forwards the requests to the web_lb load balancer, which directs the request to one of the web servers web1, web2, web3 and web4. Each web server uses its own database appliance. All database appliances are connected in a circular way to replicate the updates that the web servers do to the database. Thus an update to db1 for example is replicated to db2, db3 and db4. Each MYSQLR64 appliance uses an offset (equal to its server_id) for its auto_increment columns so that no duplicate entries occur.
Web access to db1, db2, db3, db4 is available via admin gateway on port 8080, 8081, 8082 and 8083.
The db1, db2, web1 and web2 appliances are configured to store their log files within the root directory of the share exposed by logs. In addition, an administrator can view log files through the admin gateway.
Example property configuration (properties that are not listed should be left to their default values):
db1
|
Property name |
Value |
Notes |
|
auto_create |
1 |
Create the database if the volumes are empty. |
|
error_log_filename |
db1.error |
Name of error log file that is to be stored on the logs data volume. |
|
error_log_level |
error |
Error logging level |
|
server_id |
1 |
Master server 1 |
|
rpl_mode |
master_and_slave |
master and slave |
db2
|
Property name |
Value |
Notes |
|
auto_create |
1 |
Create the database if the volumes are empty. |
|
error_log_filename |
db2.error |
Name of error log file that is to be stored on the logs data volume. |
|
error_log_level |
error |
Error logging level |
|
server_id |
2 |
Master server 2 |
|
rpl_mode |
master_and_slave |
master and slave |
db3
|
Property name |
Value |
Notes |
|
auto_create |
1 |
Create the database if the volumes are empty. |
|
error_log_filename |
db3.error |
Name of error log file that is to be stored on the logs data volume. |
|
error_log_level |
error |
Error logging level |
|
server_id |
3 |
Master server 3 |
|
rpl_mode |
master_and_slave |
master and slave |
db4
|
Property name |
Value |
Notes |
|
auto_create |
1 |
Create the database if the volumes are empty. |
|
error_log_filename |
db4.error |
Name of error log file that is to be stored on the logs data volume. |
|
error_log_level |
error |
Error logging level |
|
server_id |
4 |
Master server 4 |
|
rpl_mode |
master_and_slave |
master and slave |
Notes:
The admin, mon and log appliances are not required for the operation of the replication.
N-tier Application Running on Different Facilities (Suitable for Load Balancing and Failover)
The following diagram shows a typical usage of the MYSQLR64 appliance in a web application running in more than one facility. With this setup you can have two or more identical applications running in different facilities with the database being replicated to all applications in master-master setup. This is useful in two cases:
Master application
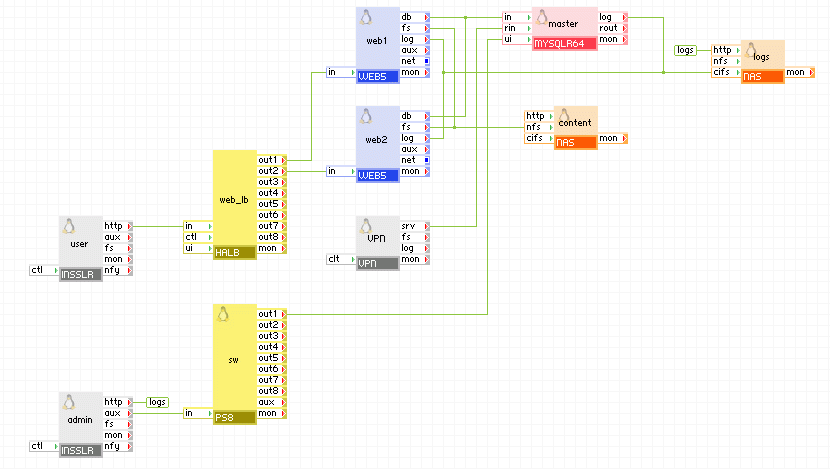
Slave application
Appliances in use:
Client request arrive on the user gateway. The gateway forwards the requests to the web_lb load balancer, which directs the request to one of the web servers web1 and web2. The web servers access the master database. The master appliance connects to the remote (slave) application, the only difference being the server_id of slave and the network setup) to replicate the database. The remote application connects to the master appliance through the vpn gateway which is configured to allow connection only from the vpn gateway of the remote application. The master and slave appliances in the two applications are running in master-master setup so they always have identical data.
Example property configuration (properties that are not listed should be left to their default values):
Web access to master and slave is available via admin gateway on port 8080.
master
|
Property name |
Value |
Notes |
|
auto_create |
1 |
Create the database if the volumes are empty. |
|
error_log_filename |
master-db.error |
Name of error log file that is to be stored on the logs data volume. |
|
error_log_level |
error |
Error logging level |
|
server_id |
1 |
Master server (not mandatory to be 1, should be different from server_id on the slave) |
|
rpl_mode |
master |
Write binary logs to have replication |
master vpn
|
Property name |
Value |
Notes |
|
mode |
server |
Operate as a server. |
|
tunnel |
certificates |
Using SSL certificates. |
|
tcp_ports |
3306,22 |
Allow ports needed by MYSQLR64. |
|
ip_addr |
master_vpn_ip |
IP address of the VPN in the master application. |
|
remote_host |
slave_vpn_ip |
IP address of the VPN in the slave application. |
slave
|
Property name |
Value |
Notes |
|
auto_create |
1 |
Create the database if the volumes are empty. |
|
error_log_filename |
slave-db.error |
Name of error log file that is to be stored on the logs data volume. |
|
error_log_level |
error |
Error logging level |
|
server_id |
2 |
Slave server (not mandatory to be 2, should be different from server_id on the master) |
|
rpl_mode |
slave |
Connect to master |
slave vpn
|
Property name |
Value |
Notes |
|
mode |
client |
Operate as a client. |
|
tunnel |
certificates |
Using SSL certificates. |
|
auth_path |
"client1" |
Path to the SSL certificate file. |
|
ip_addr |
slave_vpn_ip |
IP address of the VPN in the slave application. |
|
remote_host |
master_vpn_ip |
IP address of the VPN in the master application. |
The remote application is an exact copy, the only difference is the network setup of the user, admin, and vpn appliances, connection(s) between the vpn appliance and master=/=slave, and the server_id of the master=/=slave appliance (it should be unique).
If you need to migrate from MYSQLR to MYSQLR64 (and vice versa), you should not only use the volumes from the 32-bit appliance on a 64-bit one (or vice versa) as this could cause data corruption. The recommended way to do this is by dumping the database on the old appliance, transferring the dumped file to the new appliance, and then import the database into the new appliance.
The same procedure can be used to migrate a database from an older database appliance (MYSQL, MYSQL5, MYSQL64) or a mysql database not running on a CA 3Tera AppLogic appliance.
To migrate the database:
The database is now transferred and the appliance is ready for use.
Be aware of the following:
Important! When creating users for the database, verify all users are created with no restrictions on the host they connect from. For example:
mysql> GRANT ALL PRIVILEGES ON *.* TO 'monty'@'%'
    ->     IDENTIFIED BY 'some_pass' WITH GRANT OPTION;
http://dev.mysql.com/doc/refman/5.0/en/index.html -- MySQL 5.0 documentation
MYSQLR64 uses the following third party open source packages in addition to the 3rd party open source packages used by its base class LUX64.
|
Software |
Version |
Modified |
License |
Notes |
|
aspell |
0.60.3-7.1 |
No |
LGPLv2.1 |
N/A |
|
aspell-en |
6.0-2.1 |
No |
LGPLv2.1 |
N/A |
|
curl |
7.15.5-2 |
No |
MIT |
N/A |
|
device-mapper-event |
1.02.32-1 |
No |
GPLv2 |
N/A |
|
freetype |
1.02.32-1 |
No |
FTL |
N/A |
|
gmp |
4.1.4-10.el5 |
No |
LGPLV2.1 |
N/A |
|
libidn |
0.6.5-1.1 |
No |
LGPLv2.1 |
N/A |
|
libjpeg |
6b-37 |
No |
Distributable |
N/A |
|
libpng |
1.2.10-7.0.2 |
No |
zlib/libpng |
N/A |
|
lvm2 |
2.6.26-2.1.2.8 |
No |
GPLv2.0 |
N/A |
|
mysql |
5.0.77-3.el5 |
No |
GPL |
N/A |
|
mysql-server |
5.0.77-3.el5 |
No |
GPLv2 |
N/A |
|
perl-DBD-MySQL |
3.0007-2.el5 |
No |
Artistic |
N/A |
|
perl-DBI |
1.52-2.el5 |
No |
Artistic |
N/A |
|
php-cli |
5.1.6-23.el5 |
No |
PHPv3.01 |
N/A |
|
php-common |
5.1.6-23.el5 |
No |
PHPv3.01 |
N/A |
|
php-gd |
5.1.6-23.el5 |
No |
PHPv3.01 |
N/A |
|
php-mbstring |
5.1.6-23.el5 |
No |
PHPv3.01 |
N/A |
|
php-mysql |
5.1.6-23.el5 |
No |
PHPv3.01 |
N/A |
|
php-pdo |
5.1.6-23.el5 |
No |
PHPv3.01 |
N/A |
|
rsync |
2.6.8-3.1 |
No |
GPLv2 |
N/A |
|
samba-client |
3.0.28-1.el5_2.1 |
No |
GPLv2 |
N/A |
|
samba-common |
3.0.28-1.el5_2.1 |
No |
GPLv2 |
N/A |
|
sudo |
1.6.8p12-10 |
No |
ISC |
N/A |
|
lighttpd |
1.4.18-1.el5.rf |
No |
BSD |
N/A |
|
perl-IPC-Run |
0.84-1.el5.rf |
No |
Artistic |
N/A |
|
perl-Time-Duration |
1.06-1.el5.rf |
No |
Artistic |
N/A |
|
phpMyAdmin |
2.11.10-1 |
No |
GPLv2 |
N/A |
Starting with MYSQLR 1.6.2, you can set/change a password for the root database account. However, the MSYQLR appliance has a few root accounts with different hostnames. When setting/changing a password, you should always use the root@% account. The root@% account is the account that appliances connected to the in terminal of MYSQLR will authenticate against. The other root accounts are used only from local users and a password should never be set for them as doing so will cause the MYSQLR appliance to fail to start.
Note: If you leave the root@localhost account without a password, it is not a security issue because this account can only be used by local users on the appliance and anyone who has access to the appliance can change the password.
To recover an appliance that fails to start due to changing the database root password, perform the following steps:
comp start main.MYSQLR --debug
app start --debug
You should be able to login to the appliance a few seconds after you start the appliance. It is not necessary to wait for the appliance to time out.
mysql -p -e "update mysql.user set Password='' where User='root'"
mysqladmin -p flush-privileges
mysql -e 'update mysql.user set password=PASSWORD("NEWPASSWORD") where User="root" and Host="%"'
mysqladmin flush-privileges
Restart the appliance to verify that it boots, and that mysql connections on the 'in' terminal for user root require a password.
|
Copyright © 2011 CA.
All rights reserved.
|
|