

The Federated Search feature consists of the following components:
Enables CA SDM Analyst users to enter search arguments and pass the search request to the Federated Search server.
Main component of the federated Search feature and uses a REST interface. The Federated Search servlet runs on a dedicated Tomcat instance within the CA SDM application.
The plug-in search adapter interfaces the CA SDM application to an external search engine.The adapter translates the generic search requests to a search engine proprietary format and calls the search engine. The Federated Search servlet returns the configured search engine results to the CA SDM UI component.
The following diagram shows how to configure Federated Search with the CA SDM application:
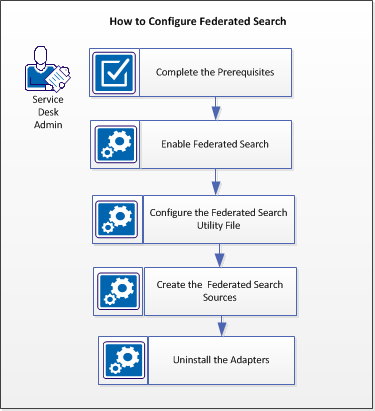
Follow these steps:
Complete the following prerequisites:
Note: Enable Basic Authentication for _vti_bin in IIS.
A dedicated Tomcat instance is installed to host the CAFedSearch and FSCrawl servlets. The Federated Search Tomcat is under the control of the Daemon Manager. Tomcat Starts and stops automatically when CA SDM runs or shuts down respectively.
Configure the Federated Search (FS) Tomcat with the following installation options:
Ensure to select this option when installing the CA SDM application. The Tomcat options are available only after selecting this option.
Specifies the Federated Search Tomcat Port. Default Port= 8040.
Specifies the Federated Search Tomcat Shutdown Port. Default Port= 8045.
To configure Federated Search and to decrease editing errors, a utility file fs_adapters_cli is provided. A batch file for Windows and a Shell script for Linux and Unix is provided. The utility file is a Java application that is contained in two Jar files.
Three template files are supplied for CA Open Space, Google, and SharePoint adapters. The adapters-config.xml file is used for both input as well as output to the utility. The adapters.properties file is used as input to the utility. This file holds all the necessary configuration parameters for the adapters. The jfedsearch.log file contains the log file information.
The fs_adapters_cli utility is used to configure the adapters-config.xml file. The utility file installs and uninstalls the adapters by adding or removing entries from the adapters-config.xml. Individual adapter XML configuration files are generated. These files are then included in the adapters-config.xml with the <import> bean directive. Ensure to maintain a clean copy of the adapters-config.xml.
For more information about using the utility file, see Federated Search Utility Files and Invoke the Utility File to Configure the Search Adapters.
The fs_adapters_ cli utility file is located in the CA SDM $NX_ROOT\samples\cafedsearch directory. The following utility file components are available in this location:
To install the federated search utility file, run the following command:
fs_adapters_cli -i -k <key> -b <bean> -t <filename> -p <filename> -o <filename> [-c <filename>]
Use the fs_adapters_cli –h option to get Help on the Utility file. The following attribute options are available:
Attribute value to map adapters. Refers to an actual ID of an adapter bean. If not specified, then the value from –k is taken as the value for –b.
The main XML file that contains all the configured adapters.
Provides Help for the Federated Search Utility.
Specifies the option used for installing the adapter.
Specifies the adapter key attribute.
Specifies the Output XML filename to be generated. Name of the XML file to create and update the merged content of the XML template and SharePoint properties file.
Indicates the properties file name to merge with the Adapter Definition XML template.
Specifies the name of the XML template file for defining an adapter.
Specifies the name of the adapter XML file to uninstall the adapter.
A Search engine requires specially coded plug-in adapters. A plug-in search adapter translates generic search requests to a search engine proprietary format, calls the search engine, and returns the search requests.
Note: If CA SDM is configured for multi-tenancy, your Tenant is passed along to the search engine. Federated Search has built-in support for multi-tenancy. You can use this to isolate data by a tenant in a single SharePoint implementation.
Important! Do not use ampersands or spaces in the adapters.properties file values.
Follow these steps:
$NXROOT\bin
encrypt_pwd [-e] <search engine password>
The default option is -e.
$NX_ROOT\samples\cafedsearch
Enter the user name for SharePoint access.
Enter the encrypted password for SharePoint access as shown in Step1.
Enter the hostname.
Enter the domain name.
Enter the communication protocol (http or https).
Enter the port number. Default is 80.
Enter the unique key value that Google uses to decide which Google Custom Search Account to use.
Enter the unique key value that helps Google determine the identity of an application. To retrieve the key in the APIs Console, activate JSON/Atom Custom search API. This API provides a new API key for Simple API Access.
Enter the communication protocol (http or https).
Enter the port number for CA Open Space. Default is 8686.
If CA SDM is not configured with multi-tenancy, enter a username to perform search in CA Open Space.
Ener the CA Open Space encrypted password. For more information, see Step1.
Enter the tenant company host details.
For example, if CA SDM contains Tenant name as Tenant 1, you have to provide the following values in the openspace-tmpl.xml file:
<entry key="Tenant1">
<bean class="com.ca.ServicePlus.cafedsearch.adapters.openspace.OpenSpaceCompanyDetail">
<property name="userName" value="$(openspace_tenant1_userName)"/>
<property name="password" value="$(openspace_tenant1_password)"/>
<property name="companyHost" value="$(openspace_tenant1_companyHost)"/>
</bean>
</entry>
openspace_tenant1_userName=
openspace_tenant1_password=
openspace_tenant1_companyHost=
Repeat steps a and b for all required tenants in the openspace-tmpl.xml file.
fs_adapters_cli -i -k OpenSpace -b OpenSpaceSearchAdapter -t "openspace-tmpl.xml" -o "openspace.xml"
fs_adapters_cli -i -k Google -b GoogleSearchAdapter -t "google-tmpl.xml" -o "google.xml"
fs_adapters_cli -i -k SharePoint -b SharePointSearchAdapter -t "sharepoint-tmpl.xml" -o "sharepoint.xml"
Modify the -k and -o attribute values with a name of your choice. For more information about the federated search utility file and attributes,.see Federated Search Utility Files.
$NXROOT\log\jfedsearch.log
$NX_ROOT\samples\cafedsearch
Use the -c option with the modified XML file (xyz.xml) to register adapters.
$NX_ROOT\bopcfg\www\CATALINA_BASE_FS\webapps\cafedsearch\WEB-INF
pdm_tomcat_nxd -c STOP -t FS
pdm_tomcat_nxd -c START -t FS
The federated search adapters are configured.
$NX_ROOT\log\jfedsearch.log
The CA SDM Web UI is loosely coupled with the CAFedSearch Servlet. Configure Search Sources in CA SDM to create a new record.
Follow these steps:
The Search Source contains the Name of the Federated Search Source that is displayed to users.
Note: Code value must match the key value attribute of an entry in the adapters-config.xml.
Search for knowledge documents and articles in the CA SDM application using the new custom search adapter.
Follow these steps:
The search information is displayed.
To uninstall the search adapters, use the fs_search_cli utility command with the –u option. Use the following utility file command:
fs_adapters_cli -u -k <key> -b <bean> [-c <filename>]-f <filename>]
Specify the -u option to uninstall the search adapters.
Specify the key name value provided at the time of installation.
Specify the bean value provided at the time of installation.
Specify the name of the new search adapter configuration xml, if you created any while configuring the search adapters with Utility.
Gives the Generated output file name at the installation time.
For more information, see Configure Search Adapters with Utility.
For example, if you want to uninstall the Google search adapter, perform the following:
Follow these steps:
fs_adapters_cli -u -k Google-b GoogleAdapter-f Google.xml
$NX_ROOT\samples\cafedsearch
$NX_ROOT\samples\cafedsearch\WEB-INF
Delete the google.xml file from this location.
pdm_tomcat_nxd -c STOP -t FS
pdm_tomcat_nxd -c START -t FS
|
Copyright © 2013 CA.
All rights reserved.
|
|