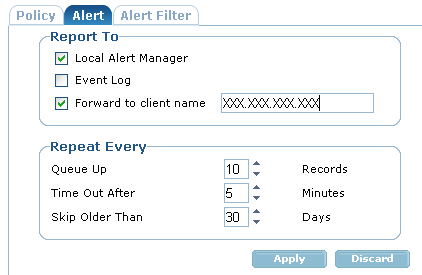
The Alert Tab lets you define where the alert messages are sent.Options include:
- Local Alert Manager
Sends the alert notifications on the local machine to the locally installed Alert Manager.
- Event Log (Windows only)
Lets you can use the Windows Event Logs to review the alerts.
- The Forward to client name
Forwards alerts to another computer or server. The specified client can, in turn, forward messages to another CA TM client in a higher tier. You can use this option to pass information along an escalation hierarchy or to send information to key personnel.
Note: You can also enter the name of the CA TM Server machine; however, if the local machine encounters a DNS resolution problem, the alerts will not be forwarded.
The Repeat Every options let you define how frequently alerts are sent.
- Queue Up
Places alert messages in a queue before forwarding them. When testing your installation, we recommend that that you decrease the Queue Up value to 0 or 1. This allows messages to be delivered quickly and reduces testing time. To have alerts sent immediately, set the value to 1.
- Time Out
Specifies the amount of time after which messages are sent regardless of the Queue Up value. For example, if you set Queue Up to 10 and the Time Out to 5, after five minutes, any messages in the queue are forwarded even if the queue is not full.
- Skip Older Than
Removes messages in the queue older than the value indicated.
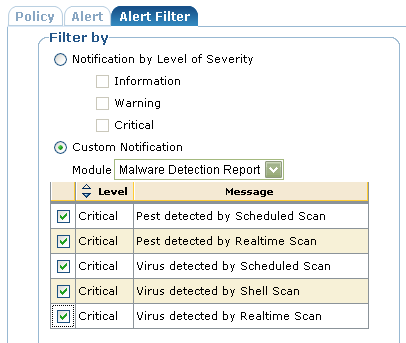
Recommendation: At a minimum choose the Malware Detection Report.
- Malware Detection Report
Pest detected by Scheduled Scan
Pest detected by Active Protection
Virus detected by Scheduled Scan
Virus detected by Shell Scan
Virus detected by Realtime Scan
Recommendation: The following alerts are also recommended if they are applicable to your installation of the CA TM:
- Realtime Server
Critical - The %s was detected in %s. Machine: %s, User: %s. File Status: %s (standard virus incident alert)
Informational - The Realtime Server has stopped.
- Job Server
Critical - Scan Job ( %s ) had the following results:
Critical - Failed to copy the signature file from (%s) to (%s).
Warning - The %s signature is out of date, it has not been updated in %d days.
Warning - The scheduled scan job skipped the directory (%s) because it does not exist.
- Shell Scanner (Applies to Windows only)
These alerts report whether files were detected and cured or detected and but the cure failed.
Critical - Scan Job (%s) had the following results.
Warning - Scan Job (%s) had the following results: