

This section contains the following topics:
Configure CA SiteMinder® SPS to Support Integrated Windows Authentication
Integrated Windows Authentication (IWA) uses the security features of Windows clients and servers. IWA enforces Single Sign-On by allowing Windows to gather user credentials during the initial interactive desktop login process and then transmitting that information to the security layer.
SiteMinder, using the Windows Authentication scheme, secures resources by processing user credentials that are obtained by the Microsoft Integrated Windows Authentication infrastructure.
The following diagram describes how you can configure CA SiteMinder® SPS to support IWA:
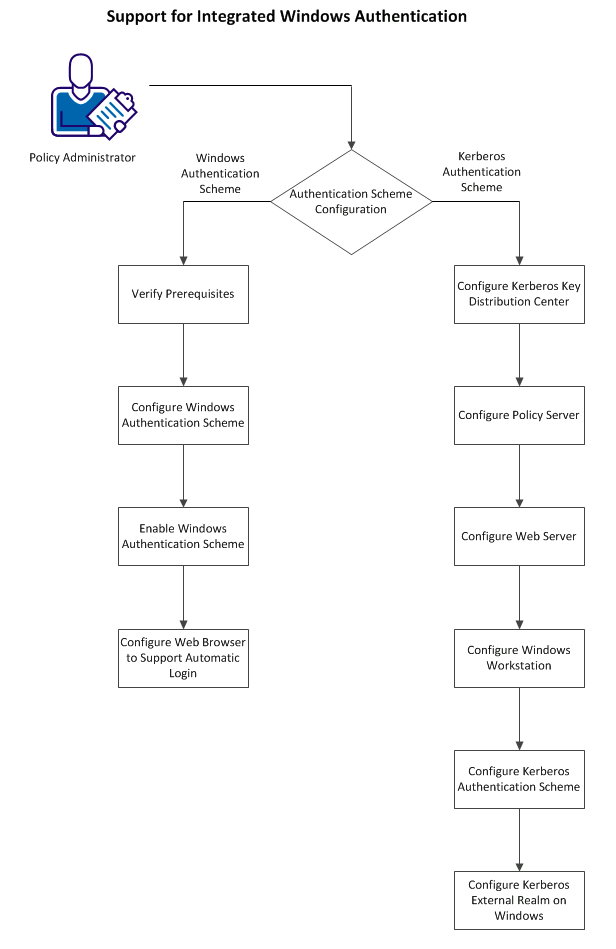
You can configure one of the following authentication schemes with CA SiteMinder® SPS:
The Windows authentication scheme allows SiteMinder to provide access control in deployments with Active Directories running in native mode and Active Directories configured to support NTLM authentication. Windows authentication scheme uses SPNEGO to allow initiators and acceptors to negotiate with either Kerberos or NTLMSSP.
Perform the following steps to support Windows authentication:
Verify that you perform the following tasks before you configure CA SiteMinder® SPS to support IWA:
You can use a Windows authentication scheme to authenticate users in a Windows environment.
Note: The following procedure assumes that you are creating an object. You can also copy the properties of an existing object to create an object. For more information, see Duplicate Policy Server Objects.
Follow these steps:
The Authentication Schemes page appears.
Verify that the Create a new object of type Authentication Scheme is selected.
The Create Authentication Scheme page appears.
Note: Click Help for descriptions of settings and controls, including their respective requirements and limits.
Scheme-specific settings appear.
The fully qualified domain name of CA SiteMinder® SPS, for example:
server1.myorg.com
/siteminderagent/ntlm/smntlm.ntc
Note: The directory must correspond to the virtual directory already configured by the installation. The target file, smntlm.ntc, does not need to exist and can be any name that ends in .ntc or the custom MIME type that you use in place of the default.
smauthntlm
The authentication scheme is saved and can be assigned to a realm.
The SPS now supports Windows authentication scheme that is configured on the Policy Server. To let the SPS support the Windows authentication scheme, perform the following steps:
Note: If you do not define or set the value of the WindowsNativeAuthentication ACO parameter, the SPS does not support the Windows authentication.
To configure automatic logon in Internet Explorer 5.x and 6.x Browsers, perform the following steps:
The Internet Options dialog opens.
The Security Settings dialog opens.
To configure automatic logon in Internet Explorer 4.x Browsers, perform the following steps:
The Internet Options dialog opens.
The Security Settings dialog opens.
CA SiteMinder® SPS is configured to support Windows authentication
Kerberos is a standard protocol, designed at MIT, to provide a means of authentication between a client and a server on an open network. The Kerberos protocol protects messages from eavesdropping and replay attacks. Kerberos uses shared secrets, symmetric keys, and Kerberos services. Microsoft Windows operating environments use Kerberos V5 as the default authentication package. Solaris 10 also includes Kerberos V5.
In a Kerberos environment, user accounts and service accounts are named principals. Kerberos uses a trusted third party (the Key Distribution Center, or KDC) to mediate message exchanges between principals. The purpose of the Key Distribution Center is to reduce the risks inherent in exchanging keys.
Kerberos authentication is based on messages that request and deliver tickets. The Key Distribution Center processes two types of tickets:
Kerberos uses keytab files for logging in to KDC. Keytab files consist of pairs of Kerberos principals and encrypted keys derived from a Kerberos password.
The Kerberos protocol message exchange can be summarized in a simplified way as follows:
Note: The ticket-granting service cannot determine whether the user is granted access to the target resource. The ticket-granting service only authenticates the user and returns the session ticket.
Perform the following steps to configure Kerberos Authentication:
When using Kerberos, the domain controller is the Kerberos Key Distribution Center (KDC) for the Kerberos Realm. In a pure Windows environment, a Kerberos Realm is equivalent to a Windows Domain. The domain controller host provides storage for the user, service accounts, credentials, the Kerberos ticketing services, and Windows Domain services.
Kerberos authentication requires a keytab file, which lets users authenticate with KDC without being prompted for a password. On Windows, use the ktpass command tool utility to create the keytab file and on UNIX, use the ktadd utility creates the keytab file.
Perform the following steps to configure KDC:
Important! For any service to use Kerberos protocol, ensure that you create the Service Principal Name (SPN) in the service/fqdn_host@REALM_NAME format.
Perform the following steps in addition to the standard Policy Server configuration:
Example: HTTP/win2k8sps.test.com@TEST.COM
Example: smps@winps.test.com
Important! If the Policy Server is installed on Windows and KDC is deployed on UNIX, ensure that you perform the additional configuration on the Policy Server host using the Ksetup utility.
Perform the following steps to configure a web server:
Important! If the web server is installed on Windows and KDC is deployed on UNIX, ensure that you perform additional configuration on the web server using the Ksetup utility.
Perform the following steps to configure the Windows workstation:
Important! If KDC is deployed on UNIX, be sure to perform the additional required configuration on the workstation using Ksetup utility.
A custom authentication scheme is required to support Kerberos authentication in the SIteMinder environment. Associate this authentication scheme with any realm whose protected resources use Kerberos authentication.
Follow these steps:
Note: When you create or modify a Policy Server object in the [set the ufi variable for your book], use ASCII characters. Object creation or modification with non-ASCII characters is not supported.
Custom Template settings appear.
LDAP Example 1: http://win2k8sps.test.com/siteminderagent/Kerberos/creds.kcc;smps/winps.test.com@TEST.COM;(uid=%{UID})
LDAP Example 2: http:/win2k8sps.test.com/siteminderagent/Kerberos/creds.kcc;smps/winps.test.com@TEST.COM;(uid=%{UID})
AD Example 1: http://win2k8sps.test.com/siteminderagent/Kerberos/creds.kcc;smps/winps.test.com@TEST.COM;(cn=%{UID})
AD Example 2: http://win2k8sps.test.com/siteminderagent/Kerberos/creds.kcc;smps/winps.test.com@TEST.COM;(cn=%{UID})
ODBC Example 1: http://win2k8sps.test.com/siteminderagent/Kerberos/creds.kcc;smps/winps.test.com@TEST.COM;%{UID}
ODBC Example 2: http://win2k8sps.test.com/siteminderagent/Kerberos/creds.kcc;smps/winps.test.com@TEST.COM;%{UID}
The Kerberos Authentication scheme is saved and appears in the Authentication Scheme List.
For the Windows workstation to use a Kerberos KDC deployed on UNIX, configure both the Kerberos KDC server and the workstation.
In the Kerberos realm, create a host principal for the Windows host. Use the following command:
kadmin.local: addprinc host/machine-name.dns-domain_name.
For example, if the Windows workstation name is W2KW and the Kerberos realm name is EXAMPLE.COM, the principal name is host/w2kw.example.com.
A Kerberos realm is not a Windows domain, perform the following procedure to configure KDC operating environment as a member of a workgroup:
ksetup /SetRealm EXAMPLE.COM
ksetup /addkdc EXAMPLE.COM rhasmit
ksetup /setmachpassword password
Note: The password used here is same as the one used while creating the host principal account in the MIT KDC.
Note: Whenever changes are made to the external KDC and realm configuration, a restart is required.
ksetup /SetRealmFlags EXAMPLE.COM delegate
ksetup /AddKpasswd EXAMPLE.COM rhasmit
ksetup /mapuser testkrb@EXAMPLE.COM testkrb
ksetup /mapuser * *
The second command maps clients to local accounts of the same name. Use Ksetup with no arguments to see the current settings.
CA SiteMinder® SPS is configured to support Kerberos authentication.
The configurations that follow include examples of the specifics, such as keytab file creation, required to implement Kerberos authentication in a SiteMinder environment. Note that additional configuration is required when KDC is deployed in a UNIX operating environment and the Policy Server, or web server, or workstation is in a Windows operating environment.
The steps listed following exemplify how to configure a Windows domain controller to support SiteMinder Kerberos authentication.
Important! This step is irreversible.
Note: The Ktpass command tool utility is a Windows support tool. You can install it from MSDN download or an installation CD. Always verify the version of support tools. The default encryption type must always be RC4-HMAC. The encryption type can be confirmed by running ktpass /? at the command prompt.
When the Policy Server is on Windows:
ktpass -out c:\wasrvwin2k8sps.keytab -princ HTTP/win2k8sps.test.com@TEST.COM
-ptype KRB5_NT_PRINCIPAL -mapuser wasrvwin2k8sps -pass <<password>>

Targeting domain controller: winkdc.Test.com
Using legacy password setting method
Successfully mapped HTTP/win2k8sps.test.com to wasrvwin2k8sps.
Key created.
Output keytab to c:\wasrvwin2k8sps.keytab:
Keytab version: 0x502
keysize 67 HTTP/win2k8sps.test.com@TEST.COM ptype 1 (KRB5_NT_PRINCIPAL) vno 2 etype 0x17 (RC4-HMAC) keylength 16 (0xfd77a26f1f5d61d1fafd67a2d88784c7)
The password is the same as the one used for creating the service account for the web server.
When the Policy Server is on UNIX:
ktpass -out d:\sol10sunone_host.keytab -princ host/sol10sunone.test.com@TEST.COM -pass <<password>> -mapuser sol10sunone -crypto DES-CBC-MD5 +DesOnly -ptype KRB5_NT_PRINCIPAL -kvno 3

Targeting domain controller: winkdc.test.com
Successfully mapped host/sol10sunone.test.com to sol10sunone.
Key created.
Output keytab to d:\sol10sunone_host.keytab:
Keytab version: 0x502
keysize 52 host/sol10sunone.test.com@TEST ptype 1 (KRB5_NT_PRINCIPAL) vno 3 etype 0x3 (DES-CBC-MD5) keylength 8 (0xb5a87ab5070e7f4a)
Account sol10sunone has been set for DES-only encryption.
When the Policy Server is on Windows:
Ktpass -out c:\polsrvwinps.keytab -princ smps/winps.test.com@TEST.COM -ptype KRB5_NT_PRINCIPAL -mapuser polsrvwinps -pass <<password>>
Targeting domain controller: winkdc.Test.com
Using legacy password setting method
Successfully mapped smps/winps.test.com to polsrvwinps.
Key created.
Output keytab to c:\polsrvwinps.keytab:
Keytab version: 0x502
keysize 72 smps/winps.test.com@TEST.COM ptype 1 (KRB5_NT_PRINCIPAL) vno 2 etype 0x17 (RC4-HMAC) keylength 16 (0xfd77a26f1f5d61d1fafd67a2d88784c7)
The password is same as the one used for creating the service account for Policy Server.
When the Policy Server is on UNIX:
ktpass -out d:\sol10polsrv.keytab -princ host/sol10sunone.test.com@TEST.COM -pass <<password>> -mapuser sol10sunone -crypto DES-CBC-MD5 +DesOnly -ptype KRB5_NT_PRINCIPAL -kvno 3

Targeting domain controller: winkdc.test.com
Successfully mapped host/sol10sunone.test.com to sol10sunone.
Key created.
Output keytab to d:\sol10polserv.keytab:
Keytab version: 0x502
keysize 52 host/sol10sunone.test.com@TEST ptype 1 (KRB5_NT_PRINCIPAL) vno 3 etype 0x3 (DES-CBC-MD5) keylength 8 (0xb5a87ab5070e7f4a)
Account sol10sunone has been set for DES-only encryption.
Or, select the third option, Trust this user for delegation to specified service. Select the Use Kerberos only option button, and add the corresponding service principal name.
The domain controller is ready for SiteMinder Kerberos authentication.
The process listed following exemplifies how to configure a KDC Kerberos Realm on a UNIX host to support SiteMinder Kerberos authentication.
Both the stash file and the keytab file are potential point-of-entry for a break-in. If you install a stash file, it must be readable only by root, must not be backed up, and must exist only on KDC local disk. If you do not want a stash file, run the kdb5_util without the -s option.
This example generates the following five database files in the directory specified in kdc.conf file:
[root@rhasmit init.d]# kdb5_util create -r EXAMPLE.COM -s
Initializing database '/var/kerberos/krb5kdc/principal' for realm 'EXAMPLE.COM',
master key name 'K/M@EXAMPLE.COM'
You will be prompted for the database Master Password.
It is important that you NOT FORGET this password.
Enter KDC database master key:
Re-enter KDC database master key to verify:
ktadd -k /tmp/win2k8sps.keytab HTTP/win2k8sps.example.com
ktadd -k /tmp/winps.keytab smps/winps.example.com
The Kerberos Realm is configured for SiteMInder on a UNIX host.
The following procedure shows an example of how to configure a Policy Server on a UNIX host to support CA SiteMinder® Kerberos authentication.
Follow these steps:
|
Parameter |
Value |
|---|---|
|
KCCExt |
.kcc |
|
HttpServicePrincipal |
Specify the web server principal name. Example: HTTP/win2k8sps.test.com@TEST.COM |
|
SmpsServicePrincipal |
Specify the Policy Server principal name. Example: smps@winps.test.com |
Sample parameter field:
http://sol10sunone.test.com/siteminderagent/Kerberos/creds.kcc;smps/sol10ps.test.com@TEST.COM;(uid=%{UID})
See the following sample krb5.ini:
[libdefaults]
 ticket_lifetime = 24000
 default_realm=TEST.COM
 default_tgs_enctypes = des-cbc-md5
 default_tkt_enctypes = des-cbc-md5
 default_keytab_name = FILE:/etc/krb5.keytab
 dns_lookup_realm = false
 dns_lookup_kdc = false
 forwardable = true
 proxiable = true
[realms]
 TEST.COM = {
  kdc = winkdc.test.com:88
  admin_server = winkdc.test.com:749
  default_domain = test.com
 }
[domain_realm]
 .test.com=TEST.COM
  test.com=TEST.COM
ktutil: rkt sol10ps_host.keytab
ktutil: wkt /etc/krb5.keytab
ktutil: q
ktutil: rkt sol10ps_smps.keytab
ktutil: wkt /etc/krb5.keytab
ktutil: q
klist -k
Keytab name: FILE:/etc/krb5.keytab
KVNO Principal
---- --------------------------------------------------------------------------
   3 host/sol10ps.test.com@TEST.COM
   3 smps/sol10ps.test.com@TEST.COM
KRB5_CONFIG=/etc/krb5/krb5.conf
The Policy Server on a UNIX host is configured for Kerberos authentication.
The following procedure shows an example of how to configure a Policy Server on Windows to support CA SiteMinder® Kerberos authentication.
Note: If the Policy Server is installed on Windows and KDC is deployed on UNIX, be sure to perform additional required configuration on the Policy Server host using the Ksetup utility.
Follow these steps:
|
Parameter |
Value |
|---|---|
|
KCCExt |
.kcc |
|
HttpServicePrincipal |
Specifies the web server principal name. Example: HTTP/win2k8sps.test.com@TEST.COM |
|
SmpsServicePrincipal |
Specifies the Policy Server principal name. Example: smps@winps.test.com |
Sample parameter field:
http://win2k8sps.test.com/siteminderagent/Kerberos/creds.kcc;smps/winps.test.com@TES.COM;(uid=%{UID})
See the following sample krb5.ini:
[libdefaults]
default_realm = TEST.COM
default_keytab_name = C:\WINDOWS\krb5.keytab
default_tkt_enctypes = rc4-hmac des-cbc-md5
default_tgs_enctypes = rc4-hmac des-cbc-md5
[realms]
TEST.COM = {
kdc = winkdc.test.com:88
default_domain = test.com
}
[domain_realm]
.test.com = TEST.COM
The Policy Server on a Windows host is configured for Kerberos authentication.
|
Copyright © 2013 CA.
All rights reserved.
|
|