

CA SiteMinder® SPS supports the custom error pages feature, which lets you customize the error pages that the Web Server displays when a client request fails.
The custom error pages section has the following format:
<customerrorpages>
#possible values are: "yes","no"
#default value is "no"
enable="no|yes"
#custom error pages implementation class
class="com.netegrity.proxy.errorpages.ErrorPageImpl"
#defines type of locale.
#possible values are: "0" (for Server specific), "1" (for Browser specific)
#default value is "0"
locale_type="0|1"
#this value should be the language code that will be understood by the java
#locale object, say "zh" for Chinese, "fr" for French, "es" for Spanish, "en" for
#english, etc.
#default value is "en"
locale_language="en"
#this value should be the country/region code that will be understood by the
#java locale object, say "CN" for China, "CH" for Switzerland, "AR" for
#Argentina, "US" for United States.
#default value is "US"
locale_country="US"
#display the complete call stack for exceptions
          #possible values: "true" or "false".
          #default value: "false"
          showcallstack="true"
</customerrorpages>
Specifies how CA SiteMinder® SPS manages the web server error pages. If the value is set to yes, you can customize the Web Server error pages and the Web Server displays the customized error pages when a client request fails. If the value is set to no, the Web Server displays the default HTTP 1.1 error pages when a client request fails. CA SiteMinder® SPS reads the value at the startup.
Default: no
Specifies the locale of the custom error pages. If the value is set to 0, CA SiteMinder® SPS uses the locale settings of the CA SiteMinder® SPS server to display the custom error messages. If the value is set to 1, CA SiteMinder® SPS uses the locale settings of your browser to display the custom error messages.
Default: 0
Specifies if the call stack must be retrieved to track exceptions that you want to debug. If the value is set to true, CA SiteMinder® SPS retrieves the call stack and displays it on the custom error page. If the value is set to false, the call stack is hidden.
Default: false
Important! For security reasons, we highly recommend that you do not enable the showcallstack option unless you want to track the complete details of an exception that you want to debug. Disable showcallstack after you complete debugging.
Enable the feature to let the web server display a customized error page when a client request fails and customize the message or code of an error. By default, CA SiteMinder® SPS supports all HTTP 1.1 error codes.
Follow these steps:
enable="yes"
By default, CA SiteMinder® SPS provides a list of possible request errors that are received from CA SiteMinder® SPS and web servers. The error messages in the SPSErrorMessages.properties and WebServerErrorMessages.properties files are in the following format:
exception|error code=error message|URL
Where
Defines the exception or the error code that CA SiteMinder® SPS or web server returns when a user request fails.
Limits: 100 characters
Defines the error message CA SiteMinder® SPS or web server displays when an exception or error code is returned. You can specify either the error message in plain text or the targeted URL that the user must use.
Limits: 4096 characters
By default, CA SiteMinder® SPS displays an error page when a user request fails due to inappropriate configuration settings of the CA SiteMinder® SPS server. Each error page is mapped to an error code. When a user request fails, CA SiteMinder® SPS checks for the error code and displays the corresponding error page.
The following table lists the default errors that CA SiteMinder® SPS displays due to inappropriate configuration settings of the CA SiteMinder® SPS server:
|
Error Code |
Error Message |
|---|---|
|
VirtualHostNotFound |
Virtual host might not have been configured properly. Verify the virtual host settings in the server.conf file |
|
SessionSchemeNotFound |
The defined session scheme is not found. Verify the session scheme settings in the server.conf file |
|
SessionCreateError |
The session store might have been corrupted during creation. Restart the SPS |
|
SessionUpdateError |
The session store might have been corrupted during update. Restart the SPS |
|
WebAgentException |
CA SiteMinder® SPS might not be communicating with the Web agent. For more information about the error, see CA SiteMinder® SPS logs |
|
Noodle_GenericException |
There might be an error during processing a request at noodle stage. For more information about the error, see CA SiteMinder® SPS logs |
|
Noodle_FilterException |
There might be an error during pre/post processing of filters at noodle. |
|
Noodle_UnknownHostException |
The IP address of the targeted host could not be determined |
|
Noodle_ConnectException |
An error occurred while attempting to connect a socket to a remote address and port |
|
Noodle_NoRouteHostException |
An error occurred while attempting to connect a socket to a remote address and port because of an intervening firewall or unavailability of an intermediate router |
|
Noodle_InteruptedIOException |
An input or output transfer is terminated because the thread that is performing the transfer was interrupted |
|
Noodle_SocketException |
An error occurred in the underlying protocol |
|
Noodle_NoSuchMethodException |
CA SiteMinder® SPS does not support the method |
|
Noodle_ProxytoProxyNotSupported |
CA SiteMinder® SPS does not support proxy Web Server |
|
Noodle_CouldNotConnectToBackEndServer |
Could not connect to backend web server due to lack of processing threads at the SPS |
|
Noodle_NoAvailableConnections |
There are no connections available to serve the request |
|
Redirect_NoTargetURLParameter |
No URL is specified during Redirect |
|
FedRequest_Redirect_ImproperURL |
The redirect URL is not specified or is malformed. Verify the federation settings or the RelayState in the client request |
|
FedRequest_Redirect_RewriteLocationHeaderFailure |
Unable to create a redirect session because the memory holding the session keys might have crashed while processing the federation request |
|
FedRequest_CookieProcessingError |
Unable to create a cookie while processing the federation request |
|
FedRequest_ResponseProcess_AddSessionError |
An error occurred while adding the session during the federation request processing, the memory holding the session keys might have crashed |
|
FedRequest_ResponseProcess_LocHeaderModifyError |
An error occurred while updating the location header during federation request processing, the memory holding the session keys might have crashed |
|
SPSException |
An error occurred while processing the request. For more information about the error, see CA SiteMinder® SPS logs |
You can modify an error message of a CA SiteMinder® SPS error page.
Follow these steps:
Default Path: <SPS_installation_folder>\Tomcat\properties\
By default, CA SiteMinder® SPS supports all HTTP 1.1 error codes and the web server displays the default HTTP 1.1 error pages when a client request fails. When you enable the custom error pages feature, you can customize the error pages and the web server displays the customized error details when a client request fails. Each error page is mapped to an error code.
If you enable the feature and customize an error page, the web server displays the customized error page when the error occurs. If you enable the feature and do not customize an error page, the web server displays the default error page returned by the web server when the error occurs.
You can add, modify, or delete an error code or an error message of a web server error page. If you delete the error message of an error code, the CA SiteMinder® SPS displays a page with the following message:
No custom message to display. Find more details in logs.
Follow these steps:
Default Path: <SPS_installation_folder>\Tomcat\properties\
The <SessionStore> section of the server.conf file specifies settings for storing user sessions. The session store configuration has the following format:
<SessionStore>
# Session Store Information
class="com.netegrity.proxy.session.SimpleSessionStore"
max_size="10000"
clean_up_frequency="60"
</SessionStore>
The SessionStore parameters are:
Indicates the implementation used to maintain user session. Do not modify this value.
Default: com.netegrity.proxy.session.SimpleSessionStore
Specifies the maximum size of the session store. The number specified is the maximum number of concurrent sessions in the in-memory session store.
Default: 10000
Sets the interval, in seconds, that the CA SiteMinder® SPS waits before cleaning out expired sessions residing in the session store cache.
Note: A long session timeout can decrease the number of session cookies of encrypted and decrypted by the server, but can increase the total number of sessions maintained in cache. If there are users who connect infrequently, specify a shorter cache time and smaller cache size. However, if there are many users who return to your site frequently, use a longer cache time and larger cache size.
The <ServiceDispatcher> section determines how CA SiteMinder® SPS provide proxy services. It also specifies the location of the proxy rules XML configuration file.
Note: This parameter is a global server configuration parameter and is not configured for each individual virtual host.
The <ServiceDispatcher> section is listed following.
# Service Dispatcher
# This is new since proxy 6.0
# Service Dispatcher is now a global server configuration parameter and is no longer
# configured on a per virtual host basis.
<ServiceDispatcher>
class="com.netegrity.proxy.service.SmProxyRules" rules_file=
"C:\Program Files\CA\secure-proxy\proxy-engine\conf\proxyrules.xml"
</ServiceDispatcher>
The parameters in this section are:
Specifies the service dispatcher used by CA SiteMinder® SPS to route user requests. Do not change the default value.
Default: com.netegrity.proxy.service.SmProxyRules
Specifies the location of the proxyrules.xml. file
Default: sps_home/secure-proxy/proxy-engine/conf/proxyrules.xml
The <Service> section of the server.conf file consists of the Proxy Service and the Redirect Service.
The two proxy services predefined for CA SiteMinder® SPS are:
These services each have a section in the file defined by the <Service name> element. Custom services are similarly defined in the server.conf file, including any parameters set by an administrator.
The forwarding service of CA SiteMinder® SPS forwards requests to the appropriate destination servers according to the conditions and cases in the proxy rules XML configuration file. The parameters for this service are defined in the <Service name="forward"> section of the server.conf file.
Many of the directives manage the connection pool maintained by the SPS. These directives help improve server performance by maintaining connections and alleviating the overhead of establishing a new connection for each request to a destination server.
Additional directives define proxy filters. Proxy filters can be defined here to perform processing tasks before a request is passed to a destination server, and after the destination server returns data to the SPS. Filter names are unique.
The following is an excerpt of the <Service name="forward"> section.
Note: The excerpt does not include most of the comments that you see when you look at the actual server.conf file.
# Proxy Service
<Service name="forward">
class="org.tigris.noodle.Noodle"
protocol.multiple="true"
http_connection_pool_min_size"4"
http_connection_pool_max_size="20"
http_connection_pool_incremental_factor="4"
http_connection_pool_connection_timeout="1"
http_connection_pool_wait_timeout="0"
http_connection_pool_max_attempts="3"
http_connection_timeout="0"
http_connection_stalecheck="false"
# Proxy filters may be defined here to perform pre/post processing tasks.
# The following format must be used to configure filters:
# filter.<filter name>.class=<fully qualified filter class name> (required)
# filter.<filter name>.init-param.<param name1>=<param value1> (optional)
# filter.<filter name>.init-param.<param name2>=<param value2>
# filter.<filter name>.init-param.<param name3>=<param value3>
# The following example illustrates the use of custom filters in a group
# Defines filter groups with valid Custom filter names.
#groupfilter.group1="filter1,filter2"
</Service>
The parameters in the forward section are:
Specifies the implementation that provides forwarding services for the SPS. Do not change this value. This value is only exposed to accommodate the rare occasion when a custom service can forward requests specified in the proxy rules XML configuration file.
Default: org.tigris.noodle.Noodle
Indicates whether CA SiteMinder® SPS supports protocols other than HTTP. Specify one of the following values:
Indicates that protocols other than HTTP are supported. Currently, only HTTPS is supported as an additional protocol in the SPS. True is the default value for this directive.
Indicates that only the HTTP protocol is supported.
Sets the minimum number of connections to a single destination server that are available for processing user requests.
Default: 4
Sets the maximum number of connections between CA SiteMinder® SPS and a destination server.
Default: 20
Important! Each connection established by CA SiteMinder® SPS creates a socket. For UNIX operating systems, if the maximum size of the connection pool is large, you can increase the limit on file descriptors to accommodate the large number of sockets.
Sets the number of connections to a destination server that CA SiteMinder® SPS opens when all available connections are being used to process requests.
Default: 4
Sets the timeout unit to seconds or minutes.
Default: Minutes
Defines the time, in minutes, the system waits before closing idle connections in the connection pool.
Default: 1
Defines the time, in milliseconds, that CA SiteMinder® SPS waits for an available connection.
Default: 0
The default, 0, specifies that CA SiteMinder® SPS waits for a connection until notified and invalidates the use of http_connection_pool_max_attempts.
Indicates the number of attempts that the system makes to obtain a connection. This directive is only applicable if wait timeout is not zero.
Default: 3
Specify one of the following values:
Indicates that CA SiteMinder® SPS makes attempts indefinitely.
Indicates that CA SiteMinder® SPS makes three attempts.
Defines the time, in milliseconds, spent on host name translation and establishing the connection with the server when creating sockets.
Default: 0; indicates that the system does not enforce a limit.
Note: This timeout explicitly refers to the HTTP connection and not to the connection pool.
Specifies if a stale connection check must be performed. If you set the value to true, a stale connection check is performed before each request execution. If you set the value to false, an I/O error may appear when you execute a request over a connection that is closed at the backend web server.
Default: false
Specifies the filter configured in the server.conf file for each unique filter that is invoked in the proxy rules.
Example: filter.PreProcess.class=SampleFilter
Specifies the initialization parameters for a filter based on how the filters are defined using the Filter API. Configure the server.conf file to define parameters for each filter.
Example: filter.PreProcess.init-param.param1=value1
Specifies the filter groups to implement one or more filters for a given proxy rule. CA SiteMinder® SPS reads the filter names declared in the group filter and processes the filters in a chain. The groupfilter name can be similarly used as a filter name in proxyrules.xml. When CA SiteMinder® SPS processes a group filter, the pre‑filters are processed before post filters even if the order in which they are defined in the groupfilter is reverse.
The following limitations are applicable:
Example:
groupfilter.BatchProcess="SampleFilter1, SampleFilter2, SampleFilter3"
Connection pooling is an important part of managing CA SiteMinder® SPS performance. For CA SiteMinder® SPS to provide the best possible service in an enterprise, destination servers must be configured with Keep-Alive messages enabled for connections. Enabling Keep-Alive messages for a destination server allows the CA SiteMinder® SPS to use its connection pooling features.
Keep Alive messages are managed differently for each type of web server.
In addition to enabling Keep-Alive messages, the following settings are recommended for destination servers and the SPS. The table lists the timeout and connection pool recommendations:
|
Settings |
HTTP |
HTTPS |
|---|---|---|
|
Destination Server Keep-Alive Maximum Requests (http_connection_pool_max_attempts) |
Unlimited |
Unlimited |
|
Destination Server Timeout |
Does not time out |
Equal to or greater than the HTTP Connection Pool Timeout |
|
Secure Proxy Server HTTP Connection Pool Timeout Unit (http_connection_pool_connection_timeout_unit) |
Set to seconds or minutes; default is minutes. |
Set to seconds or minutes; default is minutes. |
|
Secure Proxy Server HTTP Connection Pool Timeout (http_connection_pool_connection_timeout) |
1 minute |
1 minute |
|
Secure Proxy Server HTTP Connection Pool Wait Timeout (http_connection_pool_wait_timeout) |
0 waits until notified |
0 waits until notified |
|
Secure Proxy Server HTTP Connection Pool Maximum Attempts (http_connection_pool_max_attempts) |
3 value is only useful if the HTTP Connection Pool Timeout is greater than 0 |
3 value is only useful if the HTTP Connection Pool Timeout is greater than 0 |
|
Secure Proxy Server HTTP Connection Timeout (http_connection_timeout) |
0 does not timeout |
0 does not timeout |
The redirect service of the CA SiteMinder® SPS sends requests to destination servers. Unlike the forward service, the destination server handles subsequent requests, not the SPS.
The redirect service has the following format:
<Service name="redirect">
	class=com.netegrity.proxy.service.RedirectService
</Service>
The directive is:
Indicates the implementation that handles redirected requests. This directive must not be modified.
Default: com.netegrity.proxy.service.RedirectService
If the web server uses a connection-oriented authentication scheme, configure a connection-oriented connection pool for secure forward request processing.
Important! We highly recommend that you do not configure a connection-oriented connection pool.
Follow these steps:
# Pool configuraiton for connection oriented authentication backend
# connections eg: NTLM.
<connection-pool name="connection oriented authentication">
connection-timeout="connection_timeout_value"
max-size="maximum_connections"
enabled="yes|no"
</connection-pool>
Defines the time in seconds the connection times out. We recommend that you set a lower value.
Default: 5
Defines the number of connections in the connection pool.
Default: 50
Specifies the status of the connection-oriented connection pools. Set the value to yes to enable the connection-oriented connection pools.
Default: yes
Example: <nete:forward connection-auth="yes">hostname:port$1</nete:forward>
Session schemes determine how a user’s identity is maintained, providing single sign-on during the course of a session. Each potential session scheme must be included in a SessionScheme section of the server.conf. file. Session schemes must be associated with a Java class file that defines the behavior of the session. If no session scheme is specified for a particular type of user agent, the default session scheme is used.
One challenge for enterprise transactions is maintaining user sessions. SiteMinder uses cookies to encapsulate session information. Unlike SiteMinder, CA SiteMinder® SPS uses several methods and provides a set of APIs to support alternative methods of maintaining sessions that does not rely on cookies. The cookieless session schemes involve some sort of token that reference session information maintained in CA SiteMinder® SPS in‑memory session store. The session store resides in the CA SiteMinder® SPS server’s memory, and can be cleared by restarting the server.
The CA SiteMinder® SPS provides the following out-of-the-box session schemes that you can configure in the server.conf file. These schemes may be associated with user agent types for each virtual host defined in the server.conf file. The association of a session scheme with a user agent type is called a session scheme mapping.
CA SiteMinder® SPS includes the following schemes:
Note
JAVA_HOME=C:/Progra~2/Java/jdk1.7.0_03
SPS_HOME=C:/Progra~2/CA/secure-proxy
There are distinct phases for establishing a user session, as follows:
During this phase of a session, the CA SiteMinder® SPS looks for an appropriate session key based on the user agent type. Session keys are either SiteMinder cookies, or a token that points to the appropriate information in the CA SiteMinder® SPS in-memory session store. As previously discussed, tokens may be in the form of mini-cookies, SSL IDs, device IDs, or other tokens. If no session key can be identified, the Web Agent in the CA SiteMinder® SPS takes over and forwards the request for authentication and authorization and establishes the identity and entitlements of the user.
The CA SiteMinder® SPS contains a Web Agent that communicates with SiteMinder. The Web Agent is responsible for decrypting SiteMinder session information and validating a session with SiteMinder. If a user’s request is accompanied by an SMSESSION cookie, or the CA SiteMinder® SPS has located a user’s session in the session store, the Web Agent validates a user’s request with SiteMinder.
In this phase, after the user’s session has been validated, the CA SiteMinder® SPS uses one of its defined services (forward, redirect, or another service) to handle the user’s request. The action of the CA SiteMinder® SPS in this phase is determined by the proxy rules contained in the proxy rules XML configuration file.
Note: For URL rewriting session schemes, content is forwarded to the rewriting mechanism in this phase before being sent back to the user.
The default session scheme is the scheme that the CA SiteMinder® SPS uses to establish and maintain user sessions when no other scheme is specified for a user agent type. The <SessionScheme> element contains the name attribute, which is used to identify the session scheme when assigning schemes to user agent types. The server.conf file must contain a default session scheme configuration.
You can configure the default session scheme to use any available session scheme.
The default session scheme section has the following format:
#Session Schemes
<SessionScheme name="default">
class="com.netegrity.proxy.session.SessionCookieScheme"
accepts_smsession_cookies="true"
</SessionScheme>
The <SessionScheme> element has the following directives:
Indicates the Java class that contains the default session scheme.
Default: com.netegrity.proxy.session.SSLIdSessionScheme
Indicates that if a user agent type is associated with the SiteMinder cookies session scheme, users that access resources via that user agent type will maintain session using traditional SiteMinder cookies.
SiteMinder uses cookies to track sessions so a cookies scheme is supported by the SPS. Indicates if SMSESSION cookies are accepted.
Specify one of the following values:
Indicates that SMSESSION cookies are accepted and used by the session scheme.
Indicates that SMSESSION cookies are not supported by the session scheme.
The default session scheme is used when no other session scheme is specified for a user agent type.
Default Session Scheme directives are as follows:
Specifies a session scheme other than SiteMinder cookie session scheme as the default scheme. You can modify this entry to include any of your session schemes as the default session scheme.
Default: default
Instructs the CA SiteMinder® SPS to rewrite the cookie path from the URI set by the server sitting behind the proxy to the URI of the initial request.
Default: no
Instructs the CA SiteMinder® SPS to rewrite the cookie domain from the domain set by the server sitting behind the proxy to the domain of the initial request.
Default: no
A secure sockets layer (SSL) connection includes a unique identifier that is created when an SSL connection is initiated. The CA SiteMinder® SPS can use this unique ID as a token to refer to the session information for a user which is maintained in the CA SiteMinder® SPS in-memory session store. This scheme eliminates cookies as a mechanism for maintaining a user’s session.
A limitation of the SSL ID session scheme is that the initial contact with the CA SiteMinder® SPS establishes an SSL session ID. If a user’s SSL session is interrupted, and a new SSL connection is established, the user must be re-authenticated and re-authorized, since the new SSL connection has a connection to a new server, even though it is a virtual server on the same system. This also means that forms used by HTML Forms Authentication Schemes must be served from the same host name as the protected resource.
The SSL ID section lists the session scheme using the SSL ID.
SSL ID session schemes can be supported without any custom work using the Java classes that are packaged with SPS.
Important! To use the SSL ID authentication scheme, you also have to enable a setting in the Apache Web server's httpd.conf file.
The SSL ID session scheme has the following format:
<SessionScheme name="ssl_id">
class="com.netegrity.proxy.session.SSLIdSessionScheme"
accepts_smsession_cookies="false"
</SessionScheme>
The directives for the ssl_id are as follows:
Specifies the Java class that handles SSL ID session schemes.
Default: com.netegrity.proxy.session.SSLIdSessionScheme
Indicates if SMSESSION cookies are accepted. Specify one of the following values:
Indicates that SMSESSION cookies are accepted and used by the session scheme.
Indicates that SMSESSION cookies are not supported by the session scheme.
In addition to configuring the SSL ID session scheme in the server.conf file, you have to modify the Apache Web server httpd.conf file to enable SSL.
To modify the httpd.conf file for the SSL ID scheme
#SSLOptions +StdEnvVars +ExportCertData +CompatEnvVars
Note: For CA SiteMinder® SPS r6.0 SP 3 and later, also remove +CompateEnvVars so that the line reads as follows:
SSLOptions +StdEnvVars +ExportCertData
In environments where IP addresses are fixed, the CA SiteMinder® SPS can use an IP address to refer to a user’s session information in the session store. This scheme eliminates cookies, but may only be used in environments where a user is assigned a fixed IP address.
One of the disadvantages of a traditional SiteMinder cookie-based session scheme is the size of the cookies. When the amount of data transferred with each request increases, the cost of access for certain types of devices such as wireless phones increases.
A mini-cookie is a small cookie, approximately 10 bytes in size that contains a token which can be used to reference session information in SiteMinder in-memory session store. The mini-cookie is a fraction of the size of a standard SiteMinder cookie, and provides an alternative for standard SiteMinder cookies.
The mini-cookies session scheme stores session information in the CA SiteMinder® SPS in‑memory session store and creates a cookie that contains an encrypted token that the CA SiteMinder® SPS returns to the user.
This section has the following format:
<SessionScheme name="minicookie">
class="com.netegrity.proxy.session.MiniCookieSessionScheme"
accepts_smsession_cookies="false"
# The name of the small cookie to be stored in the client.
cookie_name="SMID"
</SessionScheme>
The directives in the mini-cookies session scheme are listed following.
Specifies the java class that defines the session scheme. This directive is not modified when you want to use the mini-cookies session scheme provided with the SPS.
Default: com.netegrity.proxy.session.MiniCookieSessionScheme
Indicates if SMSESSION cookies are accepted. Specify one of the following values:
Indicates that SMSESSION cookies are accepted and used by the session scheme.
Indicates that the SMSESSION cookies are not supported by the session scheme. Use this setting to verify that only a mini-cookie session is used for the session scheme.
Indicates the name of the mini-cookie that contains the token for the user session.
Note: This name is not configured using the same value for all CA SiteMinder® SPS that provides single sign-on.
Simple URL rewriting is a method for tracking a user session by appending a token to the requested URL. This token is used to retrieve session information from the in-memory session store.
The simple_url schemes support simple URL rewriting, which can be accomplished without any custom work.
Note: The CGI-based and FCC-based password schemes are supported with the simple_url session scheme.
Example
A user accesses a host and the user session is established through the simple URL rewriting session scheme. An initial request can look like the following example:
http://banking.company.com/index.html
If the user provides appropriate credentials and is authenticated and authorized, the URL requested by the user is rewritten and returned to the user in a form similar to the following:
http://banking.company.com/SMID=nnnnnnnnnn/index.html
Represents a hashed, randomly generated token that the CA SiteMinder® SPS uses to identify the user session.
Important! For the simple URL rewriting session scheme to work, any links defined in the enterprise must be relative links. If links are absolute, the simple URL rewriting scheme fails. Also, the token that the CA SiteMinder® SPS appends to a URL is stripped from the URL when the request is forward. The token is only appended at the CA SiteMinder® SPS interaction level so that it does not interfere with back-end server processing.
The format of the SimpleURL scheme is:
<SessionScheme name="simple_url">
class="com.netegrity.proxy.session.SimpleURLSessionScheme"
accepts_smsession_cookies="false"
session_key_name="SMID"
</SessionScheme>
The directives in the SimpleURL scheme are listed following.
Specifies the Java class that defines the session scheme. This directive is not modified when you want to use the cookieless rewriting session scheme.
Default: com.netegrity.proxy.session.SimpleURLSessionScheme
Indicates whether SMSESSION cookies are accepted. Specify one of the following values:
Indicates that SMSESSION cookies are accepted and used by the session scheme.
Indicates that SMSESSION cookies are not supported by the session scheme. Use this setting to verify that only a cookieless rewriting session is used for this session scheme.
Specifies the SiteMinder ID (SMID) session identifier.
Note: When a cookieless federation transaction is being processed by the CA SiteMinder® SPS federation gateway and the simple_url session scheme is used, the SMID is added to the request as a query parameter instead of the being appended to the URI.
For the CA SiteMinder® SPS to use rewritable session schemes, such as simple URL session scheme, in a federated environment, configure cookieless federation.
To configure cookieless federation
cookielessfederation="yes"
Note: No separate post filter, such as the CookielessFedFilter needs to be enabled for the SPS federation gateway. This functionality is provided out-of-the-box when you enable the federation gateway functionality. You have to enable this post filter when the SPS is not acting as a federation gateway.
If you deploy the CA SiteMinder® SPS in a federated environment, one of the session schemes you can use at the site producing assertions is a simple URL session scheme. If you use this scheme, you may be required to rewrite the links that direct the user to the appropriate site so that the session key is added to the link. In SiteMinder documentation, these links for SAML 1.x are called intersite transfer URLs. For SAML 2.0, these links are referred to as an unsolicited response or an AuthnRequest link.
For rewriting the links so that the session key information is added to the base of the URLs, a sample post filter, RewriteLinksPostFilter, is provided along with the CA SiteMinder® SPS filter examples. This filter can be compiled and be attached to the appropriate proxy rule, which handles the forwards to the intersite transfer URL, unsolicited response, or AuthnRequest.
The RewriteLinksPostFilter provided with the CA SiteMinder® SPS is a sample filter. You must configure the filter to suit your requirements.
Note: If you use the simple_url session scheme for transactions involving the SPS federation gateway, the session key (SMID) gets added to the request as a query parameter instead of being appended to the URI. However, the SMID gets added to the URI when the final target resource is accessed at the back-end server.
Some wireless devices have a unique device identification number. This number is sent as a header variable with any requests for resources. The CA SiteMinder® SPS can use this device ID as a token to refer to session information in the session store.
Because device IDs differ by wireless device vendor, define a device ID session scheme in the server.conf file. This scheme must include the class information and a device_id_header_name directive that is set to the vendor-specific device ID.
The format of the device ID scheme is:
<SessionScheme name="device_id">
class="com.netegrity.proxy.session.DeviceIdSessionScheme"
accepts_smsession_cookies="false"
device_id_header_name="vendor_device_id_header_name"
</SessionScheme>
The following table illustrates the scenarios in which each session scheme is used. The session schemes are based on the sensitivity of resources on a virtual host.
|
Session Scheme |
Security Level |
Recommendation |
|---|---|---|
|
SSL Session ID |
High |
This scheme provides a clean and highly secure means of holding user sessions. Although the most secure of the available schemes, it is limited in scalability. All content must be served over SSL and the user must continue to access the same CA SiteMinder® SPS server for the session to persist. Also, some browsers (some versions of IE), by default, terminate the SSL session after 2 minutes. This scheme is ideal for intranet and extranet applications with high security needs. |
|
SiteMinder Cookies |
Medium or High |
This scheme is the traditional SiteMinder session mechanism, which has proven highly secure in many enterprise deployments. For maximum security, the WebAgent SecureCookie setting are set to "Yes". |
|
IP Address |
Low |
This scheme is only for applications where users are retrieving information (with HTTP GET) from protected resources and not sending (with HTTP POST) information to a secure application. An example of an appropriate application would be an online library. An example of an in-appropriate application would be a bond trading application. |
|
Mini-Cookies |
Medium or High |
This scheme is ideal for applications where user clients accept cookies but are accessing the application over connections of limited speed and bandwidth. For maximum security, the WebAgent SecureCookie setting is set to "Yes". |
|
Simple URL Rewriting |
Medium |
This scheme is ideal for environments that do not support or want to use cookies. |
|
Device ID |
Medium |
This scheme is designed for wireless environments where a device ID is sent with every client request to identify a user. |
The CA SiteMinder® SPS supports multiple session schemes for each virtual host in an enterprise. Session schemes can be assigned to each user agent type that has access to a virtual host. The following illustration shows the CA SiteMinder® SPS configured for four virtual hosts.
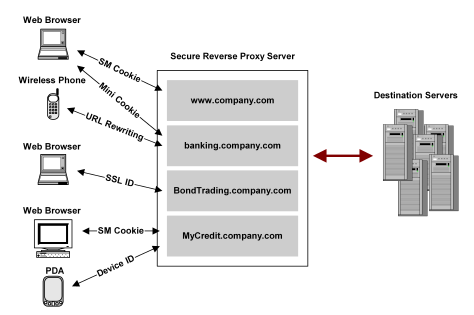
The preceding illustration shows that the session scheme varies for a user agent depending on the virtual host accessed by the user. For example, when accessing www.company.com with a browser, the CA SiteMinder® SPS uses SiteMinder cookies to maintain a user session. But when accessing BondTrading.company.com, browser sessions are maintained using the SSL ID of the user HTTPS connection. The sessions for PDA and wireless users are maintained using cookieless session schemes, while browser user sessions are maintained through cookies or mini-cookies.
To support environments that do not want to exchange cookies, the CA SiteMinder® SPS maps the SiteMinder session cookies to a cookieless session scheme and deletes the cookies from the response. However, the attribute cookies are not mapped and remain in the response.
The FWS application processes the federation requests and inserts attribute cookies and SiteMinder-created session cookies in its responses. The responses are forwarded to the SPS.
The CA SiteMinder® SPS can be configured to delete the attribute cookies inserted by the FWS application.
To configure the CA SiteMinder® SPS to delete session and attribute cookies
The file is located in the directory sps_home/secure-proxy/proxy-engine/conf.
deleteallcookiesforfed="yes"
User agents define the device types such as web browsers, wireless phones, and PDAs by which users can access network resources. All user agents must be defined in <UserAgent> elements. Each <UserAgent> element includes a name attribute that identifies the user agent type. By default no user agent types are predefined in the server.conf file.
The user agent configuration section has the following format:
#<UserAgent name="user_agent_name_1">
#  header_name_1=some regular expression
# </UserAgent>
The directive in the UserAgent section is:
This directive contains the user-agent header of an HTTP request. This header indicates the type of device making the request. You can use regular expressions and provide a partial name as part of the expression. This allows you to specify user agent types whose user-agent header may contain slight differences, such as version numbers.
Device types must be defined in a <UserAgent> element before they can be associated with a session scheme in a <SessionSchemeMapping> element.
You can specify a Nokia user agent type, which is for Nokia wireless phones. The name attribute for the <UserAgent> section is the name used to identify the user agent type when specifying session scheme mappings.
The Nokia user agent entry format would be as follows:
# Nokia
<UserAgent name="Nokia">
User-Agent="Nokia."
	attribute_name="value"
</UserAgent>
The directives for the Nokia user agent are as follows:
This directive contains the contents of the user agent header of an HTTP request. This header indicates the type of device making the request. You can use regular expressions and provide a partial name as part of the expression. This directive allows you to specify user agent types whose User-Agent header can possibly contain slight differences, such as version numbers.
Default: Nokia
The sections of the server.conf for wireless devices and other user agent types can possibly contain additional attributes and values for those attributes. Attributes are not required, but can possibly be desirable for some applications.
The <VirtualHostDefaults> element of the server.conf file specifies default settings for virtual hosts. These settings are used for each virtual host you add to the SPS.
To specify non-default values for a virtual host, add a <VirtualHost> element following the <VirtualHostDefaults> element. The <VirtualHost> element must contain directives and values that are different from the default virtual host.
The default virtual host settings are broken up into the following sections:
The format of the <VirtualHostDefaults> section is as follows:
<VirtualHostDefaults>
# default session scheme
defaultsessionscheme="default"
enablerewritecookiepath="no"
enablerewritecookiedomain="no"
enableproxypreservehost="no"
filteroverridepreservehost="no"
# specify the block size for request and response in KBs
requestblocksize="4"
responseblocksize="4"
#TO-DO: Define any session scheme mappings
#<SessionSchemeMappings>
#    user_agent_name=session_scheme_name
#</SessionSchemeMappings>
# Web Agent.conf
<WebAgent>
sminitfile="C:\Program Files\netegrity\secure-proxy\proxy-engine\
conf\defaultagent\WebAgent.conf"
</WebAgent>
</VirtualHostDefaults>
The virtual host configuration in the server.conf file includes the enablerewritecookiepath and enablerewritecookiedomain parameters, which you can use to manage cookies generated by a destination server that sits behind the SPS. When the CA SiteMinder® SPS receives a request from a client, the CA SiteMinder® SPS authenticates the user and directs the client to the requested destination server. The destination server generates a cookie that it places in the browser, then the CA SiteMinder® SPS sends the user back the client response with the cookie. After receiving the response from the SPS, the client stores the cookie.
When the client sends a subsequent request, the browser retrieves the stored cookie associated with the URL. In some cases, the destination server can possibly have set the cookie path to its own resource URI and not to the URI of the initial request. As a result, when the client sends the subsequent request, the browser contains the wrong cookie or does not even have a cookie. The request is received at the destination server with the wrong cookie or with no cookie at all.
To help ensure that the correct cookie is set in the browser, you can configure the CA SiteMinder® SPS to rewrite the cookie path and cookie domain. The destination server sets the cookie path and cookie domain to the URI of the resource on the CA SiteMinder® SPS server. The client can send the correct cookie back with subsequent requests to SPS.
The two parameters operate as follows:
Instructs the CA SiteMinder® SPS to rewrite the cookie path to the URI of the initial request from the URI set by the server that sits behind the proxy.
Default: no
Instructs the CA SiteMinder® SPS to rewrite the cookie domain from the domain set by the server sitting behind the proxy to the domain of the initial request.
Default: no
Example
The client requests a CA SiteMinder® SPS resource http://mysps.ca.com/basic/test/page0.html. With the enablerewritecookiepath set to yes, the cookie path is rewritten to /basic/test before the browser is sent back to the client. This cookie is rewritten regardless of the cookie path that was originally in the cookie received by CA SiteMinder® SPS from the destination server.
To rewrite backend cookie paths and domain
You can preserve the HTTP HOST header file and send it to the backend server by using the enableproxypreservehost parameter. To use the enableproxypreservehost parameter, perform the following steps:
enableproxypreservehost
When you enable enableproxypreservehost, the parameter takes precedence over a filter that is configured to control the HTTP HOST header. To disable enableproxypreservehost and let the filter take precedence over the parameter, perform the following steps:
filteroverridepreservehost
You can enable filteroverridepreservehost only if a filter is available to control the HTTP HOST header.
The CA SiteMinder® SPS handles the transfer of large files to users by breaking up the data transferred between the CA SiteMinder® SPS and the backend server into blocks. You control the block size read by the CA SiteMinder® SPS using two parameters in the Virtual Host section of the server.conf file:
When a user sends a file to a backend server, the CA SiteMinder® SPS verifies the requestblocksize specified for that virtual host. Based on the value of requestblocksize, the CA SiteMinder® SPS breaks down the data into blocks and then forwards the blocks to the backend server.
Similarly, when the backend server sends data to the user, the CA SiteMinder® SPS verifies the responseblocksize specified for that virtual host. Based on the value of responseblocksize, the CA SiteMinder® SPS reads the data in blocks from the backend server before further processing the blocks. This enables the user to control the number of read-write operations for such file transfers. To handle large file transfers, use large block sizes.
Note: The requestblocksize and responseblocksize parameters should be defined in proportion to the available and allocated JVM heap size for the CA SiteMinder® SPS java process.
To define the block size to handle large files when you configure the block size for a virtual host, modify the request and response block sizes for each virtual host. These parameters are valid only for that virtual host. The data block sizes can be different for different virtual hosts, but the settings only apply to the associated virtual host you are configuring.
Follow these steps:
Defines the block size of the request data that will be read at a time before the data blocks are sent to the backend server. The block sizes are in KB.
Limits: 1KB to approximately 352000 KB. For any value greater than or equal to 8 KB, chunks of 8 KB are created. A corresponding chunk size is create for values between 1 KB and 8 KB.
Default: 4
Defines the block size of the response data that will be read at a time before the data blocks are forwarded from the backend server to the user. The block sizes are in KB.
Limits: 1KB to approximately 352000 KB.
Default: 8
The requestblocksize and responseblocksize parameters are defined in proportion to the available and allocated JVM heap size for the CA SiteMinder® SPS java process.
To define CA SiteMinder® SPS JVM heap size
Session scheme mappings associate session schemes with user agent types. The user agent types defined in <UserAgent> elements of the server.conf file must be mapped to session schemes defined in the <SessionScheme> elements.
The format of the session scheme mapping associated with user agents is as follows:
#<SessionSchemeMappings>
# user_agent_name=session_scheme_name
#</SessionSchemeMappings>
The directive in this section is:
Associates a user agent with a session scheme. To set the values:
Specifies a name defined in a <UserAgent> section of the file
Specifies a scheme defined in a SessionScheme element.
Example:
User Agents named browser, phone1, and phone2 have been defined and mapped to any of the session schemes defined in the file. For this example, browser is mapped to the default session scheme, phone1 is mapped to the simple_url scheme, and phone2 is mapped to the minicookie session scheme.
The resulting <SessionSchemeMappings> element appears as follows:
# Session Scheme Maps
<SessionSchemeMappings>
  browser="default"
  phone1="simple_url"
  phone2="minicookie"
</SessionSchemeMappings>
The server.conf file includes a <WebAgent> section for the <VirtuallHostDefaults>. The sminitfile directive specifies the configuration file, WebAgent.conf for the default web agent. If local configuration is allowed, the WebAgent.conf file points to a local configuration file, LocalConfig.config.
If you create more than one virtual host, you can use the default Web Agent when you do not intend to use alternate settings in the Web Agent configuration file. If you plan to set any directive differently, for example, to specify a different log level, use a different Web Agent for the new virtual host.
To configure a new Web Agent for a new virtual host
Run smreghost if the new Web Agent points to a different SiteMinder installation.
Note: If the Web Agent configuration objects for both virtual hosts point to the same SiteMinder installation, you do not need to run smreghost. You can use the same smhost file for both the Web Agents.
ServerPath="path"
Specifies is the fully qualified path to the WebAgent.conf file you are editing
Note: For detailed information about the Web Agent settings, see the CA SiteMinder Web Agent Guide.
The requirecookies setting in the server.conf file is a special Web Agent setting that is useful only if basic authentication was set during the Policy Server configuration. This setting instructs the agent to require either an SMSESSION or an SMCHALLENGE cookie to process HTTP requests successfully, including basic Authorization headers.
If you configure the embedded Web Agent to require cookies, the browser must accept HTTP cookies. If the browser does not, the user receives an error message from the Agent denying them access to all protected resources.
Set the requirecookies setting to yes when all user agent types for the associated virtual server use the default session scheme. If an agent type uses a cookieless session scheme, set the requirecookies parameter to no.
Some destination servers can respond to a request from the CA SiteMinder® SPS with a redirection.
Note: A redirection that is the result of a request to the CA SiteMinder® SPS is not the same as a redirect that occurs in a proxy rule. For information about a redirect in a proxy rule, see nete:redirect.
Because the redirection initiated by the destination server is likely to a server behind the DMZ, the URL specified in the redirection results in an error. However, you can include parameters in a virtual host configuration that substitute the virtual host server name and port number in place of a redirect from a destination server.
To substitute the virtual host server and port for redirect writing, configure the following:
Enables or disables redirect rewriting. If this directive is set to a value of yes, the URL for a redirect initiated by a destination server is examined by the SPS. If the redirect URL contains a string found in the list of strings specified in the associated redirectrewritablehostnames parameter, the server name and port number of the redirect are replaced by the server name and port number of the virtual host.
If the parameter is set to a value of no, any redirects initiated by destination servers are passed back to the requesting user.
Contains a comma-separated list of strings that the CA SiteMinder® SPS searches for when a redirection is initiated by a destination server. If any of the specified strings are found in the server or port portion of the redirect URL, the CA SiteMinder® SPS substitutes the name and port number of the virtual host for the server name and port portion of the redirect URL.
If you specify a value of "ALL" for this parameter, the CA SiteMinder® SPS substitutes the server name and port number of the virtual host for all redirects initiated by the destination server.
For example, consider a virtual host configuration in the server.conf file that contains the following parameters:
<VirtualHost name="sales">
hostnames="sales, sales.company.com"
enableredirectrewrite="yes"
redirectrewritablehostnames="server1.company.com,domain1.com"
</VirtualHost>
When a user makes a request from http://sales.company.com:80, the CA SiteMinder® SPS forwards the request to a destination server according to proxy rules. If the destination server responds with a redirect to server1.internal.company.com, the redirect is rewritten before being passed to the user as sales.company.com:80.
Note: The proxy rules for the CA SiteMinder® SPS must be configured to handle the redirected requests.
For the CA SiteMinder® SPS to act as a virtual host for one or more host names, configure a <VirtualHost> element for related hostnames and IP addresses. Each server.conf file must contain one <VirtualHost> element for the default virtual host, in addition to additional elements for hostnames at other IP addresses.
The following is an example of a <VirtualHost> element for the default virtual host in a server.conf file.
# Default Virtual Host
<VirtualHost name="default">
hostnames="home, home.company.com"
addresses="123.123.12.12"
</VirtualHost>
The default virtual host in the preceding example is the host named home.company.com residing at IP address 123.123.12.12. You can add hostnames that resolve as the default virtual host by adding to the comma-separated list of values in the hostnames. To add additional virtual hosts to the proxy configuration, add additional <VirtualHost> elements that include hostname directives for the additional virtual hosts.
Example:
To add a sales virtual host for the server, sales.company.com virtual host, add the following element:
<VirtualHost name="sales">
hostnames="sales, sales.company.com"
</VirtualHost>
The <VirtualHostDefaults> settings are used for all virtual hosts defined in the server.conf file unless you explicitly enter settings for a particular virtual host.
You do not have to reconfigure all the virtual settings for the single virtual host. Any settings that you do not redefined in the <VirtualHost> element are applied from the <VirtualHostDefaults> settings.
To override virtual host default values
Example
The virtual host named "sales" requires a default session scheme from what is configured for the default virtual host. The <VirtualHost> element could be modified as follows:
<VirtualHost name="sales">
hostnames="sales, sales.company.com"
addresses="123.123.22.22"
defaultsessionscheme="minicookie"
</VirtualHost>
|
Copyright © 2013 CA.
All rights reserved.
|
|