

The CA SiteMinder for Secure Proxy Server is a stand-alone server that provides a proxy-based solution for access control. CA SiteMinder® SPS employs a proxy engine that provides a network gateway for the enterprise and supports multiple session schemes that do not rely on traditional cookie-based technology.
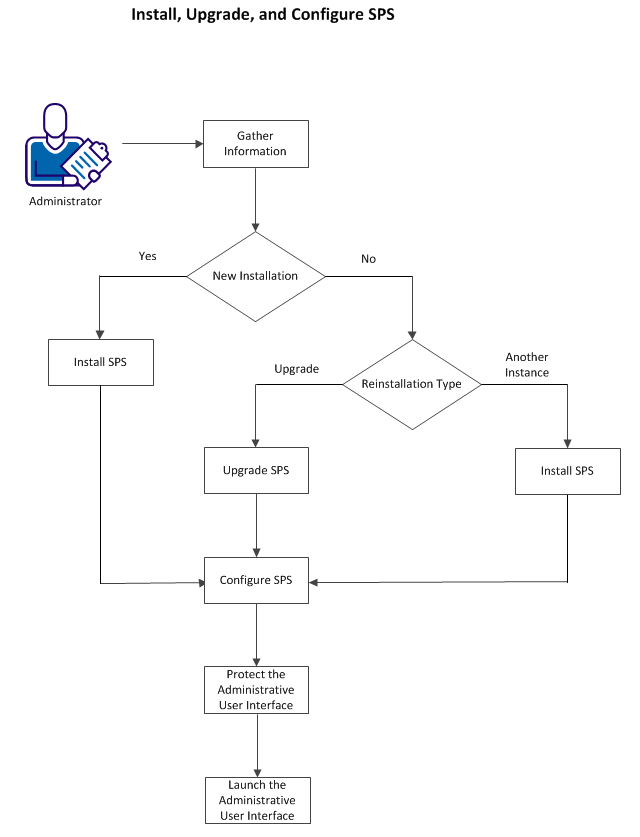
The following diagram describes how you can install and configure CA SiteMinder® SPS:
Before you install or upgrade CA SiteMinder® SPS, verify the following prerequisites:
Note: These libraries must be 32-bit binaries rather than 64-bit binaries.
Apply the patches to the following files on your system:
These files are in the following directories:
Windows: jre_home\lib\security
UNIX: jre_home/lib/security
jre_home
This variable specifies the location of the Java Runtime Environment installation.
Windows
CA RiskMinder Service READY
UNIX
CA RiskMinder Service READY
CA SiteMinder® SPS configuration wizard displays a series of prompts for registering a trusted host. A trusted host is a client computer where one or more SiteMinder Web Agents can be installed. To establish a connection between the trusted host and the Policy Server, register the host with the Policy Server. After registration is complete, the registration tool creates the SmHost.conf file. When this file is created, the client computer becomes a trusted host.
Before you install, upgrade, or configure CA SiteMinder® SPS, verify that you gathered the following information required for host registration, embedded Apache web server and Tomcat server:
|
Parameter |
Description |
|---|---|
|
SiteMinder administrator name |
Name of the administrator that matches the name already defined at the Policy Server. This administrator must have the privileges to create a trusted host. |
|
SiteMinder administrator password |
Password of the SiteMinder administrator who has privileges to register a trusted host. Must match the password used at the Policy Server. |
|
Trusted host name |
Name of the trusted host assigned during the installation. |
|
Host Configuration Object |
Name of a host configuration object already defined in Administrative UI. |
|
Agent Configuration Object |
Name of an existing Agent Configuration Object defined in Administrative UI. |
|
IP address of the Policy Server where the host is registered |
Note: Include a port number when SiteMinder is behind a firewall. For example, 111.12.12.2:12. |
|
Agent Name |
Name of the default agent or an agent defined in the ACO. |
|
Master Key |
Identifies the master encryption key for the advanced authentication server. Enter the same value that you configured in the Policy Server. |
|
Host Configuration File name and location |
Identifies the SmHost.conf file, which Web Agents and custom Agents use to act on behalf of the trusted host. The wizard lists the default location. |
|
Name and location of the Web Agent configuration file |
The wizard lists the default location. |
|
Email address of the Apache web server administrator |
The email address for the administrator Default: admin@company.com. |
|
Fully qualified host name of the server |
A fully qualified name in the following format: computer_name.company.com. |
|
Port number for Apache HTTP requests |
The port listening for HTTP requests from Apache. Default: 80 |
|
Port number for Apache SSL requests |
The port listening for SSL requests from Apache. Default: 443 |
|
Port number for Tomcat HTTP requests |
The port listening for HTTP requests from Tomcat. Default: 8080 |
|
Port number for Tomcat SSL requests |
The port listening for SSL requests from Tomcat. Default: 543 |
|
Port number for Tomcat shutdown requests |
The port listening for shutdown requests from Tomcat. Default: 8005 |
|
Port number of AJP |
The port number of AJP. Default: 8009 |
Before you install CA SiteMinder® SPS, verify that you have gathered the information required to install CA SiteMinder® SPS.
Follow these steps:
The installation program starts.
Note: By default, CA SiteMinder® SPS sets the instance name of the first installation as default. You cannot modify the default value and you cannot use the name for any other CA SiteMinder® SPS instance.
CA SiteMinder® SPS supports installations on Linux and Solaris.
Follow these steps:
Solaris: ca-proxy-12.5-sol.bin
Linux: ca-proxy-12.5-rhel30.bin
sh ./ca-proxy-12.5-sol.bin
sh ./ca-proxy-12.5-rhel30.bin
You can check the InstallLog file to verify that CA SiteMinder® SPS installation is successful. By default, the InstallLog is installed in the following location on all platforms:
sps_home\install_config_info\CA_SiteMinder_Secure_Proxy_Server_InstallLog.log
You can install multiple CA SiteMinder® SPS instances on the same computer. Each CA SiteMinder® SPS instance uses a unique instance name and ports for communication, and creates a separate directory structure.
Follow these steps:
The installation program starts.
Note: Verify that you enter unique values for the instance name and the different ports that are used for communication.
You can run the installation program to upgrade from a previous version of CA SiteMinder® SPS to the current version.
Note: If you configured filters or customized session schemes, take a back up of the lib directory from the Tomcat/ path before you upgrade.
Follow these steps:
The installation program starts.
At the end of the installation process, you can perform some additional steps to support the upgrade. Depending on the amount of customization in your CA SiteMinder® SPS deployment, you can perform one or more of the following tasks:
<install-path>/secure-proxy/proxy-engine/sps-ctl startssl
You can customize Java Virtual Machine (JVM) parameters in the following files:
After you install CA SiteMinder® SPS, run the configuration wizard. The configuration wizard lets you register the trusted host for the embedded SiteMinder Web Agent and performs some administrative tasks for the embedded Apache web server.
Important! Before you run the wizard, verify that you have set up the required objects at the Policy Server where you want to register the host. If these objects are not configured, trusted host registration fails.
Follow these steps:
Windows: ca-sps-config.exe
UNIX: ca-sps-config.sh
The configuration wizard starts.
Note: The information you enter must already be defined at the Policy Server where the trusted host is registered.
Note: The name you enter for the trusted host must be unique. The name for the Host Configuration Object must already be defined at the Policy Server where the trusted host is registered.
Note: The Agent Configuration Object that you enter must already be defined at the Policy Server where the trusted host is registered.
Note: Users installing on systems running Solaris or Linux see an additional screen that prompts for the name of the user under which Tomcat and Apache runs. This user cannot be root. Create the user account manually; the installation program does not create it for you. The Tomcat user must have all privileges (rwa) for the log directories.
CA SiteMinder® SPS is configured and the configuration files are installed.
Note: If you run the Configuration Wizard again, SSL must be reinitialized.
After installing CA SiteMinder® SPS and running the configuration wizard, you can modify CA SiteMinder® SPS configuration to suit your environment. The following configuration files contain settings that affect CA SiteMinder® SPS:
Contains the settings for the Apache web server.
Contains the settings that determine CA SiteMinder® SPS behavior, including virtual hosts, and session scheme mapping.
Contains the settings that determine CA SiteMinder® SPS logging behavior.
Contains the rules that determine how CA SiteMinder® SPS handles incoming requests.
By default, CA SiteMinder® SPS enables Session Assurance. If you want to disable the feature, perform the following steps:
Beginning with CA SiteMinder® SPS v6.0, the default location of the SiteMinder forms is no longer /siteminderagent/forms. To continue to use this location to serve forms, modify the CA SiteMinder® SPS forms location.
Follow these steps:
sps_home/proxy-engine/examples/siteminderagent
sps_home/proxy-engine/examples
to the following directory:
sps_home/proxy-engine/examples/siteminderagent
The forms are copied to sps_home/proxy-engine/examples/siteminderagent/forms.
Note: If you customize the location of the forms folder, ensure that you update the httpd.conf file with the location of the forms images.
By default, the installer creates a protection policy to protect the Administrative User Interface. The installer uses the defined Agent Name to create the protection policy with the following details:
The protection policy does not contain the user directory information. Perform the following steps to log in to the Administrative User Interface:
You can launch the Administrative User Interface after you start the proxy engine services. To launch the URL, enter the following URL in a web browser:
http://fullyqualifiedhostname:Tomcat_port/proxyui/
CA SiteMinder® SPS is installed or upgraded, and is configured.
If you want to perform a silent installation and configuration after the first installation, see Silent Installation and Configuration. If you want to uninstall CA SiteMinder® SPS, see Uninstall CA SiteMinder® SPS. If you want to start CA SiteMinder® SPS in various modes, see Start CA SiteMinder® SPS in Single-Process or Multiple Process Mode. If you want to modify the default location of the SiteMinder forms, see Modify the Default Location of the SiteMinder Forms.
|
Copyright © 2014 CA Technologies.
All rights reserved.
|
|