

CA SiteMinder® currently offers an authentication web service and an authorization web service. The process of working with the CA SiteMinder® authentication and authorization web services includes the procedures shown in the following diagram:
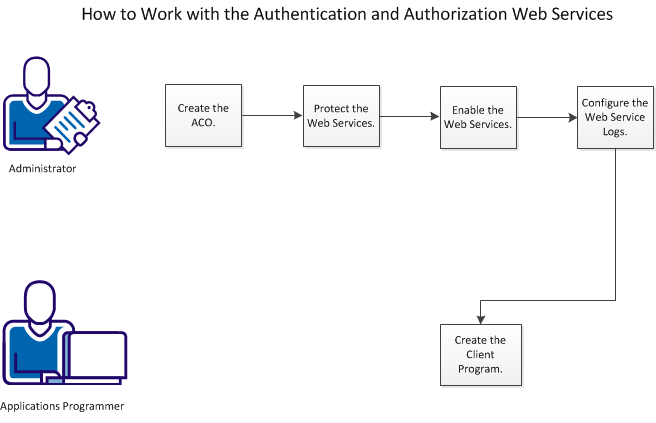
To work with the authentication and authorization web services, perform the following steps:
The CA SiteMinder® authorization and authentication web services are part of the CA SiteMinder® SPS installation. You can enable or disable them individually.
The web services configuration process presupposes configuration of the following CA SiteMinder® objects:
You can use the authentication and authorization web services to support an application that is not otherwise protected. A free-standing application on a mobile phone, for example, can authenticate a user when the appropriate CA SiteMinder® objects are available.
These web services support the SOAP 1.2 protocol and the HTTP-based RESTful architecture. The authentication and authorization web services provide the following functionality:
Note: If the Enable User Tracking option is enabled, the response contains an identity token additionally.
The response to a request of an operation is dependent on the corresponding SiteMinder generated headers. If a resource is protected with the Anonymous authentication scheme, the response does not contain a session token but contains an identity token. The identity token can be used in the subsequent authorization request instead of a session token.
An authentication request includes the following parameters:
The appId references a user-defined logical name for the location of a hierarchy of resources, not a CA SiteMinder® Application object. Internally, the appId maps to an agent. CA SiteMinder® uses the agent name to determine the realm. The realm, the resource string, and user credentials are enough to authenticate the user.
An authorization request is simpler than an authentication request. The authorization request includes an appId, resource path, action, and session token, obtained from the login response. The web service validates the token and determines whether to grant access to the specified resource.
By default, the web services feature is installed when you install or upgrade to CA SiteMinder® SPS 12.51.
To configure the web services, perform the following steps:
You can manage the web services through an ACO. The ACO is also used for resource access protection and must be defined in AgentName. To use the web services, you must enable the enableauth parameter or the enableaz parameter or both.
Follow these steps:
Defines the names of the web agent that protects a resource, and the defaultagentname or the agent name of the ACO that protects the web services. You must append these values in AgentName.
To define multiple web agents that protect an application, enter a multi-value pair in the following format:
agent_name1,appID1
agent_name2,appID2
agent_namen,appIDn
Defines the name of the web agent that protects a resource.
Defines the reference name of the web agent that was specified in agent_name or of the application that is protected by the web agent. CA SiteMinder® uses this value in the web services requests, thus protecting the agent name from the users.
Append the specified AgentName with the defaultagentname or the agent name of the ACO that protects the web services.
To use the agent name of the ACO that protects the web services, define the agent name in the the following format:
agent_name,hostname
To use the defaultagentname of the ACO that protects the web services, define the agent name in the following format:
agent_name
Specifies the status of the authentication web service. If you want to use the authentication web service, set the value to yes.
Specifies the status of the authorization web service. If you want to use the authorization web service, set the value to yes.
Specifies whether the web services must be protected by a CA SiteMinder® agent. In a production environment, we highly recommended that you set this value to yes and protect the web services by a CA SiteMinder® Agent. If you set the value to yes and the web services are not protected, the requests to web services fail.
Note: The value of RequireAgentEnforcement can be set to no in a test environment or if the web services are protected by any other mechanism other than CA SiteMinder®.
We recommend that you protect the web services in a production environment. Protecting the web agent of the web services lets CA SiteMinder® authenticate and authorize the web services client before a user request is processed. When you protect the web services in your production environment, CA SiteMinder® SPS includes the SMSESSION cookie into the user request. If the RequestSmSessionCookie ACO parameter is enabled, CA SiteMinder® ensures that the web services verify the user request for the SMSESSION cookie before processing the user request.
To protect the web services, we recommend that you configure CA SiteMinder® SPS to protect the web services root URL using the X.509 Client Certificate authentication scheme.
Use the ACO that you created in the previous procedure to enable the web services through Administrative UI.
Note: If the values of enableauth and enableaz are set to no, the web services do not function even though you enable the support through CA SiteMinder® SPS Admin UI.
Follow these steps:
The web services are enabled.
When you enable the web services, CA SiteMinder® SPS saves the logs of the web services in the server.log file. You can change the log location from server.log to authazws.log.
If you want to change the log location, perform the following steps:
<appender name="AuthAZ_ROLLING" class="org.apache.log4j.DailyRollingFileAppender">
<param name="File" value="logs/authazws.log"/>
	<layout class="org.apache.log4j.PatternLayout">
	<param name="ConversionPattern" value="%d %-5p [%c] - %m%n"/>
</layout>
</appender>
<appender-ref ref="AuthAZ_ROLLING"/>
The log location is changed to the authazws.log file, which is located in sps_home/proxy-engine/logs/.
The function of the client program is to issue authentication and authorization requests to the web service on behalf of another application. The client program requires code for a client stub. The stub manages, sends, and receives messages to communicate with the web service. The web service support a WSDL file (for the SOAP protocol) and a WADL file (for the REST architecture). You can access the WSDL or WADL file using a web browser, and then save it as an XML file.
Follow these steps:
http://hostname:port/authazws/auth?wsdl
http://hostname:port/authazws/AuthRestService/application.wadl
Note: To retrieve the metadata from these locations, be sure to set the DefaultAgentName parameter in the ACO to one of your agents.
The sections that follow list simplified sample SOAP and REST messages for reference.
These simplified samples show authentication works using the SOAP protocol. Most authentication schemes can be supported by an IdentityContext consisting of just three fields, username, password, binaryCredentials. Other schemes, requiring more fields are supported by additional operations whose inputs are tailored to the credential type.
The following example is an authentication web service normal user login request:
<s:Envelope xmlns:s="http://www.w3.org/2003/05/soap-envelope"
            xmlns:aut="http://ca.com/2010/04/15/authentication.xsd">
  <s:Header/>
  <s:Body>
    <aut:login>
      <identityContext>
        <binaryCreds>
        </binaryCreds>
        <password>user1</password>
        <userName>user1</userName>
      </identityContext>
      <appId>app1</appId >
      <action>GET</action>
      <resource>/*</resource >
    </aut:login>
  </s:Body>
</s:Envelope>
The blogin operation (Boolean Login) is similar to the login operation. However, blogin does not return a SMSESSION value in the response, as shown in the following example:
<s:Envelope xmlns:s="http://www.w3.org/2003/05/soap-envelope"
            xmlns:aut="http://ca.com/2010/04/15/authentication.xsd">
  <s:Header/>
  <s:Body>
    <aut:blogin>
      <identityContext>
        <binaryCreds>
        </binaryCreds>
        <password>user1</password>
        <userName>user1</userName>
      </identityContext>
      <appId>app1</appId >
      <action>GET</action>
      <resource>/*</resource >
    </aut:blogin>
  </s:Body>
</s:Envelope>
The following example represents a successful login response:
<s:Envelope xmlns:s="http://www.w3.org/2003/05/soap-envelope">
  <s:Header/>
  <s:Body>
    <aut:loginResponse xmlns:aut="http://ca.com/2010/04/15/authentication.xsd">
      <return>
        <message>Authentication successful.</message>
        <resultCode>LOGIN_SUCCESS</resultCode>
        <sessionToken>session</sessionToken>
	<responses>
	  <response/>
	  <response/>
	</responses>
      </return>
    </aut:loginResponse>
  </s:Body>
</s:Envelope>
The following example represents a failed login attempt:
<s:Envelope xmlns:s="http://www.w3.org/2003/05/soap-envelope">
  <s:Header/>
  <s:Body>
    <ns2:loginResponse xmlns:ns2="http://webservice.sm.services.soa.ca.com/">
      <return>
        <message>Authentication failured</message>
        <resultCode>LOGIN_FAILED</resultCode>
        <smSessionCookieValue/>
      </return>
    </ns2:loginResponse>
  </s:Body>
</s:Envelope>
The following example represents an authentication web service user logout request:
Note: Even though a user has successfully logged out, the agent can still use the SessionToken to authorize, because it is considered to be a valid user credential.
<s:Envelope xmlns:s="http://www.w3.org/2003/05/soap-envelope"
            xmlns:aut="http://ca.com/2010/04/15/authentication.xsd">
  <s:Header/>
  <s:Body>
    <aut:logout>
      <smSessionCookieValue>session</smSessionCookieValue>
    </aut:logout>
  </s:Body>
</s:Envelope>
The following example represents a successful authentication web service logout response:
<s:Envelope xmlns:s="http://www.w3.org/2003/05/soap-envelope">
  <s:Header/>
  <s:Body>
    <ns2:logoutResponse xmlns:ns2="http://ca.com/2010/04/15/authentication.xsd">
      <return>
        <message>Logout successful.</message>
        <resultCode>SUCCESS</resultCode>
      </return>
    </ns2:logoutResponse>
  </s:Body>
</s:Envelope>
REST means REpresentational State Transfer. In REST, service requests transform the state of objects accessible by URIs. HTTP drives state change using actions such as create, read, update, and delete.
The URI mapping for authentication and authorization consists of the appId and resourcePath. The resource state is the collections of authenticated or authorized users associated with the Resource. The service names for authentication are login, blogin, and logout.
A URI in this format, http://hostname:port/authazws/AuthRestService/login/appID/Resource, posts the following request:
<loginRequest>
      <binaryCreds></binaryCreds>
       <password>user1</password>
       <userName>user1</userName>
       <action>GET</action>
</loginRequest>
The login responses:
HTTP return code 200
<loginResponse>
<message>Authentication successful</message>
<resultCode>LOGIN_SUCCESS</resultCode>
<sessionToken>session</sessionToken>
<authenticationResponses>
	<response>
		<name>SM_SESSIONDRIFT</name>
		<value>0</value>
	</response>
</authenticationResponses>
</loginResponse>
HTTP return code 400
<loginResponse>
<message>Bad Request</message>
<resultCode>LOGIN_ERROR</resultCode>
</loginResponse>
HTTP return code 200
<loginResponse>
<message>Authentication Failed</message>
<resultCode>LOGIN_FAILED</resultCode>
<authenticationResponses>
	<response><name>SM_AUTHREASON</name>
	<value>0</value>
	</response>
</authenticationResponses>
</loginResponse>
HTTP return code 500
<loginResponse>
<message>System</message>
<resultCode>Server Error</resultCode>
</loginResponse>
The bLogin operation (Boolean Login) is similar to login. A URI in this form, http://host:port#/blogin/appId/resourcePath posts as shown in the login request. It returns yes or no in the response message.
A URI in this format, http://host:port#/authazws/AuthRestService/logout/, posts the following the logout request:
<logoutRequest>
<sessionToken>session</sessionToken>
</logoutRequest>
The authentication web service logout responses:
<logoutResponse>
<message>Logout Successful</message>
<resultCode>LOGOUT_SUCCESS</resultCode>
<smSessionCookieValue>yyy</smessionCookieValue>
</logoutResponse>

<logoutResponse>
<message>Logout Failed</message>
<resultCode>LOGOUT_FAILURE</resultCode>
<smSessionCookieValue>yyy</smessionCookieValue>
</logoutResponse>
The following XML approximates an authorization request to the web service:
<soapenv:Envelope xmlns:soapenv="http://schemas.xmlsoap.org/soap/envelope/" xmlns:aut="http://ca.com/2010/04/15/authorization.xsd">
   <soapenv:Header/>
   <soapenv:Body>
      <aut:authorize>
	<sessionToken>session</sessionToken>
           <appId></appId>
           <action>GET,POST</action>
	 <resource>/domainAdmin/a.jsp</resource>
      </aut:authorize>
   </soapenv:Body>
</soapenv:Envelope>
The following example represents an authorization web service AUTHORIZED response:
<env:Envelope xmlns:env="http://schemas.xmlsoap.org/soap/envelope/">
   <env:Header/>
   <env:Body>
      <ns2:authorizeResponse xmlns:ns2="http://ca.com/2010/04/15/authorization.xsd">
         <return>
            <message>Authorization Successful</message>
            <resultCode>AUTHORIZED</resultCode>
	<sessionToken>aklaks</sessionToken>
	<authorizationResponses>
	<response/>
	</authorizationResponses>
         </return>
      </ns2:authorizeResponse>
   </env:Body>
</env:Envelope>
The following example represents an authorization web service UN AUTORIZED response:
<env:Envelope xmlns:env="http://schemas.xmlsoap.org/soap/envelope/">
   <env:Header/>
   <env:Body>
      <ns2:authorizeResponse xmlns:ns2="http://ca.com/2010/04/15/authorization.xsd">
         <return>
            <message> Authorization Failed</message>
            <resultCode>NOTAUTHORIZED</resultCode>
         </return>
      </ns2:authorizeResponse>
   </env:Body>
</env:Envelope>
Note: For an authorization web service request with a valid session token, the NOTAUTHORIZED authorization response has the following constraints:
The REST interface for authorization is http://hostname:port/authazws/AuthRestService/authz/appID/Resource:
<authorizationRequest>
<action>POST</action>
<resource>RealmA/index.html</resource>
<sessionToken>affl;;alkf;l;fd</sessionToken>
</authorizationRequest>
HTTP return Code 200:
<authorizationResult >
<message>The user is authorized.</message>
<resultCode>AUTHORIZED</resultCode>
</authorizationResult >
|
Copyright © 2014 CA Technologies.
All rights reserved.
|
|