

CA SiteMinder® SPS supports SSL to provide a secure communication between client and server. CA SiteMinder® SPS uses the OpenSSL cryptography toolkit that implements the SSL v2/v3 and Transport Layer Security (TLS v1) network protocols and related cryptography standards that are required by the protocols. The OpenSSL toolkit includes the openssl command line tool for generating keys and certificates. The openssl executable image and supporting libraries are located in the installation_home\SSL\bin folder or the corresponding UNIX directory.
The following flowchart describes how to configure SSL for CA SiteMinder® SPS:
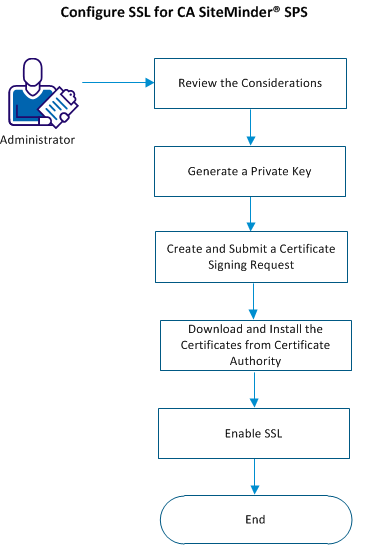
Follow these steps:
SSL is configured.
Before you configure SSL, review the following information about private keys and server certificates:
SSL uses keys to encrypt and decrypt messages. Keys come in pairs: one public key, and one private key.
Keys use various cryptographic algorithms and key exchange methods. For generating private keys for use with certificates, the RSA key exchange method with the Date Encryption Standard (DES) cryptographic algorithm is commonly used. The key output file is in an encrypted ASCII PEM format.
If you want to protect your server key, generate a private encrypted RSA server key.
Follow these steps:
installation_home\SSL\bin
Defines the directory where CA SiteMinder® SPS is installed.
Default: (Windows) [32-bit] C:\Program Files\CA\secure-proxy
Default: (Windows) [64-bit] C:\CA\secure-proxy
Default: (UNIX/Linux) /opt/CA/secure-proxy
.\openssl genrsa -des3 -out ..\keys\server.key [numbits]
Specifies the fully qualified domain name of the server.
Specifies the size in bits of the private key that must be generated.
Default: 1024
Range: 1024 - 2048
The private encrypted server keys are created and written to the specified key output file. The key output file is in the encrypted ASCII PEM format. As the file is encrypted, you will be prompted for a pass-phrase to protect it and decrypt it later if you want.
If you do not want to protect your server key, generate a private unencrypted RSA server key.
Follow these steps:
installation_home\SSL\bin
Defines the directory where CA SiteMinder® SPS is installed.
Default: (Windows) [32-bit] C:\Program Files\CA\secure-proxy
Default: (Windows) [64-bit] C:\CA\secure-proxy
Default: (UNIX/Linux) /opt/CA/secure-proxy
.\openssl genrsa -out ..\keys\server.key [numbits]
Specifies the fully qualified domain name of the server.
Specifies the size in bits of the private key that must be generated.
Default: 1024
Range: 1024 - 2048
The private unencrypted server key is generated.
Generate a certificate request or Certificate Signing Request using the private key. You can send the Certificate Signing Request to a Certificate Authority for signing into a certificate, or you can create a self-signed certificate for an internal demo.
Generate a Certificate Signing Request and submit it to a Certificate Authority that your organization uses.
Follow these steps:
.\openssl req -config .\openssl.cnf -new -key ..\keys\server.key -out ..\keys\server.csr
The system generates a certificate request with the certificate file name and a request number.
If you want to enable SSL for an internal demo, generate a self-signed certificate.
Follow these steps:
.\openssl req -config .\openssl.cnf -new -x509 -key ..\keys\server.key -out ..\certs\cert_name.crt
sps_home\SSL\certs
A self-signed certificate is generated.
Download the signed certificates from the Certificate Authority.
Follow these steps:
Default Path: installation_home\httpd\conf\extra\httpd-ssl.conf
You can enable SSL for an encrypted or unencrypted private key.
To enable SSL for an unencrypted private key on Windows, generate the spsapachessl.properties file.
Follow these steps:
installation_home\httpd\bin
configssl.bat -enable
Note: If an overwrite warning appears, confirm that you want to overwrite the existing spsapachessl.properties file.
SSL is configured.
To enable SSL for an unencrypted private key on UNIX, edit the spsapachessl.properties located in the following location:
installation_home/httpd/conf/spsapachessl.properties
Follow these steps:
apache.ssl.enabled=Y
apache.ssl.enabled=Y
SSL is configured.
To enable SSL for an encrypted private key, generate the spsapachessl.properties file.
Follow these steps:
Windows
installation_home\httpd\bin
UNIX
installation_home/httpd/bin
Windows
configssl.bat -enable passphrase
UNIX
configssl.sh passphrase
Note: The passphrase value must match the passphrase value of the server key. If an overwrite warning appears, confirm that you want to overwrite the existing spsapachessl.properties file.
SSL is configured.
The Apache server supports virtual hosts, which are multiple Web hosts that are run from a single Apache binary. Apache virtual hosts can be name-based or IP-based. Name-based virtual hosts can share a single IP address, while IP-based virtual hosts require a different IP address for each virtual host.
Apache virtual hosts using the SSL protocol:
The following is an example of a secure (HTTPS) virtual host:
<VirtualHost 10.0.0.1:443>
DocumentRoot ".../htdocs/site1"
ServerName www.site1.net
ServerAdmin webmaster@site1.net
ErrorLog logs/covalent_error_log_site1
TransferLog logs/...
SSLEngine on
SSLCertificateFile /www.site1.net.cert
SSLCertificateKeyFile /www.site1.net.key
CustomLog logs/cipher_log_site1 \
          "%t %h %{SSL_PROTOCOL}x %{SSL_CIPHER}x \"%r\" %b"
</VirtualHost>
|
Copyright © 2014 CA Technologies.
All rights reserved.
|
|