

|
|
|
You can use the Process Realms page to add new realms to CA XCOM Gateway.
To add new realms
The Home page appears.
The Admin page appears.
The Process Realms page appears.
The Add New Realms page appears.
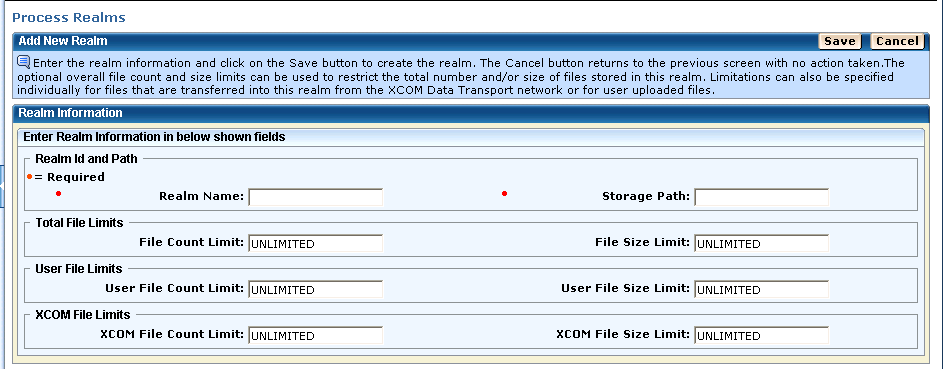
The storage path must define the path of a folder that can be accessed by the CA XCOM Gateway server and in which files associated with this realm are to be stored. The specified folder is not created by CA XCOM Gateway and must therefore be created manually before defining the realm. Multiple realms can share use of the same folder.
The total file limits define limits which apply to stored files of all types that are associated with this realm. In contrast, user file limits define limits for files associated with this realm that have been uploaded into CA XCOM Gateway by registered users by means of either HTTP(S) or FTP(S) upload, and XCOM file limits define limits for files associated with this realm that have been transferred into CA XCOM Gateway from CA XCOM Data Transport.
When a file limit is set to a value other than UNLIMITED, it restricts the number of files that can coexist in CA XCOM Gateway at any given time. When a size limit is set to a value other than UNLIMITED, it restricts the total size of the files that can coexist in CA XCOM Gateway at the same time. Size limits can be specified in bytes, or in kilobytes, megabytes, gigabytes, or terabytes, suffixed by K, M, G, or T respectively.
Note: The specified value is always rounded to the nearest number of kilobytes. For example, if 700 is entered as a size limit, it is automatically changed to 1024.
The new realm is added to CA XCOM Gateway and a confirmation message is displayed.
Note: If a realm already exists with the specified name, an error message is displayed.
The Add New Realms page also lets you use the following options:
| Copyright © 2011 CA. All rights reserved. | Tell Technical Publications how we can improve this information |