

As a report user you can create a filter and activate the filter for future use. The filter can be defined and saved in the database.
You can create two types of filters:
You create filters to:
Example
To demonstrate the use of filters, here is a simple example showing how you can customize the view of your reports.
The original report lists all accounts, including telephone numbers and cost centers:
CA View Browse - PROVRPT ------- Rec 0000000 Pg 0000000.000 Lock 00 Col 001 080
Command ===>                                                    Scroll ===> PAGE
********************************* TOP OF DATA **********************************
.SARPAGE 1
 .
 .   TBEXPFCN                                         TELECOMMUNICATIONS BILLING
 .                                                     FREQUENTLY CALLED NUMBERS
 .                                             FOR PERIOD 05/25/2013 THRU 06/01/
 ........................................................---------NAME----------
 ..DIALED NUMBER........COSTCENTER  ....STAT/AUTH CD.....LAST...............FIRS

 . 216 222 3333    ACCOUNTING SERVICES      15 2230    ACCOUNTING SERVICES
 . 216 222 3344    PRINT                    15 2635    PRINT
 . 216 222 3355    SPECIALTY AUTO APM       15 2657    COLLIN              DARRY
 . 216 222 3366    OUTSIDE PROD MGR         15 2411    LAMBERS             DAVID
 . 216 222 3534    HUMAN RESOURCES          15 2463    HUMAN RESOURCES
 . 216 222 3360    HUMAN RESOURCES          15 2465    RUSSEL              RACHA
 . 216 222 3560    HUMAN RESOURCES          15 2647    HENRY               WILLI
 . 216 222 3360    HUMAN RESOURCES          15 2465    RUSSEL              RACHA
 . 216 222 3530    TRAINING                 15 2647    HENRY               SHARI
 . 216 222 4233    TRAINING                 15 2646    SOFTWARE TRAINING
 . 312 555 2012    HUMAN RESOURCES          15 2465    WORTH               KENNE
You create a filter to display only those lines that contain the cost center HUMAN RESOURCES. Use the WHERE command to verify online that the cost centers begin in column 19 and finally define the filter specification. The filter in this example specifies that CA View must display each line containing the text HUMAN RESOURCES starting in column 19. (By leaving the Col End field, blank, you specify that CA View is to start in column 19 and check for the length of the specified text string.)
The report that is browsed with the filter selected and activated is as follows:
CA View Browse ---- PROVRPT ---- Rec 0000000 Pg 0000001.013 Lock 00 Col 001 080
Command ===>                                                    Scroll ===> PAGE
********************************* TOP OF DATA **********************************
 . 216 222 3534    HUMAN RESOURCES          15 2463    HUMAN RESOURCES
 . 216 222 3360    HUMAN RESOURCES          15 2465    RUSSEL              RACHA
 . 216 222 3560    HUMAN RESOURCES          15 2647    HENRY               WILLI
 . 216 222 3360    HUMAN RESOURCES          15 2465    RUSSEL              RACHA
 . 312 555 2012    HUMAN RESOURCES          15 2462    WORTH               KENNE
******************************** BOTTOM OF DATA ********************************
Note: The role Report User also includes and denotes the roles of System Administrator or End User.
The following diagram describes how a report user creates and uses filters.
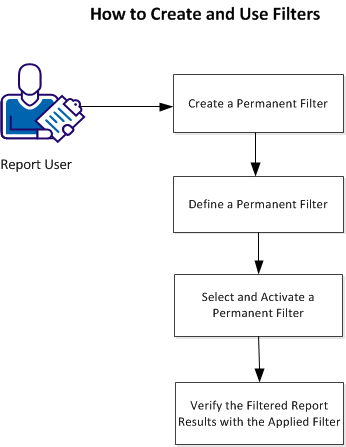
To create and use filters follow these steps:
Select and Activate a Permanent Filter
Verify the Filtered Report Results with the Applied Filter
You can create permanent filters and save them in the database by name. These filters can be used while browsing reports to display customized views of reports based on your specific requirements. A permanent filter can also be specified within a logical view. If specified within the logical view, the filter is applied whenever the logical view is selected or when viewing a report using the logical view.
Important! If a filter name is specified within multiple logical views, then any modifications that are made to the existing filter affect all the logical views using that filter.
Follow these steps:
The Filter Definition Specification List panel appears with the list of filters.
S filter-name
where
Specifies the name of a new or existing filter
The filter name that is specified opens. If the filter does not exist, a new filter is created.
Note: You can create a temporary filter as needed while browsing a report. To create a temporary filter:
FILTER CREATE or
FIL C
The Filter Definition Specification panel is displayed.
A permanent filter can be defined and saved in the database by a name. When, you select or create a filter from the filter definition selection list the filter definition specifications panel is displayed. You can define the filter on this panel.
Follow these steps:
The following illustration displays the Filter Definition Specifications panel:
CA View ALL ---------- Filter Definition Specifications ---- Row 00001 of 00001
 Command ===>                                                  Scroll ===> PAGE
   Filter ID   ---> FILTER1
   Description ===> THIS IS TEST FILTER1                               Emphasis

 Filter Specifications:                                                  C H L
    Records Columns                                                      l l o
Sel Beg End Beg End Op Text                                    Type Show r t c
            19      EQ 'HUMAN RESOURCES’                              N
 ******************************* Bottom of Data ********************************
The Filter Definition Specifications panel contains the following fields:
Specifies the lines on the unfiltered report that should be searched.
Specifies the columns on the unfiltered report that should be searched.
Specifies the comparison operator.
The options are:
The data that is being searched for on the unfiltered report page.
Note: If you want to include blank spaces preceding or following the text, you must explicitly specify the quotes around that text.
The Boolean connectors: AND, OR, NOT
Specifies whether lines that match the specified criteria are to be displayed (Y or N)
Specifies the color to be used for the displayed line. The options are:
Note: Only the first letter of the color must be specified.
Specifies the highlight attribute to be used for the displayed line. The options are:
Note: Only the first letter of the highlight attribute must be specified.
Specifies the coloring and highlighting to be applied to the report line. You can specify one of the following values:
Apply to ALL occurrences of the specified Text string on the report line.
Apply to the first occurrence of the specified Text string on the report line.
Apply to the entire report line.
You can select a filter and activate or deactivate it for your browse session. If you specify a filter name on the logical view definition panel, that filter is automatically selected and activated when you browse. The filter can be used to generate a customized report only after it is activated.
Follow these steps:
FILTER SELECT or
FIL S
The Filter Definition Specification List panel appears with the list of filters.
S filter-name or
Select a filter by placing an ’S’ next to the filter-name
where,
Specifies the name of an existing filter
The filter is selected and you are taken back to the report browse panel.
FILTER ON or
FIL N
The report is now displayed with the selected filter applied.
Note: You can deactivate a filter by using the FILTER OFF or FIL F command from the command line of the browse panel. The filter remains selected and can be edited, but the report is displayed without the filter being applied.
After you create and activate a filter, browse the report to verify that the filter is applied.
For example, you create a filter that displays only those lines including the cost center HUMAN RESOURCES and does not display the lines that contain the 216 area code.
The following report lists all accounts, including telephone numbers and cost centers:
CA View Browse - PROVRPT ------- Rec 0000000 Pg 0000000.000 Lock 00 Col 001 080
Command ===>                                                    Scroll ===> PAGE
********************************* TOP OF DATA **********************************
.SARPAGE 1
 .
 .   TBEXPFCN                                         TELECOMMUNICATIONS BILLING
 .                                                     FREQUENTLY CALLED NUMBERS
 .                                             FOR PERIOD 05/25/2013 THRU 06/01/
 ........................................................---------NAME----------
 ..DIALED NUMBER........COSTCENTER  ....STAT/AUTH CD.....LAST...............FIRS

 . 216 222 3333    ACCOUNTING SERVICES      15 2230    ACCOUNTING SERVICES
 . 216 222 3344    PRINT                    15 2635    PRINT
 . 216 222 3355    SPECIALTY AUTO APM       15 2657    COLLIN              DARRY
 . 216 222 3366    OUTSIDE PROD MGR         15 2411    LAMBERS             DAVID
 . 216 222 3534    HUMAN RESOURCES          15 2463    HUMAN RESOURCES
 . 216 222 3360    HUMAN RESOURCES          15 2465    RUSSEL              RACHA
 . 216 222 3560    HUMAN RESOURCES          15 2647    HENRY               WILLI
 . 216 222 3360    HUMAN RESOURCES          15 2465    RUSSEL              RACHA
 . 216 222 3530    TRAINING                 15 2647    HENRY               SHARI
 . 216 222 4233    TRAINING                 15 2646    SOFTWARE TRAINING
 . 312 555 2012    HUMAN RESOURCES          15 2465    WORTH                KENNE
Create the filter by using the following filter specifications:
CA View ALL ---------- Filter Definition Specifications ----- Row 00001 of 00002
Command ===>                                                    Scroll ===> PAGE

   Filter ID   ---> FILTER2                                        -Emphasis--
   Description ===> THIS IS TEST FILTER2

Filter Specifications:                                               C   H   L
     Lines  Columns                                                  l   l   o
Sel Beg End Beg End Op Text                               Type Show  r   t   c
            19      EQ 'HUMAN RESOURCES'                         Y
            3       EQ '216'                                     N
 ******************************* BOTTOM OF DATA ********************************
Select the filter and activate it. With the filter applied, the following view of the report is displayed:
CA View Browse - PROVRPT ------- Rec 0000000 Pg 0000001.067 Lock 00 Col 001 080
Command ===>                                                    Scroll ===> PAGE
********************************* TOP OF DATA **********************************
 . 312 555 201     HUMAN RESOURCES           15 2465    WORTH             KENNE
******************************** BOTTOM OF DATA *********************************
|
Copyright © 2015 CA Technologies.
All rights reserved.
|
|