

You can use the Message Automation (MA) Script Builder wizard to do the following:
The following is an example procedure for using the Automation Script Builder wizard and explains the different Message Automation (MA) Script Builder wizard page options.
The Automation Scripts Builder wizard opens.
The General Section page contains the basic parameters that apply to the entire script. This section enables you to name the script, specify the z/OS systems on which the script will execute, and decide whether the script should be loaded into z/OS memory for execution when you exit the wizard.
Use this page to give the name of your new script, to select the script you want to modify, or select a script from the CA Vantage SRM Best Practice Solutions Area for downloading to the wizard.
The new script name can have a maximum of eight characters.
If you select Modify an existing script, the wizard displays the list of all defined object automation scripts found in the scripts PDS on the host. You can either modify the contents of the script or enable the script:
The Scripts available for the selected object box is populated with a list of available scripts.
After you confirm the deletion, the script is deleted from memory and scratched from the PDS on the host.
If you are creating a new script, then the Title and System Execution page opens.
If you are modifying an existing script or exploiting an existing MA script from the CA Vantage SRM Best Practice Solutions Area, you can change the script title, the script description, or both from this page. If you are creating a new script, then type in the script title and the script description. This page provides the following options:
This is a free form string that will appear in the various CA Vantage SRM tables that list automation scripts.
(Optional) The only place you will see this description is in this wizard, but you can use it to help describe and keep track of any changes you make to the script in the future.
(Optional) Change or add the Systems on which the script should be loaded (or refreshed). Click the Systems button and the Sys ID/ System Name window opens.
Use the four or eight character z/OS sysid (SMF sysid), z/OS name, or JES3 name to specify on which z/OS system you want the script loaded:
In the example SYS/ is entered, this instructs it to load the script on any system that starts with the id: SYS.
When you have provided the system IDs, click OK in the Sys ID/ System Name window to save your selections.
Message Automation scripts are normally intended to look for a specific message, so a filter to identify the desired message is needed. Click the Filter button to start the process of defining the needed filter. The following is a sample of the Filter dialog:
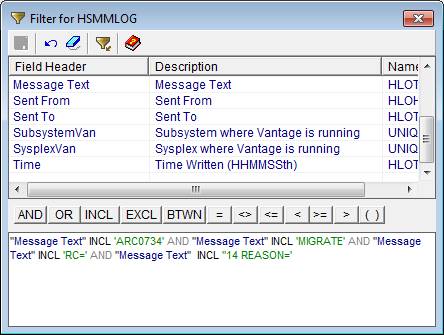
Object attributes are listed in the Filter dialog in alphabetical order by field name. You can click the Description column header cell to sort rows by description name. You can reverse the sort order by clicking again at the top of either column. You can also click and re-click the Field Header or Name column header cells to sort rows by them.
You can build a filter from the attributes of the objects displayed in a window by combining them in Boolean expressions. Filter expressions can contain patterns created with wildcard characters ?, /, and !.
You can use single quotes to filter text strings with blanks or any values containing blanks. If blanks are a significant part of the substring for which you are searching within a text field, you can use double quotes rather than single quotes.
When filtering on date fields, you can compare against either an absolute date or one calculated by adding or subtracting nnn days from the current date. You can refine your filter by using the AND and the OR logical operators to combine several expressions. You can also use parentheses to group sub-expressions.
The Filter dialog guides you in the process of defining the filter expression by enabling and disabling the appropriate fields and controls at every step. You can enter a filter expression directly into the text box at the bottom of the Define Filter dialog, or use the typing aids available in the dialog. Whichever way you created the filter expression, you can edit it in the text box.
This page provides the following options:
Every script, regardless of type, is assigned a time period when it is to be active. That is, it has a start-time, when it is typically enabled, and an end-time when it is typically disabled. During a script's active time period, it will pass control to its Event Procedure section based upon a schedule that you establish. GOA, Log, System and Audit scripts use timer-driven schedules; that is, you specify time intervals or specific days and times. When these intervals or specific times are reached, inside the active period, the Event Procedure is triggered. Message Automation (MA) scripts typically use an event-driven schedule; that is, you specify the number of messages an MA script must intercept inside its active period in order for the script to trigger its Event Procedure. For example, if you specify 1, the script responds (gives control to its Event Procedure) as soon as it intercepts a single message. But if you specify 5, it will respond after every 5th message. This event-driven schedule is most common for MA scripts, but a timer-driven schedule can also be used for an MA script if it is more appropriate for a particular need. The main point here is that regardless of the type of script, each script responds according to its schedule, but only within its active time period.
To designate the active time period, enter the start and end times. If you choose 0000 and 2400, you define what is called a continuous or 24-hour script. Continuous scripts have a few unique properties. By definition, they have no end-time, so they are never disabled at an end-time as is routinely done for all non-continuous scripts. In this respect, continuous 24-hour scripts are permanently enabled. When loaded or refreshed, these 24-hour scripts are immediately enabled, and from that point on, start-time and end-time processes do not apply (are ignored).
You can manually disable any type of script, whether it runs continuously or not, by issuing the Disable command or the Disable line action. In addition, MA scripts automatically disable themselves if and when their execution count reaches the Max_Execute count. All non-continuous scripts automatically re-enable when they reach their next start-time. For an MA script, this also means that its execution count is reset to zero. A continuous 24-hour MA script will also re-enable automatically, every day at midnight. But all other continuous 24-hour scripts do not automatically re-enable. You must re-enable them manually by issuing the Enable command, the Enable line action, or by refreshing the script from its script library.
Continuous 24-hour MA scripts have another property that must be properly managed. An MA script typically accumulates messages in memory until its trigger count is reached. If no trigger count is specified, these messages are counted and accumulated indefinitely and can consume a large amount of memory and paging space. So be sure to set an appropriate trigger count, or ensure that the accumulated messages are processed or cleared manually by using an appropriate line action or operator command, such as Fire or Clear.
In the Active Time Period For Script fields specify the start and end time of the period for which the script is active during the day. See Scheduling Method for daily, weekly and monthly cycles within the active time period.
By default, scripts execute according to the schedules within their active time periods, without any concern for those days and times falling on a holiday or a weekend. Select this option if you want to exclude holidays and weekend days as specified in the EXCLUDE-DAYS parameter in parmlib member INCLEXCL.
Every script has an active time period (see above). Within that time period, it automatically passes control to its Event Procedure according to the schedules that you specify, if any. For most scripts you will specify a timer-driven schedule; that is, you request that the Event Procedure be invoked every so many minutes within the day, or at specific days and times within the week or month.
Object automation scripts are executed repeatedly. Using the wizard, you can automatically execute the script on a daily, weekly or monthly cycle by using specifying one of the following Scheduling Methods:
(Typically used for GOA, not MA) option specifies the intervals within the active period displayed at the bottom of the dialog, as shown in the following sample:

In the Daily Cycles box specify the number of minutes you want to elapse between consecutive executions of the script.
(Typically used for GOA, not MA) this option displays schedules at the bottom of the dialog if they exist. To add a new schedule, click the Add button. The Schedule the Action window is displayed, as shown in the following sample:
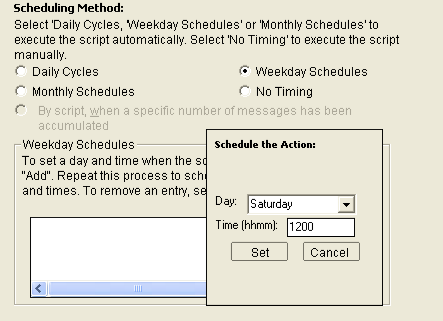
In the Schedule the Action window select the day of the week and time when you want to execute the script, then click the Set button to add the schedule to the list.
You can repeat this process to schedule executions on multiple days and times.
(Typically used for GOA, not MA) this option displays schedules at the bottom of the dialog if they exist. To add a new schedule, click the Add button. The Schedule the Action window is displayed where you can specify that the script shall run on a particular month or all months, which day or days of the month, and the time of day it shall run, as shown in the following sample:
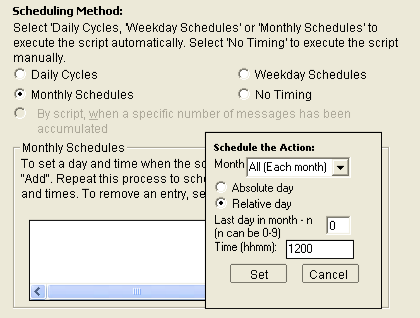
Choose either an absolute day or a relative day from the end of the month. A relative day is a digit from 0 to 9 where 0 is the last day of the month, 1 the next to the last day, and so on. For an Absolute day, enter a day number from 1 to 31. Day number 31 always means the last day of the month, regardless of the actual number of days in the month. For February, 29 and 30 also mean the last day of the month. All other day numbers represent the absolute day within the month. You must also specify the desired time within the day you want the script to execute.
Click the Set button to add the schedule to the list.
You can repeat this process to schedule executions on multiple days and times.
In some cases you may want to omit a schedule completely, this is called a No Timing script, which can be just as useful as one with an automation schedule. You must invoke No Timing scripts manually, use the Fire command or Fire line action whenever its function is needed. To execute a script manually using the Fire line action, perform the following steps:
The All Scripts Loaded object is displayed.
(Typically used for MA, does not apply to GOA) the script executes when the number of messages you designate is exceeded. In the Number of Messages box, enter the number of messages at which you want the execution of the script to occur.
This page provides the following options:
Check this box to allow the script to be loaded or refreshed in memory. The script is automatically loaded from the script library when CA Vantage SRM is started, and can be refreshed from that library when needed. Clear this box if you want the script to be bypassed during load or refresh processing.
If a script has already been loaded (because Load was previously checked), and you clear it now because you no longer want it loaded, a subsequent Save and Activate of the script will Delete the script from memory (the same as if the host Delete command were issued).
This option applies to only continuous 24-hour scripts. Check this box to enable the script whenever it is loaded within its active time period. Clear this box if you want the script disabled as soon as it is loaded.
Not available for MA scripts, it is available for GOA scripts only.
The Advanced Parameters page offers you the choice of modifying several advanced options that control the script's behavior. These are the maximum number of times to execute, whether the messages have to be accumulated or counted, the actions to take at the end of the script's active time period, and the actions to take at shutdown time. The default options are as follows:
This parameter determines the maximum number of times that the script will give control to its Event Procedure between the start and end time. This parameter can be used as a safety measure to prevent the system from looping on a particular type of message, especially in cases where the script action itself might cause the generation of the message to which it responds. That is why the default value is 1. But in most cases you will want a higher value, so set it appropriately.
By default, this box is checked and the script accumulates all messages that match the script's filter. If you clear the box, messages are only counted. If you want to view the trapped messages, or substitute some of the message text into the models you are using for your script's actions (such as model JCL for submitting a job, a model operator command, or model text for sending email or notification messages to other systems and users), you must leave this box checked.
If you chose start or end times other than 0000 and 2400 in the dialog, you need to instruct the script what to do when it reaches the end of its Active Time Period; that is, what end-time actions are to be done. The following are the options available:
Gives control to the script's Event Procedure regardless of the number of messages counted and accumulated.
Does not give control to the script's Event Procedure but keep the count and accumulated messages for the script's next active time period (the default).
Does not give control to the script's Event Procedure, and discard the accumulated messages (the next active time period starts without any messages).
Gives control to the script's Event Procedure if no messages were counted during its active time period.
You can also specify the action to take at shutdown time. The following are the options available:
Gives control to the script's Event Procedure.
Saves the count and accumulated messages. When the system is brought up again, and the script becomes active, it will warm start with the count and messages that were saved.
Discards the accumulated messages.
The Event Procedure Section is responsible for generating the script statements that correspond to executable instructions on a z/OS system. You can control which z/OS systems will load and execute any given script. Return to the Title and System Execution page to check or re-specify the appropriate z/OS systems for this script.
The Conditions for Performing Actions page enables you to test a condition on the number of records before continuing. Observe the following:
Use this page to indicate which actions, one or more, that you want the script to trigger. As you click on different actions the corresponding options in the left pane will become highlighted and available for selection.
Notice that the options Perform Object Action, Add a Spare Volume to a CA Allocate Storage Group, Add a Spare Volume to a DFSMS Storage Group, and Log the Selected Records are not highlighted for MA scripts. These options are for GOA scripts only.
From this dialog you can specify the maximum number of times actions should be executed within the start and end time established in the Timing of Events page. When this number is reached the script will be disabled until its next active period.
A page for each action you selected in the Action Selection page is displayed sequentially. The following provides an example and explanation of each of the Action Selection pages.
Note: If you are in the process of downloading an existing script from the CA Vantage SRM Best Practice Solutions Area, the linked JCL member is displayed in an editor and you must save the job by selecting Save As from the File menu of the editor. If more than one JCL is included with the script, then you must save all jobs using the Submit a Job dialog (there will be a Submit a Job dialog available for each job) before you save the script.
This displays the Submit a Job page.
To submit a job as an action, you must identify the library member that contains the JCL to be submitted, and to specify when you want it to be submitted - now or later.
To submit a job:
Note: Instead of using this feature to defer an action, it is usually better to change the schedule for the script such that it runs at the desired day and time, and then performs its actions immediately (without using this Defer feature).
ARCHIVE DSN=%%DSN%%,VOL=%%VOL%%
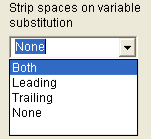
The %%DSN%% variable represents a character field of length 44. But most data set names are less than 44 characters, having several trailing blanks. When standard substitution is done, all the trailing blanks would be left, which may make the syntax invalid for the action statement. To fix this, you can specify that Trailing blanks are to be removed, as follows:
Both - means that both leading and trailing blanks will be removed.
Leading - means that leading blanks will be removed.
Trailing - means that trailing blanks will be removed.
None - means the field will be kept untouched.
If you issue a z/OS operator command as an action, the wizard asks you to enter the command and to specify the timing of the execution.
In the Substitution Variables window double click a variable and it will appear at the cursor position in the Command field.
- If you select Send once for the first record then the command will be sent for only the first object record processed.
- If you select Send for all object records then the command will be sent for every object record processed.
Note: Instead of using this feature to defer an action, it is usually better to change the schedule for the script such that it runs at the desired day and time, and then performs its actions immediately (without using this Defer command execution feature).
You can issue as many operator commands as needed.
To modify the entries in the List of Commands box, right click on one of the entries. The new menu allows you to Remove the selected entry, Pop-it-up one position in the list, or Clear the entire list. Use these options to arrange the entries as needed.
Use this page to:
List of Messages - if mail messages have already been defined, they are listed here. Click on one and its text is displayed in the Message Text box. Double click on one and you are put into edit mode. Right click on one and you can delete it or the entire list of messages.
Message Text - displays the message text of the message highlighted in the List of Messages box.
New Message - to create a new message click the New Message button. The Send CA Vantage SRM Mail or Regular E-mail dialog is displayed.
Use this dialog as follows:
CA Vantage SRM Mail Box - select this if you want the message to be issued to a CA Vantage SRM user's mailbox. Use this option if you want all recipients to receive it whether currently logged on or not.
CA Vantage SRM Session - select this if you want the message to be issued to users logged on to CA Vantage SRM. Use this option if you want the message to be seen only by recipients currently logged on.
E-mail Address - select this if you want the message sent to the e-mail address you provide.
To: - for CA Vantage SRM mail, enter the user's TSO logon ID. For regular E-mail, enter a valid e-mail address. The drop down list can be used for addresses previously entered.
Severity - for CA Vantage SRM mail, select the severity or importance of the message from the drop down list.
From: - this is valid only for regular e-mail. The default is a dummy address to indicate the message came from the automation system. Provide a valid address if you want to allow a reply to that address, perhaps your own.
Subject: - this is valid only for regular e-mail. Provide a meaningful subject as appropriate. The subject field limit is 60 characters in length. The system will not allow you to enter more than 60 characters in the subject field. Variable substitution can be used in the subject field. If you use variables and the total length of the subject text with the expanded variables values results in a text length that exceeds 60 characters then the system will fail to send the message. If this is the case, adjust the Subject field so that it does not exceed 60 characters, including expanded variable values.
Message: - type in the message text for your mail. You can use Substitution Variables within the text.
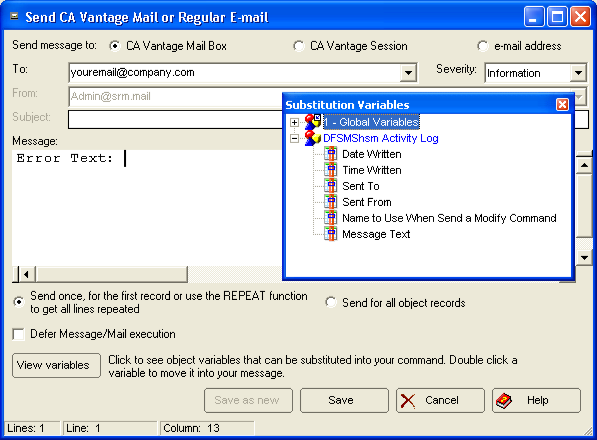
To place variables in the text, place your cursor where you want the variable to appear and then click View Variables.
In the following example, the cursor is placed after Error text: in the message box. The Substitution Variables list is displayed, as shown in the following example:
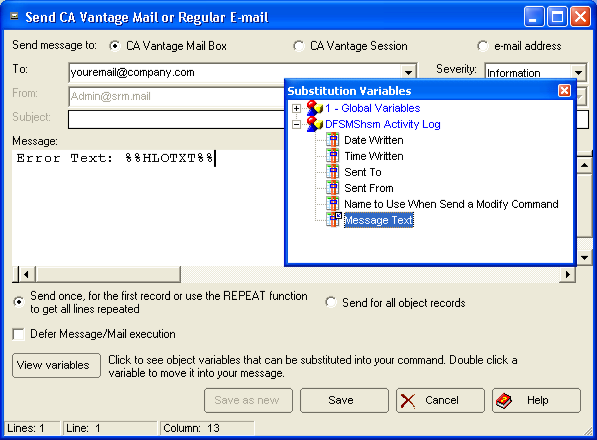
Select the desired variable from the list by double clicking it (Message Text was selected in this example). The variable name now appears where your cursor was placed in the Message Box. In the following example, variable %%HLOTXT%% has been copied to the cursor position:
Select this option if you want to specify a day and time for sending the message rather than sending the message immediately.
Note: Instead of using this feature to defer an action, change the schedule for the script to run the script on a specific day and time. The script then performs the script actions immediately (without using this Defer feature).
Select this if you want to create a new email or message with these changes.
Select this if you want to save your changes for an existing email or message.
The Send Message to Unicenter and/or the z/OS Operator page is displayed.
Use this page to send messages to the z/OS Operator, as an alert to Unicenter, or to the CA Service Desk.
The messages action supports both the FEMS (Framework Event Management Server) and SNMP (Simple Network Management Protocol) interfaces to Unicenter. FEMS is the default. To use SNMP you must ensure that the Unicenter server TCP/IP address for SNMP has been specified in the UNICSNMP system parameter. CA Service Desk event library support is a component of CA Common Services. It provides a mechanism to open CA Service Desk (USD) requests from CA Vantage SRM.
Use this page to specify:
To create a new message select the destination, enter the messages text, select when the message should be sent, and the severity. When you have completed the new message click Add to List and the new message will appear in the List of Messages box.
To include a variable in the message, click the View variables button. Double click the variable from the pop-up window that appears, and the variable will be copied to the cursor position within the Message box.
You can remove messages from the list by selecting a message, clicking the right mouse button, and selecting Remove. You can remove all the messages from the list by selecting Clear list from the right mouse button. You can also promote messages to the top of the list by using Pop-up on the right-click mouse menu.
(Optional) select this option to limit the number of actions during the time period you specified in the Timing for Events dialog. For example, if you specify an action limit of 10, but the Event Procedure is invoked 40 times within the active period, the actions will be triggered only the first 10 times, not the last 30.
Use this page to save and optionally activate the script or to share a script to the CA Vantage SRM Best Practice Solutions Area:
The Share Solution Request dialog is displayed.
An email is sent to CA to open an issue in the CA Support system. This email contains the script along with one or more JCL members as text in the email. When the issue is opened, CA will email the issue number to you.
Note: By sending the email with the script to CA, you are authorizing CA to share the script with other CA Vantage SRM users.
The Share Solution Request dialog closes and the Saving the Script page is displayed.
Note: If you are in the process of downloading a script from the CA Vantage SRM Best Practice Solutions Area, then all JCL members used in the script must be saved from the Submit a Job dialog before saving the script. If you do not do this you will be issued a message telling you will be returned to the Submit a Job dialog. Click OK and proceed to save all the jobs.
|
Copyright © 2014 CA.
All rights reserved.
|
|