
Administration Guide › Accessing Collected Events with ODBC and JDBC › Example: Use an Access Filter to Limit ODBC Results
Example: Use an Access Filter to Limit ODBC Results
You can create an access filter to limit the data returned to an ODBC access request. When members the named application group accesses CA User Activity Reporting Module event data using the ODBC client, they see only the information allowed by the filter.
This example assumes that you have an application group named UNIX_Analysts and that you want to restrict all members of that group to see only UNIX events from the event log store. The filter created in this example limits event data views from within the CA User Activity Reporting Module user interface and external requests through ODBC.
More information about access filters is available in the online help.
To create an access filter
- Log in to CA User Activity Reporting Module as an Administrator user.
- Click the Administration tab, then click the User and Access Management subtab.
- Click New Access Filter
 . The Access Filter Design wizard starts.
- Enter UNIX Analysts for the Name field, and the phrase, UNIX Analysts access filter in the Description field, and then click step 2 Identities at the top of the dialog.
- Change the Type to Application Group and type UNIX in the Name field and then click Search Identities.
A list of identities matching your search criteria appear in a shuttle control so that you can select the desired identities.
- Select the UNIX_Analysts application group from the Available Identities list and click the right arrow shuttle control to move the selection into the Selected Identities list.
- Click step 3 Access Filters at the top of the dialog.
- Click New Event Filter
 to add a line, and then click the field area under Column.
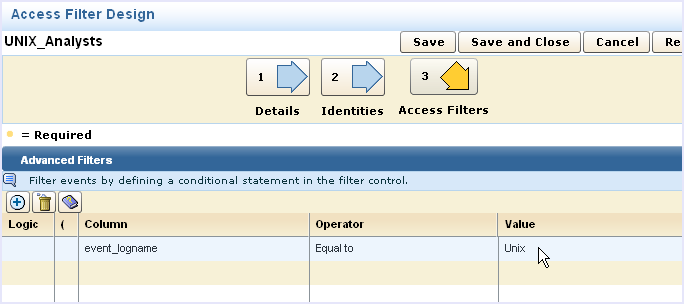
- Select event_logname from the drop-down list, and then click the field area under Value.
- Select Unix from the drop-down list. Your dialog resembles the following:

- Click Save and Close.
Copyright © 2013 CA.
All rights reserved.
 
|
|


