

These utilities convert from other z/OS tape management systems to CA TLMS. Conversions are available for these products:
The utilities convert the tape system data into a common tape record format, regardless of the source. It can then be imported directly into CA TLMS.
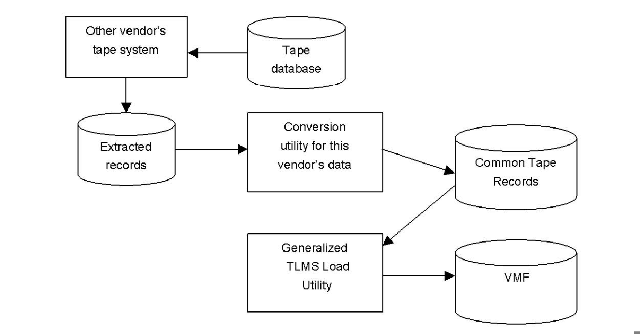
Each of the supported vendors' products has an "extract" function that can create a sequential file of extracted data. For each of the supported vendors' products, CA TLMS offers a utility that will convert that information into "Common Tape Records" or "Earl Format Records." CA TLMS also provides a generalized utility that will read the Common Tape Records and create VMF records from them. The conversion process is the same for each product being converted.
Several "dry runs" of the conversion are strongly recommended prior to allowing CA TLMS to take control of tape processing activity.
The range(s) of volumes currently defined to the VMF must not be in the incoming tape management system. Overlapping volser ranges will need to be excluded from the conversion. Note that the conversion of volume serial numbers less than 6 characters is not supported at this time.
Running two tape management systems on the same system will cause conflict due to the Operating System Intercepts (OSI) that are required by the currently installed tape management system. During the conversion process, CA TLMS should be run with no OSIs active. Ensure that CAS9 starts with the "OSI=NO" parameter setting. This will allow updating the VMF without interfering with the other tape management system's OSI settings.
During the conversion process, the ALOG data set will require much more than the ordinary number of records required in a CA TLMS production environment. Every time a VMF record is updated by conversion utility, an image of the updated record is appended with a date and time stamp and written to the ALOG data set. Since there will be multiple updates to the same records, especially during chain construction, it is recommended that you use an ALOG data set at least five times larger than production capacity. Once the conversion is completed, you can reformat the ALOG to a normal size.
Note: No tape activity should occur during the conversion process. CA also recommends that you backup the catalog for the product you are converting from prior to starting the conversion. If you are converting into a VMF that already contains data, the VMF should be backed up as well. In addition, the conversion process may update the z/OS system catalog and any associated user catalogs, therefore, it is recommended that you backup your z/OS system and user catalogs prior to the conversion.
Prior to converting from CA 1 to CA TLMS, it is very important to ensure that your existing CA 1 Tape Management Catalog (TMC) is free of chaining errors. This can be done by using the TMSPTRS utility (documented in the CA 1 Utilities Guide) and correcting the identified errors.
Any multi-volume or multi-data set errors in the TMC will be reported. Multi-volume errors are less critical, although certain types of errors can cause a job using the data set to ABEND. Multi-data set errors can be more critical, especially those related to the "free chain" of DSNBs that are unused. See the TMSPTRS documentation in the CA 1 Utilities Guide for information on the errors and how to correct them. Once the errors are corrected, you can execute the TMSEARL job in the CA1.CTAPJCL library using TMEMVMD as input to obtain an inventory report of all multi-volume data sets and multi-data set volumes.
Job TLMJCA11 in the CAI.CTAPJCL library provides all the JCL necessary to convert the CA 1 input file to the common Earl format. This job should be run on the system where CA1 is running (in a least batch active mode.) The output file should then be copied to the receiving CA TLMS system. Ensure that there is no tape activity during the execution of this job.
After the TMC has been extracted into common Earl format, you may optionally modify the data within the common Earl file. Job TLMJCA12 in CAI.CTAPJCL provides the JCL and Earl statements necessary to allow you to drop certain ranges of volumes or select specific accounting codes for conversion and several other options. If you choose to modify the common Earl file you must make changes to the Earl statements provided. The input for this program is the output file created in Step 2. A new common Earl file will be written to the OUTFILE DD which will be used as input to the next step.
Job TLMJ2TRN will take the modified OUTFILE from Step 3 or the OUTFILE from Step 2 and update the VMF. Ensure that there is no tape activity during this timeframe. If the ALOG becomes full during this update step, execute proc CATALOGB to dump the ALOG records. The VMFTRANS DD statement will contain a list of all the transactions that could not be processed.
Execute proc CATVCVS to report any multi-volume errors in the VMF. See the "Maintaining the Volume Master File" documentation in the Configuration Guide on the errors and how to correct them.
After the VMF conversion and CATVCVS cleanup activities you should run the CA TLMS Tape Retention System (CATTRS) utility TLMSTRS in FORECAST mode to identify any possible scratch activity. This will allow you to take any preventive action to preserve volumes that you do not want to move to scratch status by defining Retention Master File (RMF) rules to retain these volumes. See the User Guide for more information on the TLMSTRS utility.
Execute DFSMSrmm utility EDGUTIL with the parameter of MEND to correct any errors within the DFSMSrmm database. Prior to running this utility, all volumes that are on "loan" need to be returned back to the data center within DFSMSrmm and scratched. DFSMSrmm allows the user to loan out volumes of a multi-volume set and scratches and reuses the remaining volumes. This feature causes volume chain errors within CA TLMS. By having these "loan" volumes brought back to the data center, these chain errors will not be created.
Execute member CTSJRMM1 in CAI.CTAPJCL to produce the DFSMSrmm extract file. The output file from DD REPTEXT will be used in the next step as input.
|
Copyright © 2014 CA.
All rights reserved.
|
|