

Managing Oracle Databases › Registering Oracle Databases › Using the CA SRM Oracle Registration Wizard
Using the CA SRM Oracle Registration Wizard
To run the Oracle Registration Wizard, follow these steps:
- Select Configuration and then Register from the Oracle Instance table. You can also start the Oracle Registration Wizard by from the Open Systems menu of the Windows Client, select Register, Applications, and then Oracle.
- Select the name of the proxy collector from the drop-down list:
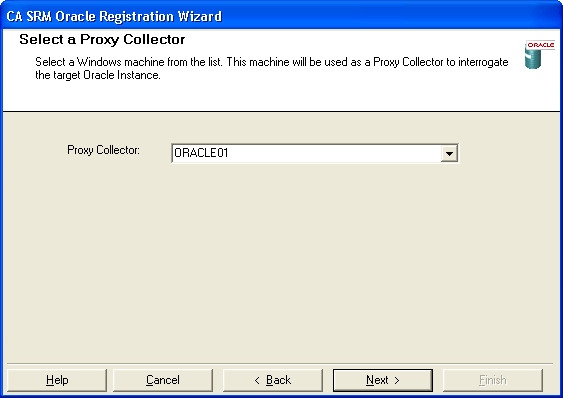
The list of proxy collectors is based on machines where the Oracle client is already installed.
- Select an Oracle instance. Type the user name and password that corresponds with the instance you selected. All defined services available on the collector you selected in the previous dialog are listed here:
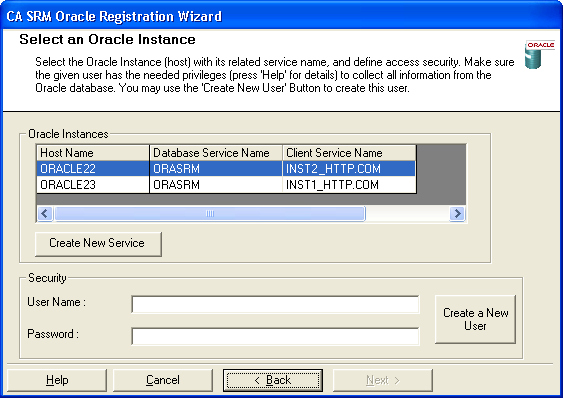
Note: If your Application Server is on a Windows 2003 Server machine and the Oracle server is on a Sun Solaris machine, you need to register the Oracle server as a managed computer to view raw partitions.
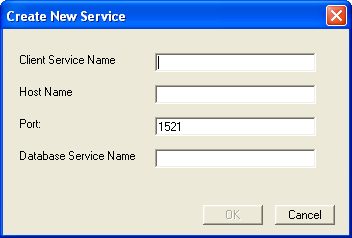
- (Optional) Click Create New Service to define a new Oracle service. Enter:
- Client Service Name—The service name that is defined on the proxy collector to connect to this specified instance.
- Host Name—The name of the host where the Oracle server is running.
- Port—The port used by this specified instance (the default is 1521).
- Database Service Name—The service name defined on the server side that identifies a particular instance.
- (Optional) Click Create a New User button to create a user in the Oracle database. Enter the system security user name and password. You also need to provide the database user name and password. and the default tablespace and temp tablespace:
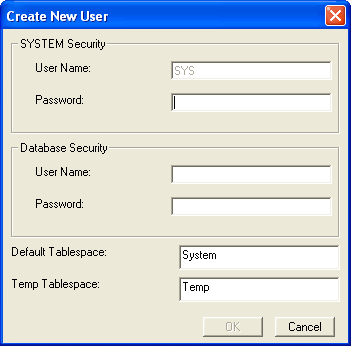
Note: If you are using the Oracle 9.1 client to connect to an Oracle server, the Oracle ODBC driver version 9.0.1.3 is required for creating a user during registration. If you are using the Oracle 9.2 client to connect to an Oracle server, the Oracle ODBC driver version should be 9.2.0.2.0 or higher for creating a user during registration.
- In the Setting Properties dialog:
- Choose the frequency with which you want to update the Oracle Instance data.
- Check the Detailed box if you want to collect detailed data.
- Select the log switch period the default is 0.
- Edit the fields in this dialog if you want to add a different location, organization, and contact:
- Location-Lets you attach a geographic location to the computer or server. Select a location from the drop-down list. You can also click New Location to add the details of the new location in the Create New Location dialog. Click OK to exit the dialog.
- Organization- Lets you attach organization to the computer or server. Select an organization from the drop-down list. You can also click New Organization to add the details of the new organization in the Create New Organization dialog. Click OK to exit the dialog.
- Contact- Lets you add a contact. Click New Contact to add a contact using the Create New Contact dialog. Enter the name, telephone number, and email address of the new contact. You can access your default address book by clicking the To: Button and select the email address from there.
Note: You can also add new contacts by clicking New Contact in the Create New Location dialog or Create New Organization dialog.
- Click Register when finished.
Copyright © 2016 CA Technologies.
All rights reserved.
|
|