

CA SRM manages many types of network storage objects, and keeps information about the attributes of the objects and the relationships between the objects. It also provides a licensed Network Attached Storage (NAS) option that collects storage usage data from Network Appliance (NetApp) filer and EMC Celerra devices using SMI-S agent.
A NAS device is a dedicated, high‑performance server that is optimized for shared access to large file systems. A NAS server typically offers centralized administration from any client on the network or from anywhere on the Internet. Access is based on a standard protocol: Network File System (NFS), or CIFS.
The NAS option supports the following tasks:
Note: For existing registered NetApp devices, CA SRM supports the data collection from existing API/protocols such as ONTAPI/SSH/telnet/SNMP/RSH.
This section contains the following topics:
Manage NAS Devices to Generate NAS Storage Reports
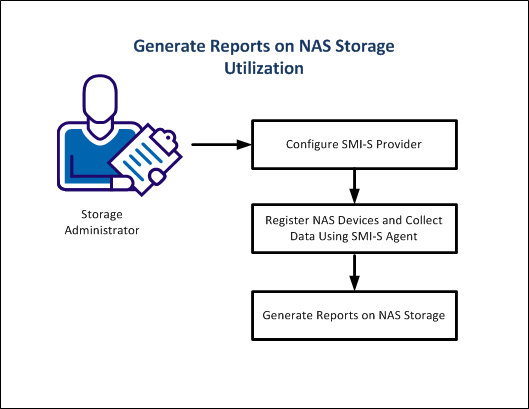
As a Storage Administrator, your responsibilities include registering NAS devices with valid credentials of SMI-S to enable SRM data collection. CA SRM lets you generate storage reports on NAS utilization.
The following diagram illustrates how a Storage Administrator generates customized reports on NAS storage utilization.
An SMI-S provider is a vendor-specific component that lets autonomous management software manage a vendor device using the Common Information Model (CIM) protocol.
Configure an external SMI-S provider for all NetApp devices and configure the SMI-S provider that is built in with the EMC Celerra devices.
Note: We recommend you to use the latest SMI-S, provided by the vendor.
The application host is the computer that controls the NAS device. The proxy collector is the computer through which CA SRM performs data collection on the NAS device. The application host and the proxy collector can reside on the same computer, or they can reside on two separate computers.
The application host and proxy collector computers have different requirements, though the requirements depend on the manufacturer of the NAS device.
Installation and configuration information, and requirements for specific SMI-S providers vary by vendor.
Follow these steps:
When you register a NAS device in CA SRM as a new object, the wizard creates a computer object. If the volumes of this computer are accessible from proxy collector, file scanning is possible. The CA SRM data collection creates these volumes that are based on the volume definition of the NetApp filer and EMC Celerra devices.
You can run the CA SRM NAS Registration Wizard from any Windows Client and can collect data.
Follow these steps:
The CA SRM NAS Filer Registration Wizard dialog opens.
The Setting Provider Credentials dialog opens.
Note: By default, CA SRM collects data once a day. Use the ellipsis button to open the Data Collection Frequency dialog that lets you set the data collection frequency.
Note: If you want to use a computer as a proxy collector, register the computer with CA SRM. For more information about registering a computer with CA SRM, see the Registering New Objects.
Important! If a proxy collector (other than Application Server) manages an already registered NetApp device, update the agent software on the proxy collector to r12.7 or later.
The Devices Managed by the NAS Application dialog populates all NAS devices that are managed by the SMI-S provider.
Note: You can alter / disable / enable the file storage analysis flags from the Windows Client view by right-clicking the NetApp filer and selecting the File & Storage Analysis option.
Note: For NetApp devices, select filers that you want to register. For EMC Celerra, select control stations that you want to register.
The Set Organization and Location dialog opens.
Select a location from the drop-down list.
You can also click New Location to add the details of the new location.
Select an organization from the drop-down list.
You can also click New Organization to add the details of the new organization.
The Summary dialog displays the number of available licenses you have.
CA SRM populates the registered NetApp and EMC Celerra devices data in the Object Tree.
Note:
You can set the interval at which you want to perform data collection.
Follow these steps:
The default value for data collection is once every day.
You can add a contact or can select a contact from the drop-down list on the Set Organization and Location dialog.
Follow these steps:
The new contact is added to the list.
You can add a location or can select a location from the drop-down list on the Set Organization and Location dialog.
Follow these steps:
The new location is added to the list.
You can add an organization or can select an organization from the drop-down list on the Set Organization and Location dialog.
Follow these steps:
The new organization is added to the list.
You can customize and generate various reports on NAS storage utilization using the user views and by customizing the query and automate services.
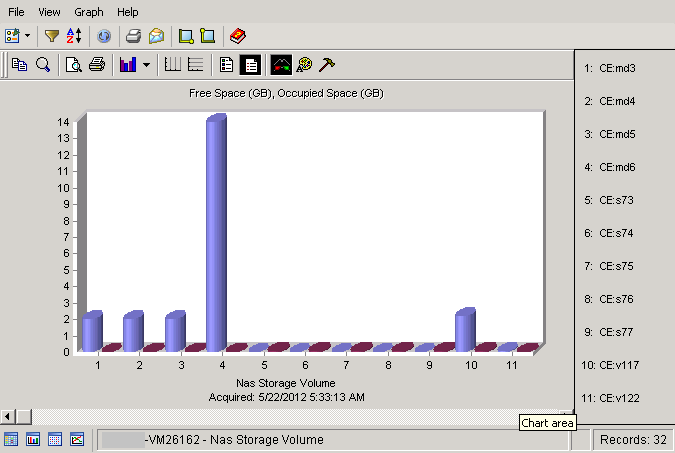
Using the NAS device objects from the object tree, you can create a sample report with the graph for each of the NAS device:
Follow these steps:
The grid opens on the right pane.
The graph displays the free and occupied space utilization of registered NAS storage volumes.
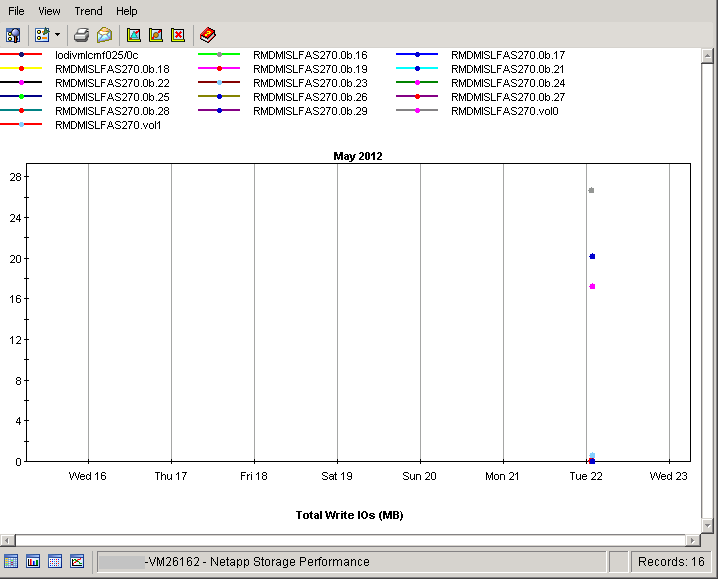
Using the NAS device objects from the object tree, you can create a sample report with the trending information for each of the NAS device:
Follow these steps:
The grid opens on the right pane.
The trend provides the total write IOs for the registered NetApp devices over a time.
You can export these reports to Excel, HTML, PDF, TXT, .MDB, and Web Document formats. Thus, you can customize and generate NAS reports. These reports help you to identify the devices in your NAS filers that are most vulnerable and contain the most valuable data.
When you register the NAS devices in the CA SRM, the following objects display in the object tree view. CA SRM collects information about these objects. Based on these objects, you can generate reports on NAS storage utilization.
NAS Devices:
You can create a query using the Service Builder Wizard. The Service Builder Wizard contains predefined sets of sample services. After you complete the configuration steps, the service is ready to use. If you want to tailor a service, use the Query Service Builder Wizard to customize it. The following example shows you how to query the database for all NAS volumes.
Follow these steps:
The Query table opens.
The Query Service Builder Wizard opens.
Defines the collection occurs immediately, but only once.
Defines the collection occurs at a future date, but only once. Click the drop-down list to enter the date in the calendar.
Defines the collection occurs at regular intervals. Designate the interval in the Every box. Type a number and select one of the frequency options:
If you select Weeks, you can click a specific day in the On box.
Note: The On box is inactive for the other frequencies.
The Retain Historical Data (Trending) option is only available when you enable periodic execution.
Defines the collection occurs at, or as soon as possible after, a specific time of day. If a server is down and CA SRM cannot collect at the specified time, it collects as soon as it can that day (before midnight).
If you want to collect at a specific time, select this box. This only works with the Execute once and Execute periodically options. Use the spin box to designate the time of day you want the collection to occur.
Defines the service as available but the service does not run. The service remains on hold until you change the option to one of the frequencies listed. You can use the Hold option for situations where you want to kickoff this service from outside of CA SRM using the command line option.
Note: The Hold option is not available for every service.
The Summary dialog displays the parameters that you defined for the service.
CA SRM runs the service according to the configuration shown in this dialog.
Note: If you change the Advanced dialog, you will have to use it for all of your future changes. After you use the Advanced dialog for a service, you can no longer edit the service in the Service Builder Wizard.
The service executes or saves depending on your selection in the previous dialog.
You can use the CA SRM Activity Monitor to verify the progress of any service that you create.
You can export the report from the Query Results under the Service Results in the Object Tree.
You can create automate services using the Service Builder Wizard. The Service Builder Wizard contains predefined sets of sample services. After you complete the configuration steps, the automate service is ready to use. If you want to tailor a service, use the Automate Service Builder Wizard to customize it.
The following example shows you how to perform the listed items:
Follow these steps:
The Automate table opens.
Note: You can also access Automate services from the Open Systems file menu by selecting Create Services and then Automate.
The Automate Service Wizard opens.
Defines the collection occurs immediately, but only once.
Defines the collection occurs at a future date, but only once. Click the drop-down list to enter the date in the calendar.
Defines the collection occurs at regular intervals. Designate the interval in the Every box. Type a number and select one of the frequency options:
If you select Weeks, you can click a specific day in the On box.
Note: The On box is inactive for the other frequencies.
The Retain Historical Data (Trending) option is only available when you enable periodic execution.
Defines the collection occurs at, or as soon as possible after, a specific time of day. If a server is down and CA SRM cannot collect at the specified time, it collects as soon as it can that day (before midnight).
If you want to collect at a specific time, select this box. This only works with the Execute once and Execute periodically options. Use the spin box to designate the time of day you want the collection to occur.
Defines the service as available but the service does not run. The service remains on hold until you change the option to one of the frequencies listed. You can use the Hold option for situations where you want to kickoff this service from outside of CA SRM using the command line option.
Note: The Hold option is not available for every service.
The Summary dialog displays the parameters for the service that you have defined.
CA SRM runs the service according to the configuration shown in this dialog.
Note: If you change the Advanced dialog, you will have to use it for all of your future changes. After you use the Advanced dialog for a service, you can no longer edit the service in the Service Builder Wizard.
The service executes or saves depending on your selection in the previous dialog.
You can use the CA SRM Activity Monitor to verify the progress of any service that you create.
|
Copyright © 2016 CA Technologies.
All rights reserved.
|
|