

CA SRM collects and monitors storage capacity and other information from a server virtualization product, for example, Microsoft Hyper-V server. Virtual Host Environments allows you to correlate the virtual hosts to the physical environment.
CA SRM provides a licensed option that collects storage usage data from the following virtual host server objects:
CA SRM supports the independent virtual host data collection by the Hyper-V host servers.
This section contains the following topics:
Virtual Host Hyper-V Environment Objects
Registering Virtual Host Hyper-V Servers
CA SRM collects information about the following virtual host Hyper-V environment objects:
Objects representing the physical servers of your virtual host environment. Virtual Host Servers provides a virtualization layer that abstracts the processor, memory, storage, and networking resources of the physical host into multiple virtual machines.
Objects representing the virtual machines. The virtual machine is a Virtual Guest. Collection of virtual guests comprises a host (Hyper-V) server. You can run multiple virtual guests on the same host at the same time.
Objects representing virtual disks. A virtual disk is a storage location for all the files constituting a virtual machine configuration and data files. To a host, a virtual hard disk is stored as .vhd file in physical disk.
Objects representing the snapshot of your virtual machine. Snapshots let you preserve the state of a virtual machine so that you can return to the same state at any given time. A snapshot captures the entire state of a virtual machine.
Note: To verify that the Windows Client displays the most recent data collection, refresh open user views.
To create a virtual host environment, register the virtual host Hyper-V servers using the computer registration wizard.
Follow these steps:
The CA SRM Computer Registration Wizard welcome dialog opens.
The Select Operating System dialog opens.
The Selecting a Domain and Defining Security dialog opens.
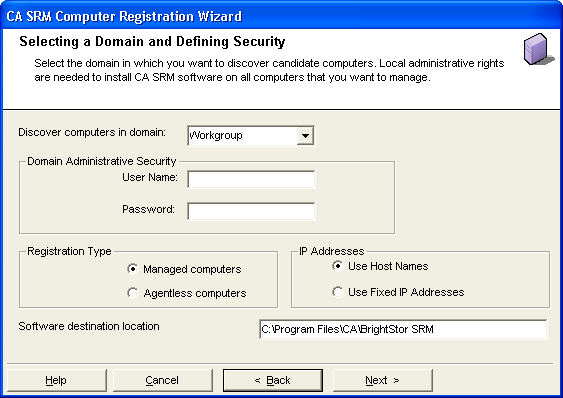
The following list describes the fields on this dialog:
Select the domain that contains the computers you want to register.
Type the name of a user with at least Administrator privileges on the computers you want to register.
Type the password for the user name.
Specify whether this computer is a managed computer or an agentless computer.
If you select Managed computers, the CA SRM Agent is installed, which enables CA SRM to collect detailed data.
If you select Agentless computers, CA SRM collects basic data using WMI.
Specify whether you want to use the host name or the numeric IP address for the computer.
Specify the location in which you want the CA SRM agent to be installed on the target computers.
When you finish entering this information, click Next to start the Discovery process.
The Setting Data Collection Properties dialog opens.
The Non-published Computer dialog opens.
The Setting Data Collection Security dialog opens.
Important! If at least one Windows 2008 or later server version computers with Hyper-V on a full installation, configured to be registered, the Collect Hyper-V information check box appears on the Setting Data Collection Security dialog.
Microsoft Hyper-V on a Server Core installation is not supported.
The Set Organization and Location dialog opens.
Note: The Collect Hyper-V option enables data collection for the computers with Hyper-V information as part of managed computers registration. The Hyper-V information will be populated in the Virtual Host Server Environment, after the data collection is complete.
SRM does not collect Hyper-V through System Center Virtual Machine Manager (SCVMM).
You must have valid Virtual Host Server license for the successful data collection of the Hyper-V information. If you do not have valid Virtual Host Server license, the Hyper-V information will not be collected for those managed computers.
Lets you attach a geographic location to the computer or server. Select a location from the drop-down list. You can also click New Location to add the details of the new location in the Create New Location dialog. Click OK to exit the dialog.
Lets you attach organization to the computer or server. Select an organization from the drop-down list. You can also click New Organization to add the details of the new organization in the Create New Organization dialog. Click OK to exit the dialog.
Lets you add a contact. Click New Contact to add a contact using the Create New Contact dialog. Enter the name, telephone number, and email address of the new contact. You can access your default address book by clicking the To: Button and select the email address from there.
Note: You can also add new contacts by clicking New Contact in the Create New Location dialog or Create New Organization dialog.
Notice that your CA license information for computer and Hyper-V is updated and displays.
The CA SRM Computer Registration Wizard displays the registration complete message.
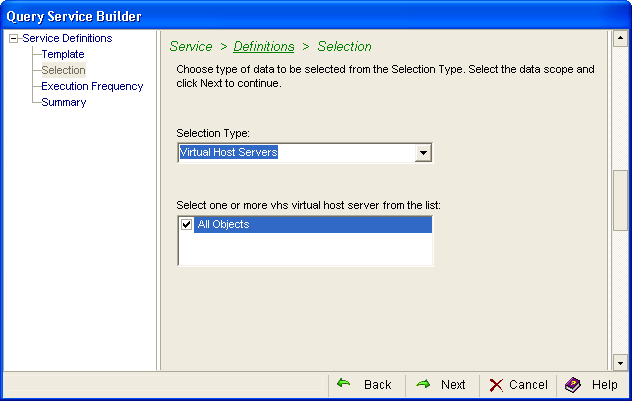
This section describes how to create a query using the Service Builder Wizard. The Service Builder Wizard contains predefined sets of sample services. After completing the configuration steps, the service is ready to use. If you want to tailor a service, use the Query Service Builder Wizard to customize it.
The following example shows you how to query the database immediately for all Virtual Host Servers.
To do this, follow these steps:
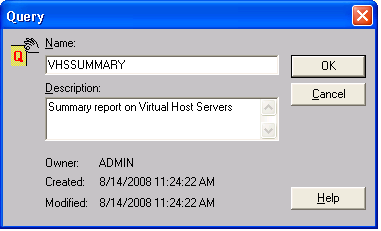
The Query table opens.

If you select Weeks, you can choose a specific day in the On box. The On box is inactive for the other frequencies.
The Retain Historical Data (Trending) option is only available when you enable periodic execution.
If you want to collect at a specific time check this box. This only works in conjunction with the Execute once and Execute periodically options. Use the spin box to designate the time of day you want the collection to occur.
Note: If you make changes in the Advanced dialog, you will have to use it for all of your future changes. After you use the Advanced dialog for a service, you can no longer edit the service in the Service Builder Wizard.
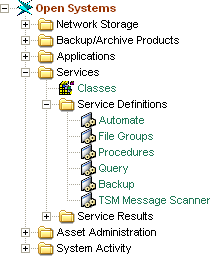
You can use the CA SRM Activity Monitor to check the progress of any service that you create. From the Open Systems menu, select Activity Monitor.
|
Copyright © 2016 CA Technologies.
All rights reserved.
|
|