

You can collect data from any managed computer that has the SMI-S agent installed with supported protocols.
Follow these steps:
The CA SRM Fabric Registration Wizard welcome dialog opens.
The Provider Credentials dialog opens.

Defines the computer name or the IP address.
Defines the user name of the SMI-S provider.
Defines the password associated with the user name.
Defines the port of the switch.
Note: The default port of the switch is 5988, which is not secured.
Select the https check box if you had installed the provider in either secured mode.
Defines whether the community string is public or private. By default, the community string is public.
Note: The Community String is configurable field.
Displays the list of switch vendors.
Specifies how often you want CA SRM to perform data collection on the server. Click the Ellipsis button. The Data Collection Frequency dialog opens.
Displays the list of proxy collectors. Select a proxy collector from the drop-down list.
Note: If you have selected McData or Brocade vendor and if the fabric size is large with many switches, then the system throws a timeout error message. See the SAN Fabric Timeout Message under the Troubleshooting section to know more about how to avoid this error.
Important! Brocade/McData fabric switches that are managed in CA SRM must have the respective SMI agents supporting the latest firmware versions as mentioned in vendor Release Notes.
By default, Brocade SMI-S vendor provider prefers IPv4 Stack. If you would prefer to use IPv6 stack, disable it in the Configuration Tool and restart the server if it is already running.
The Discovered Switches dialog opens populating the information of set of switches in the fabric.
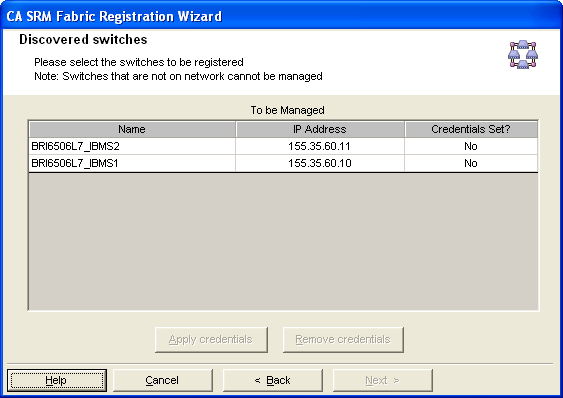
Important! The fabric switches having valid network IP addresses and can be accessible from the Proxy collector computer are only managed in SRM.
The Set Organization and Location dialog opens.
The Registration Completion Wizard displays the registration complete message with the total count of registered switches.
|
Copyright © 2016 CA Technologies.
All rights reserved.
|
|