

The Windows Client has numerous wizards to help you create and modify your definition settings (the definition can be, for example, an automation script, a User View and outputs, a Console, a Summary Object, or a Joined Object). The wizards are designed similarly so that they are easy to navigate and are user friendly. Some of the wizards available are:
For creating automation scripts, for example General Object Automation (GOA) scripts, Message Automation (MA) scripts, Audit Scripts, System Scripts, and Object Logging scripts.
For creating Consoles.
For setting (global) options and the behavior of the Windows Client.
For creating User Views and outputs.
For creating new z/OS Summary Objects.
For distributing Summary Objects to other z/OS hosts.
For creating new z/OS Joined Objects.
For distributing Joined Objects to other z/OS hosts.
For distributed systems (creating Query, Threshold and Trend services).
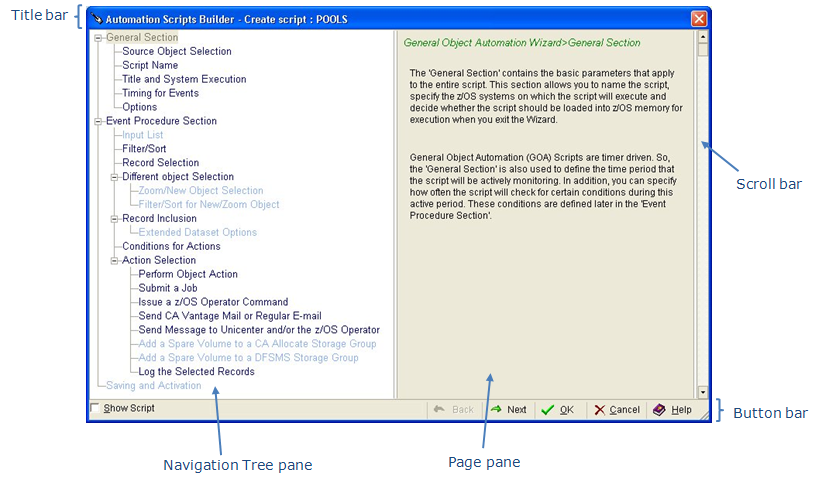
The wizards are a multiple-page dialog that have a title bar at the top which provides the wizard title, a navigation tree pane on the left side, the page pane in the center, the scroll bar on the right side, and the button bar at the bottom. Each wizard page represents a logical section of the definition.
The following is an example of the z/OS General Object Automation Scripts Builder wizard:
To create or modify the definition, you move from page to page providing or modifying information until the definition is completed. The wizard provides defaults whenever they are available.
In general, the following navigation methods are available in the wizard:
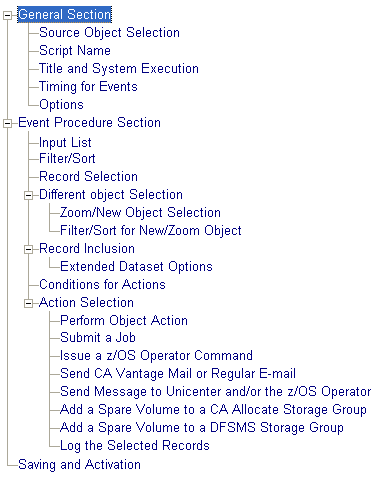
The navigation tree presents the pages of the definition in a hierarchical view. Click a navigation tree node to go to the page. The navigation tree allows you to perform non-sequential navigation through the wizard pages. That is, you can click a node (page title) in the navigation tree to go directly to that page. This method of navigation is useful when you want to modify only a few parameters of a definition.
The following is an example of the z/OS General Object Automation Scripts Builder wizard navigation tree:
The button bar at the bottom of the window provides the Back, Next, OK, Cancel, and Help buttons. Use these buttons as follows:
The Back and Next buttons allow back and forth sequential navigation through the wizard pages. Using these buttons is the easiest way to navigate the wizard and helps you step through the wizard pages and make all the settings needed. You should use these buttons when you create a new definition or if you are not familiar with the wizard.
Click OK when you are finished with the definition. The wizard validates and sends the definition to the host. When accepted, and depending on the definition, the new definition is displayed in the Object Tree or output sent to the destination.
Click Cancel to interrupt the process and close the wizard without saving any data.
Click Help to get online help about the wizard. If you click Help in a wizard page, the Windows Client online Help system opens to the topic relevant for that page, which advises you on the options on that page.
The scroll bar provides an additional method for sequential navigation through the wizard pages. Drag the tomb or click the Up or Down buttons to change pages.
Note: Some validation can occur on each page of the wizard. Therefore, you must fill in certain data before you can leave the page using Next, Back, the scroll bar, or by clicking a node (page title) in the wizard’s navigation tree. In these cases you receive a message that you must provide information in the page before you can leave it.
Sometimes some of the navigation nodes (page titles) in the navigation tree are not highlighted (and are not selectable). This is because you need to follow certain steps and specify certain criteria when creating or modifying the definition before they are highlighted. To ensure that you follow the steps in the correct sequence and specify the criteria, you can use the Next button at the bottom of the dialog to move through the wizard.
At times the wizard displays a yellow clock and progress bar on the left side of the button bar of the window. The yellow clock indicates that the wizard is communicating with z/OS hosts. The progress bar shows the data exchange status. Usually, the wizard freezes other operations (it does not react) while in this condition.
You can resize the wizard window to fit your needs.
Example of navigation nodes (page titles) in the navigation tree not highlighted
Some navigation nodes (page titles) might not appear highlighted even though you have gone through the whole process of creating, this is because an option selection on one of the pages has determined that you do not want the definition to enable an alternative and subsequently the page pertaining to that option is not highlighted.
For example, if you are in the Action Selection dialog of the General Object Automation Scripts Builder wizard and if you have selected Submit a Job and Issue a z/OS Operator Command then only those items will be highlighted in the navigation tree, as shown in the following example:
In order to get the General Object Automation Scripts Builder wizard to highlight Send CA Vantage Mail or Regular E-mail you would have to return to the Action Selection page (either by clicking the Next or Back button until you reach it or clicking the node (page title) Action Selection in the navigation tree) and select the Send CA Vantage Mail or Regular E-mail option. The Send CA Vantage Mail or Regular E-mail node (page title) will then be highlighted in the navigation tree, as shown in the following example:
Example of Perform and Preview buttons
Some of the wizards have the Perform and Preview buttons, for example they can be found in the top of the View and Output Destinations wizard, as shown in the following example:
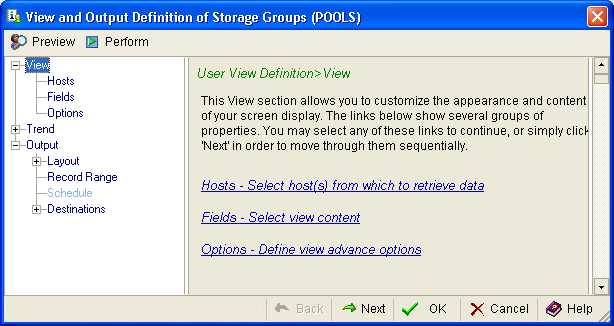
Preview allows you to preview your progress. A maximum of 100 table rows are used for the preview. If you have defined a Record Range, the Preview uses that starting row number and number of rows, up to the maximum of 100 rows as input to the preview.
If you click Perform, everything you have defined up until that point is executed.
|
Copyright © 2013 CA.
All rights reserved.
|
|