

CA Business Intelligence (CABI) is a set of reporting and analytic software that various CA products use to present information and support business decisions. CA products use CABI to integrate, analyze, and present the vital information through various reporting options that is required for an effective enterprise IT management.
CABI installs SAP BusinessObjects Enterprise XI (BOXI) as a standalone component. The installation runs independently and enables other CA products to share Business Intelligence services. CABI installation is a distinct activity within the overall CA product installation process. You can activate the integration between CABI and Spectrum Report Manager after installing CABI on your system. For more information, see Business Objects Integration.
Important! We recommend that you disable the antivirus software in your system while installing CABI.
The following diagram illustrates the process to install CABI:
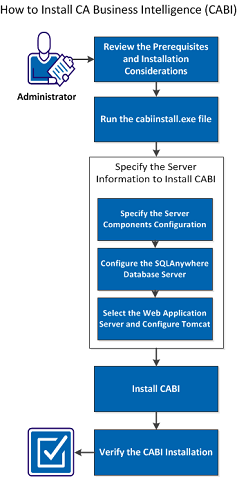
Perform the following tasks to install CA Business Intelligence (CABI):
Important! Do not uninstall BOXI software unless CA Support recommends it. Uninstalling BOXI or OneClick uninstalls Spectrum Report Manager and removes all reports.
For more information, see the CA Business Intelligence Implementation Guide and CA Spectrum Installation Guide.
Review the following prerequisites and installation considerations before installing CABI:
For Unix:
For Windows:
Note: CABI installation takes about an hour. A Windows installation takes more time than a Linux/Solaris installation. Do not invoke CABI installation using 'sudo' on Linux or Solaris. A root user account is required.
For more information, see the CA Business Intelligence Implementation Guide.
You can run the cabiinstall.exe file from the root directory of the CABI DVD as an initial step of setting up your BOXI installation on Windows.
After running the CABI Installer, select the language for the installation setup, language packs, installation type, and installation directory.
Follow these steps:
The Please Choose Setup Language dialog opens.
The Introduction dialog opens.
The CA Technologies License Agreement dialog opens
The following default locations are available:
The Review Settings dialog opens.
The CABI installation wizard appears.
The BusinessObjects Enterprise License Agreement dialog opens.
The Choose Language Packs dialog opens.
The Install Type window appears. For more information, see the CA Business Intelligence Implementation Guide.
The following default locations are available:
The Server Components Configuration window appears.
You can specify the server information to install CABI (such as the information about your CMS, Server Intelligence Agent Information). Performing a new installation deploys all of the required and optional components to the computer. You can perform the following tasks to install CABI:
Use the Server Components Configuration screen to enter the port number and an administrator password for the new Central Management System (CMS). CMS is the only server that accesses the CMS system database. The CMS system database stores configuration, authentication, user, auditing, and other BOXI-related information. The CMS system database allows CMS to maintain security, manage objects, and manage servers. The CMS uses a database to store system information. For more information, see the CA Business Intelligence Implementation Guide.
Follow these steps:
The default CMS port number is 6400.
CMS communicates with other BOXI servers through the specified port.
Note: Select the Configure the BOXI Administrator password later check box if you want to configure the Administrator password, after the installation is complete. If you select this option, log in to the CMC with a blank password for the first time to be able to change the Administrator password.
The Server Intelligence Agent screen appears.
Note: A Server Intelligence Agent (SIA) node is automatically created during installation of BOXI. For more information, see the CA Business Intelligence Implementation Guide.
Note: Do not use spaces or non-alpha-numeric characters in a SIA node name. By default, the node name is same as the system host name.
Once the SIA information is entered, the port number is validated before you can proceed to configure the CMS database for your installation. A warning displays if the port you specified (6410) is not available. To continue, specify unused and valid port numbers.
In BOXI, a database can be defined as a data repository that organizes information into structures (tables) for rapid search and information retrieval.
The CMS uses a database to store system information. If you install SQL Anywhere as part of the BOXI installation, SQL Anywhere CMS database is created.
The SQL Anywhere Database Server Configuration screen displays if you select the option to install SQL Anywhere as part of the BOXI installation. For more information, see the CA Business Intelligence Implementation Guide. If you do not have a database system ready, the BOXI installer can create and configure a SQL Anywhere database system as part of the installation process. The SQL Anywhere database server lets you group the tables together into collections of logically related tables (tablespaces). Tables are grouped into tablespaces within a database system in the same way that files are grouped into a directory within a file system.
Follow these steps:
The default name is BOE120.
The default port number is 2638.
Note: The user name must be unique on the network.
The Select Web Application Server screen displays.
SQL Anywhere Database Server is configured.
Note: You can use any database system with BOXI as long as the CA Technologies product implementing BOXI supports the database system. If you use your own database system, first configure the system and confirm that the system is operational. For more information, see the CA Business Intelligence Implementation Guide.
The Web application server runs BOXI web applications such as InfoView, the CMC, and custom web applications. Use the Select Web Application Server screen to select the web application.
To configure a Java web application server for BOXI, the web application server administrator account name, password, and the listener port number are required.
Follow these steps:
The Configure Tomcat screen displays.
Note: If the port numbers that you specified are in use, a warning message displays. To continue, specify unused and valid port numbers.
The Start Installation screen displays.
Web Application Server is selected and Tomcat is configured.
Note: If you select an existing server in the Select Web Application Server screen, provide specific configuration information about your existing web application server. For more information, see the CA Business Intelligence Implementation Guide.
After selecting the Web Application Server and configuring Tomcat, start the Installation Process.
Follow these steps:
Once the installation is complete, the Installation Complete screen displays.
The CA Business Intelligence Completion screen displays with a summary of the installation.
CABI installation is completed.
Note: A GUI-based CABI installation is not supported on UNIX. Console based and silent installation of CABI is supported on UNIX. For more information, see the CA Business Intelligence Implementation Guide.
After installing CABI, you can verify the status of the installation. Verification of CABI installation depends on the deployment type and the components that are selected in the installation process. You can use the following methods to verify the CABI installation:
Follow these steps:
The Central Configuration Manager window opens.
The Log On window opens.
A list of servers that are related to CABI is displayed.
CABI installation is verified.
This Documentation, which includes embedded help systems and electronically distributed materials, (hereinafter referred to as the “Documentation”) is for your informational purposes only and is subject to change or withdrawal by CA at any time.
This Documentation may not be copied, transferred, reproduced, disclosed, modified or duplicated, in whole or in part, without the prior written consent of CA. This Documentation is confidential and proprietary information of CA and may not be disclosed by you or used for any purpose other than as may be permitted in (i) a separate agreement between you and CA governing your use of the CA software to which the Documentation relates; or (ii) a separate confidentiality agreement between you and CA.
Notwithstanding the foregoing, if you are a licensed user of the software product(s) addressed in the Documentation, you may print or otherwise make available a reasonable number of copies of the Documentation for internal use by you and your employees in connection with that software, provided that all CA copyright notices and legends are affixed to each reproduced copy.
The right to print or otherwise make available copies of the Documentation is limited to the period during which the applicable license for such software remains in full force and effect. Should the license terminate for any reason, it is your responsibility to certify in writing to CA that all copies and partial copies of the Documentation have been returned to CA or destroyed.
TO THE EXTENT PERMITTED BY APPLICABLE LAW, CA PROVIDES THIS DOCUMENTATION “AS IS” WITHOUT WARRANTY OF ANY KIND, INCLUDING WITHOUT LIMITATION, ANY IMPLIED WARRANTIES OF MERCHANTABILITY, FITNESS FOR A PARTICULAR PURPOSE, OR NONINFRINGEMENT. IN NO EVENT WILL CA BE LIABLE TO YOU OR ANY THIRD PARTY FOR ANY LOSS OR DAMAGE, DIRECT OR INDIRECT, FROM THE USE OF THIS DOCUMENTATION, INCLUDING WITHOUT LIMITATION, LOST PROFITS, LOST INVESTMENT, BUSINESS INTERRUPTION, GOODWILL, OR LOST DATA, EVEN IF CA IS EXPRESSLY ADVISED IN ADVANCE OF THE POSSIBILITY OF SUCH LOSS OR DAMAGE.
The use of any software product referenced in the Documentation is governed by the applicable license agreement and such license agreement is not modified in any way by the terms of this notice.
The manufacturer of this Documentation is CA.
Provided with “Restricted Rights.” Use, duplication or disclosure by the United States Government is subject to the restrictions set forth in FAR Sections 12.212, 52.227-14, and 52.227-19(c)(1) - (2) and DFARS Section 252.227-7014(b)(3), as applicable, or their successors.
Copyright © 2103 CA. All rights reserved. All trademarks, trade names, service marks, and logos referenced herein belong to their respective companies.
|
Copyright © 2103 CA.
All rights reserved.
|
|