

The XPSExport tool supports the following tasks for migrating policy store data:
You can export a policy-data subset by specifying the identifier of a root object:
Only those objects without a parent class can be exported. For example, to export a realm object, you specify the identifier (XID) the parent object that contains the realm.
You can also create and edit a custom export file using the "shopping cart", or XCart, capability in XPSExplorer (XPSExplorer -xf). You can set the import mode (ADD, OVERLAY, REPLACE, or DEFAULT) for each object that the XCart file contains. Then pass the XCart file to XPSExport using the -xf parameter.
Consider the following points:
The XPSExport command can add these objects the new environment or can overwrite existing objects. Be sure that you do not adversely affect environment settings when importing the objects.
The syntax of the XPSExport is following:
XPSExport output_file [-xo object_XID] [-xo-add object_XID] [-xo-replace object_XID]
[-xo-overlay object_XID] [-xf file_name]  [-xe] [-xs] [-xc] [-xi] [-xm]
[-f] [-fm] [-q] [-m <number>[%]] [-pass <passphrase>] [-comment comment]
[-cf commentpath] [-?] [-vT] [-vI] [-vW] [-vE] [-vF] [-l log_file] [-e err_file]
The output XML file.
Specifies one or more objects for granular export. You can optionally specify one of the following export types:
Specifies only additions are done during the import.
Specifies that the policy data is overwritten during an import.
Specifies that policy data is updated during an import.
(Optional) Specifies the absolute name of a file that contains the XIDs for the exported objects.
The entries in the file have the following format:
CA.SM::UserDirectory@0e-255e2456-556d-40fb-93cd-f2fed81f656e
ADD = CA.SM::AuthScheme@0d-4afc0e41-ae25-11d1-9cdd-006008aac24b
REPLACE = CA.SM::Agent@01-cb8b3401-a6aa-4794-964e-c569712269c0
OVERLAY = CA.SM::Domain@03-7bdf31f2-44d7-4d7b-a8f5-5de2eaa0b634
These entries correspond to the following command-line parameters:
-xo CA.SM::UserDirectory@0e-255e2456-556d-40fb-93cd-f2fed81f656e
-xo-add CA.SM::AuthScheme@0d-4afc0e41-ae25-11d1-9cdd-006008aac24b
-xo-replace CA.SM::Agent@01-cb8b3401-a6aa-4794-964e-c569712269c0
-xo-overlay CA.SM::Domain@03-7bdf31f2-44d7-4d7b-a8f5-5de2eaa0b634
(Optional) Exports the object types that are related to the execution environment.
(Optional) Exports the entire security data.
(Optional) Exports the entire configuration data.
(Optional) Exports the object types that were initially installed.
Example: AgentType
(Optional) Exports the objects that are specified in an ExtractManifest object.
(Optional) Overwrites the output file.
(Optional) Uses less memory, but affects the performance.
(Optional) Suppresses progress messages.
(Optional) Indicates that progress messages are output after every <number> of objects.
If the optional percent sign ("%") is included, then <number> is a percentage of the total objects, not a number of objects.
Default: ten percent.
(Optional) Specifies the passphrase that is required for encrypting sensitive data. This password must be at least eight characters long. The password must contain at least one digit, one uppercase, and one lowercase character. The passphrase can contain a space that is enclosed in quotes. If not specified as a command-line option, the export process prompts for a passphrase when sensitive data is being exported.
(Optional) Adds a comment to the output file.
(Optional) Obtains the comment from the <commentpath> and adds it to the output file.
Displays command-line help.
(Optional) Averts the beeps on error.
(Optional) Sets the verbosity level to TRACE.
(Optional) Sets the verbosity level to INFO.
(Optional) Sets the verbosity level to WARNING (default).
(Optional) Sets the verbosity level to ERROR.
(Optional) Sets the verbosity level to FATAL.
(Optional) Outputs log to the specified file.
(Optional) Specifies the file to which errors and exceptions are logged. If omitted, stderr is used.
XPSExport PolicyData.xml -xo CA.SM::UserDirectory@0e-255e2456-556d-40fb-93cd-f2fed81f656e
-xo-overlay CA.SM::Domain@03-7bdf31f2-44d7-4d7b-a8f5-5de2eaa0b634
Note: For granular exports, the export type is specified explicitly on the command line or is retrieved from the data dictionary. For dump exports, the export type attribute for all objects is REPLACE (whatever the data dictionary value for the object class is set to). A load import of the policy data replaces all the policy data in the policy store.
When XPSExport command finds errors in the command-line options, the export tool aborts and creates a log file. The export process aborts when the export of any object fails. Any export errors are logged to the exception file (or stderr). The XML output file (if it has been created) is deleted.
The diagram following shows a SiteMinder policy domain named Domain1 in the source policy store that has to be exported and imported to the target policy store.
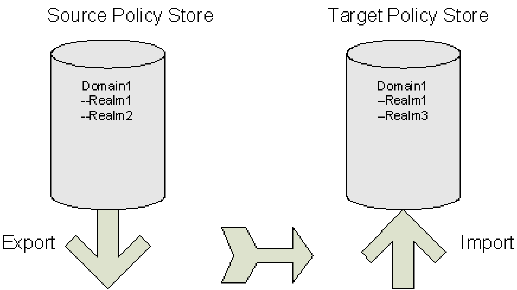
The target policy store already has a domain with the same name, but there are differences between the two:
To specify a granular import of only one object (Realm2) into the target policy store, the command line on export would look like this:
XPSExport gran-add.xml -xo-add CA.SM: :Domain@03-0fb7bd02-6986-4bb9-b240-c232358958b1
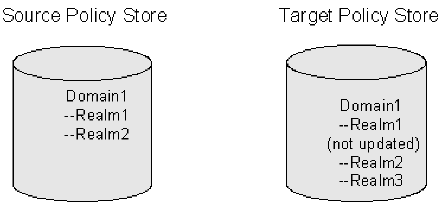
After a successful import Domain1 in the target policy store has three realms. The properties of Realm1 are not updated, as shown in the figure following.
To specify a granular export of an explicitly specified object (domain) into the target policy store using the add method, use the following command:
XPSExport -ma -xo <object_XID>
Adds all the objects appearing after this parameter on the command line.
To specify a granular export of all the relevant objects of the explicitly specified object (domain) into the target policy store using the add method, use the following command:
XPSExport -ra -xo <object_XID>
Adds the relevant system objects of the objects appearing after this parameter on the command line.
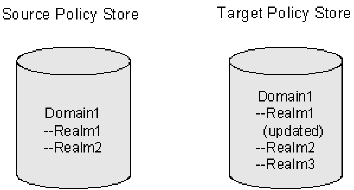
The diagram following shows a SiteMinder policy domain named Domain1 in the source policy store that has to be exported and imported to the target policy store.
The target policy store already has a domain with the same name, but there are differences between the two:
To specify a granular import where the target policy store is updated with the latest changes from the source policy store, the command line on export would look like this:
XPSExport gran-add.xml -xo-overlay CA.SM: :Domain@03-0fb7bd02-6986-4bb9-b240-c232358958b1
After a successful import the properties of Realm1 on the target policy store are updated, as shown in the figure following.
To specify a granular export of an explicitly specified object (domain) into the target policy store using the overlay method, use the following command:
XPSExport -mo -xo <object_XID>
Overlays all the objects appearing after this parameter on the command line.
To specify a granular export of all the relevant objects of the explicitly specified object (domain) into the target policy store using the overlay method, use the following command:
XPSExport -ro -xo <object_XID>
Overlays the relevant system objects of the objects appearing after this parameter on the command line.
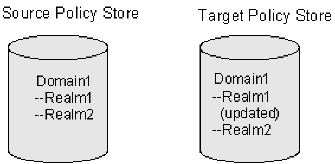
The diagram following shows a SiteMinder policy domain named Domain1 in the source policy store that has to be exported and imported to the target policy store.
The target policy store already has a domain with the same name, but there are differences between the two:
To duplicate the contents of the source policy store in the target policy store, the command line on export would look like this:
XPSExport gran-add.xml -xo-replace CA.SM: :Domain@03-0fb7bd02-6986-4bb9-b240-c232358958b1
After a successful import Domain1 in the target policy store is exactly the same as Domain1 in the source policy store, as shown in the figure following.
To specify a granular export of an explicitly specified object (domain) into the target policy store using the replace method, use the following command:
XPSExport -mr -xo <object_XID>
Replaces all the objects appearing after this parameter on the command line.
To specify a granular export of all the relevant objects of the explicitly specified object (domain) into the target policy store using the replace method, use the following command:
XPSExport -rr -xo <object_XID>
Replaces the relevant system objects of the objects appearing after this parameter on the command line.
The XPSImport tool supports the following tasks for migrating policy store data:
Note: XPSImport does not import keys into the key store. You must use smkeyimport for this purpose.
The syntax for XPSImport is:
XPSImport input_file [-pass <passphrase>] [-npass] [-validate] [-fo] [-vT] [-vI] [-vW] [-vE] [-vF] [-e file_name] [-l log_path] [-?]
Specifies the input XML file.
(Optional) Suppresses progress messages.
(Optional) Indicates that progress messages are output after every <number> of objects.
If the optional percent sign ("%") is included, then <number> is a percentage of the total objects, not a number of objects.
Default: 10%.
(Optional) Specifies the passphrase required for decryption of sensitive data. The phrase must be the same as the phrase specified during export, or the decryption will fail.
(Optional) Specifies that no passphrase is to be used.
Important! Sensitive data is imported as clear text.
(Optional) Validates the input XML file without updating the database.
Specifies the schema file to validate the input file. If this option is not specified then input file will not be validated.
Allows force overwrite of existing policy store date for a dump load.
Displays command-line help.
(Optional) Averts the beeps on error.
(Optional) Sets the verbosity level to TRACE.
(Optional) Sets the verbosity level to INFO.
(Optional) Sets the verbosity level to WARNING (default).
(Optional) Sets the verbosity level to ERROR.
(Optional) Sets the verbosity level to FATAL.
(Optional) Outputs log to the specified file.
(Optional) Specifies the file to which errors and exceptions are logged. If omitted, stderr is used.
Example
XPSImport PolicyData.xml -e C:\\tmp\\ExceptionLog.txt
This example imports policy data objects as specified in the PolicyData.xml file. It is not immediately evident from the command line if the import is a dump load or a granular import. That information can however be retrieved by looking at the IsDumpExport attribute of <PolicyData> element in the input XML file. If this attribute is set to true, it indicates that the input XML file has to be used for dump load.
The following factors might possibly be relevant when transferring policy store data:
The smexportkey tool exports keys from the key store. The syntax for smkeyexport is following.
smkeyexport -dadminname -wadminpw [-ooutput_filename] [-f] [-c] [-cb] [-cf] [-l] [-v] [-t] [-?]
Specifies the name of the SiteMinder administrator.
Specifies the password of the SiteMinder administrator.
(Optional). Specifies the output file; defaults to stdout.smdif.
(Optional).Overwrites an existing output file.
(Optional). Exports sensitive data unencrypted.
(Optional). Exports sensitive data encrypted with backward-compatible cryptography.
(Optional). Exports sensitive data encrypted with FIPS-compatible cryptography.
(Optional). Creates and logs entries to the specified file (filename.log).
(Optional). Specifies verbose messaging.
(Optional). Enables tracing.
(Optional). Displays command options.
The smldapsetup utility allows you to manage an LDAP policy store from the command line. Using smldapsetup, you can configure an LDAP policy store, generate an LDIF file, and remove policy store data and schema.
To use smldapsetup, specify a mode, which determines the action that smldapsetup will perform, and arguments, which contain the values that are used to configure the LDAP server.
The following table contains the modes you can use with smldapsetup and the arguments each mode uses:
|
Modes |
Arguments |
|---|---|
|
reg |
-hhost, -pportnumber, -duserdn, |
|
ldgen |
-hhost, -pportnumber, -duserdn, |
|
ldmod |
-hhost, -pportnumber, -duserdn, |
|
remove |
-hhost, -pportnumber, -duserdn, |
|
switch |
none |
|
revert |
-v |
|
status |
-v |
To use smldapsetup
Specifies the installed location of SiteMinder.
smldapsetup mode arguments
Important! Before running a SiteMinder utility or executable on Windows Server 2008, open the command line window with administrator permissions. Open the command line window this way, even if your account has administrator privileges.
Example: smldapsetup reg -hldapserver.mycompany.com -d”LDAP User”
-wMyPassword123 -ro=security.com
Note: When running smldapsetup, make sure that the LDAP user you specify has the appropriate administrator privileges to modify schema in the LDAP Directory Server. If this user does not have the proper privileges, then the LDAP server will not allow you to generate the policy store schema. After running the smldapsetup command, this user appears in the Admin Username field on the Data tab of the Policy Server Management Console.
The mode indicates the action that smldapsetup performs. You can specify a mode to connect to the LDAP server, generate an LDIF file, configure an LDAP policy store and remove policy data.
The modes for smldapsetup include:
Tests the connection to the LDAP server. If the connection succeeds, smldapsetup configures the SiteMinder LDAP server as its policy store using the -hhost, -pportnumber, -duserdn, -wuserpw, -rroot, -ssl1/0 and -ccertdb arguments.
Automatically detects supported LDAP servers and generates an LDIF file with the SiteMinder schema. The generated file is used by smldapsetup ldmod to create the SiteMinder schema. If the -e argument is specified, smldapsetup ldgen creates an LDIF file that can be used with ldmod to delete the SiteMinder schema. Use the -m switch to skip automatic detection of LDAP servers. The ldgen mode requires the -f switch unless previously configured in reg mode.
Connects to the LDAP server and the SiteMinder schema without populating the policy store with any data. It requires the LDAP modify program and the LDIF file, specified with the -fldif argument. If you specify the -hhost, -pport_number, -duserdn,-wuserpw, -rroot, -ssl1/0 and -ccertdb arguments, smldapsetup ldmod will modify the LDAP directory specified using these arguments. If you do not specify -hhost, -pportnumber, -duserdn, -wuserpw, -rroot, -ssl1/0 and -ccertdb, smldapsetup ldmod uses the LDAP directory previously defined using smldapsetup reg or the Policy Server Management Console.
Connects to the LDAP server, then removes all policy data stored under the SiteMinder LDAP node that corresponds to the current version of smldapsetup. If you specify the -hhost, -pport_number, -duserdn,-wuserpw, -rroot, -ssl1/0 and -ccertdb arguments, smldapsetup remove will remove policy data from the LDAP directory specified by these arguments. If you do not specify -hhost, -pport, -duserdn, -wuserpw, -rroot, -ssl1/0 and -ccertdb, smldapsetup remove will remove the policy data from the LDAP directory previously defined using smldapsetup reg or the Policy Server Management Console.
Reconfigures the Policy Server to use LDAP rather than ODBC. It does not prepare the LDAP store or the LDAP connection parameters before making the change.
Reverts to ODBC policy store from LDAP. The only argument used with this mode is -v.
Verifies that the LDAP policy store connection parameters are configured correctly. It requires the -v argument. If you specify the
-hhost, -pport_number, -duserdn, -wuserpw, -rroot,
-ssl1/0 and -ccertdb arguments, smldapsetup status tests the connection to the LDAP directory specified using these arguments. If you do not specify -hhost, -pport_number, -duserdn, -wuserpw,
-rroot, -ssl1/0 and -ccertdb, smldapsetup status verifies the connection to the LDAP directory previously defined using smldapsetup reg or the Policy Server Management Console.
From the Data tab in the Policy Server Management Console, you can view or change the settings you configured with the reg, switch and revert functions using a GUI interface. You must use smldapsetup to perform the ldgen, ldmod, remove, and status functions.
|
Copyright © 2012 CA.
All rights reserved.
|
|