

Several administrators in your company can be responsible for different aspects of federation management. Assign the administration of CA SiteMinder® Federation Standalone to multiple people in your organization to establish accountability and separation of responsibilities.
A default administrator account is always available to manage CA SiteMinder® Federation Standalone. After you add new administrators, optionally, disable the default administrator account.
Create and maintain new administrative users through the Administrative UI.
The following graphic shows the configuration tasks for configuring administrators:
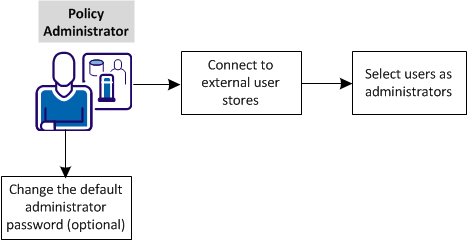
Complete these tasks:
Create the connections to LDAP and ODBC external user stores. This step is required before you configure multiple administrators.
LDAP and ODBC are the two types of directories that the federation system supports.
Follow these steps:
You can select Action, Modify to verify the configuration of an existing directory connection.
Note: Click Help for a description of fields, controls, and their respective requirements.
The universal ID value must be unique to identify individual users in a directory. For example, enter uid as a universal ID for an LDAP directory because each user has a uid. Do not use an attribute such as a job title because many users have the same title.
(uid=
)
You can click View Contents to list the contents of the user directory.
Note:
If your settings are valid, you are redirected to the View User Directories dialog.
The connection to the directory is configured.
After you establish connections to external user stores, select users to serve as administrators.
Follow these steps:
Note: Click Help for a description of each privilege.
You can change the privileges of the administrator and can enable/disable the administrator.
Multiple administrators are now available to divide ederation management tasks.
For security reasons, change the password that gives the default administrator access to the Administrative UI. This task is optional.
Two methods are available to change the administrator password:
If the administrator user account is locked or the administrator is not available, reset the password from the command line.
|
Copyright © 2013 CA.
All rights reserved.
|
|