

A federated partnership relies on trust between the two parties. Part of the trust relationship can be a contractual requirement to have user permission to pass on identity information to a relying partner. Additionally, users that control whether to exchange their identity information for a requested service helps enforce the trust relationship.
Your federation system acting as an Identity Provider supports the SAML 2.0 user consent feature. User consent at the Identity Provider site requires that the Identity Provider asks the user to grant permission before it sends an assertion to a partner. If you enable user consent at the Identity Provider, the Identity Provider prompts the user for consent. The Identity Provider passes the consent value in an assertion.
The consent validity period is 5 minutes. When the Identity Provider redirects the user to the consent page, the user has 5 minutes to grant consent. The user is then redirected back to the Identity Provider. The Identity Provider then generates the assertion and sends it to the Service Provider. These tasks must be complete in the 5-minute time period. If the time expires before the Identity Provider generates an assertion, it does not pass on the user identity.
Consent applies only to a single assertion. After the Identity Provider generates an assertion, it deletes all record of consent being granted. The same user can return to an Identity Provider before the 5-minute validity period expires, but the Identity Provider still prompts the user for consent.
Note: The validity period is not configurable.
This figure shows the configuration tasks at each partner.
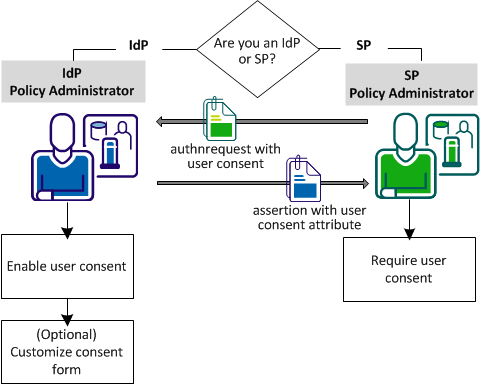
The configuration tasks at the IdP are:
The configuration task at the SP is:
The following use case illustrates user consent.
User1 logs in and authenticates at MyWorkPlace.com at 2:00PM. MyWorkPlace is acting as an Identity Provider. At 2:03PM, the user selects a link to the partner company that runs travel specials for employees. User1 is redirected to a form that asks for consent before sending User1 to ExampleTravel.com. User1 takes a phone call before completing the consent form. The time is now 2:10PM. MyWorkPlace does not generate an assertion because the validity period has expired.
If User1 grants consent promptly and is redirected back to the Identity Provider by 2:05PM, the Identity Provider generates an assertion. Only 2 minutes pass between consent and assertion generation, so the validity period is still active.
Configuring user consent requires that you:
The Identity Provider sends the custom form to the user to get consent.
Configure user consent at the Identity Provider using the Administrative UI. When you configure this feature through the UI, only the following URI is used in the assertion response:
urn:oasis:names:tc:SAML:2.0:consent:obtained
You can also enable this feature using the CA SiteMinder® Federation Standalone Java or .NET SDKs. The SDK passes whatever user consent value it receives from the third party that is performing delegated authentication.
User consent is also configurable at the Service Provider. A Service Provider can require the Identity Provider to pass the user consent value in the assertion response.
Note: The User Consent Service URL is specified by default. You cannot change this value.
The product ships with a consent to federate form named ca_defaultconsentform.html. The Identity Provider sends the custom form to the user to get permission to send an assertion for that user. The default consent form is in the following locations:
Windows: %FEDROOT%\customization
UNIX: $FEDROOT/customization
FEDROOT is the system environment variable.
You can write a custom form instead of using the default consent form.
Follow these steps:
Represents the SP ID configured in the partnership
Represents the IDP ID configured in the partnership.
The SP can require that the user consent attribute be in the assertion response returned by the IdP. To include this attribute in the authentication request, enable the setting in the Administrative UI.
Follow these steps:
Note: Click Help for a description of fields, controls, and their respective requirements.
The user consent attributes is placed in the authentication request sent to the IdP.
|
Copyright © 2014 CA.
All rights reserved.
|
|