

Directory connections resolve how CA SiteMinder® Federation Standalone establishes a context for user identities. The asserting party determines which users it can create assertions for by authenticating each user against a user directory.
Multiple user directories in a federated environment often store the same type of user information, but each directory uses a different underlying schema and different user attribute names to identify the information. Therefore, CA SiteMinder® Federation Standalone receives a disparate view of the same user information. For example, an LDAP directory can use the attribute uid to represent a user name, whereas an ODBC directory can use the attribute name for the same information.
The purpose of user attribute mapping is to create a common view of the same information by defining a universal schema. The universal schema can resolve user information across multiple user directories. The system can reference user attributes without regard for the directory type, greatly reducing the number of configuration objects that are required for multiple user directories.
Each user attribute mapping is specific to the user directory in which it is defined.
After the connections to the user directories are configured, use one common name to reference the same information in different user directories.
The feature that you use to create a universal schema is called user attribute mapping. Configure this feature within the user directory configuration of the Administrative UI.
The following graphic shows the process for configuring user attribute mapping at the asserting party.
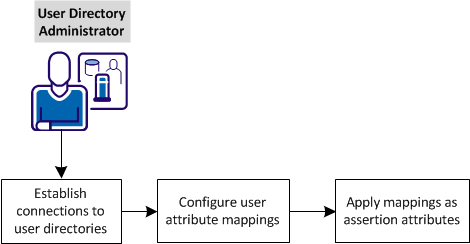
Complete the following tasks at the asserting party for user attribute mapping:
Before you can establish user attribute mappings, establish connections to the user directories that store user records.
LDAP or ODBC are the two types of directories to which the product can connect.
Follow these steps:
Note: Click Help for a description of fields, controls, and their respective requirements.
You can click View Contents to list the contents of the user directory.
Note:
If your settings are valid, you are redirected to the View User Directories dialog.
The connection to the directory is configured.
Use one or more of the following mapping types to define attribute mappings:
The following table lists the type of data you can enter in the mapping definition. Define individual mappings for each user directory in your deployment.
|
Mapping Type |
Map Common Name to... |
Data Types |
Access |
|---|---|---|---|
|
Alias |
A user attribute name in the directory. |
String, Number, Boolean |
Read/Write |
|
Group name |
An attribute that identifies whether a user belongs to a specific group. |
Boolean |
Read/Write |
|
Mask |
A user attribute that stores a bit pattern. |
Boolean |
Read/Write |
|
Constant |
A value that is the same or constant for every user in a directory. |
String, Number, Boolean |
Read |
|
Expression |
To an expression. For complete syntax information, see the Attributes and Expression Reference appendix in the SiteMinder Policy Server Configuration Guide. This guide is part of the SiteMinder bookshelf. |
String, Number, Boolean |
Read |
The configuration procedures for each mapping type are basically the same. Refer to the use cases for each mapping type for implementation examples.
Follow these steps:
Specify the common name for this mapping. Common names must conform to the same rules as user attribute names.
Enter a description of the attribute mapping.
Select the mapping type that you want to configure.
Enter the mapping definition using the appropriate syntax. Refer to the previous table.
The new attribute mapping is submitted and then added to the list on the Attribute Mapping List table.
This use case shows two LDAP user directories, which identify the last name of users, but the directories have different underlying schema.
Note: Review the advanced user attribute mapping examples, which detail how to use different attribute mapping types to identify the same user attribute across different directory types.
The following illustration details how two alias attribute mappings can create a common view of the same user information.
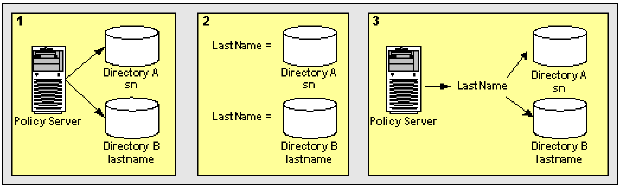
This results in two different views of the same user information.
LastName results in a common view of the same user information. Use LastName when defining assertion attributes or NameID attributes that use the last names. The system has no concern for the directory-specific schema because the directories are operationally identical.
This use case shows two LDAP user directories, which use different underlying schema to identify users that belong to an Administrator group.
Note: Review the advanced user attribute mapping examples, which detail how to use different attribute mapping types to identify the same user attribute across different directory types.
The following illustration details how two group name attribute mappings can create a common view of the same user information.
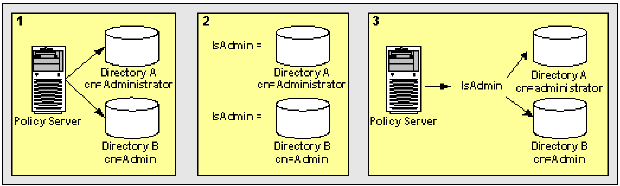
This results in two different views of the same user information.
IsAdmin results in a common view of the administrator group. You can reference IsAdmin when defining assertion attributes or NameID attributes that apply to the Administrator group. The system has no concern for the directory-specific schema because the directories are operationally identical.
Some directory implementations use individual bits in an attribute to provide information about that attribute, such as the state of an account. You can apply a bit mask to an attribute.
This use case shows two Active Directory user stores that identify disabled user accounts. Each account has a different underlying schema.
Note: Review the advanced user attribute mapping examples, which detail how to use different attribute mapping types to identify the same user attribute across different directory types.
The following illustration details how two mask attribute mappings can create a common view of the same user information.
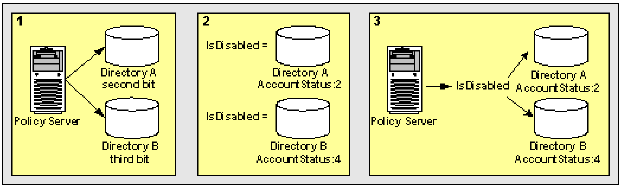
This results in two different views of the same user information.
IsDisabled results in a common view of disabled user accounts. You can reference IsDisabled when defining assertion attributes or NameID attributes that require the account status of users. The system has no concern for the directory-specific schema because the directories are operationally identical.
A bit mask attribute mapping tests the value of one or more bits by masking the values of the other bits in a user attribute.
A mask attribute mapping is defined as follows:
user_attribute_name:bit_mask
For example, assume that the user attribute is named AccountStatus. The attribute AccountStatus stores the states of the following three flags in a bit pattern:
|
Bit Pattern |
Flag |
|---|---|
|
00? |
account disabled? |
|
0?0 |
password expired? |
|
?00 |
gold member? |
When a bit equals one, the flag is TRUE. The table shows the results:
|
Bit Pattern |
Account Status |
|---|---|
|
000 (0) |
no flags are TRUE |
|
001 (1) |
account disabled |
|
010 (2) |
password expired |
|
100 (4) |
gold member |
|
011 (3) |
password expired, account disabled |
|
101 (5) |
gold member, account disabled |
|
110 (6) |
gold member, password expired |
|
111 (7) |
gold member, password expired, account disabled |
Note: Equivalent decimal values are shown in parentheses.
Assume that you only want to test whether a user is a gold member. To test this bit, select the bit pattern that corresponds to a gold member as the bit mask or 100 (binary) and specify it as 4 (decimal). The resulting mask attribute mapping is defined as follows:
AccountStatus:4
A bitwise AND operation on AccountStatus is performed on the bit mask and tests whether the result is equal to the bit mask. An equal result means the value of the tested bit is one and the flag is TRUE. The following table shows the results:
|
Account Status |
Bit Mask |
Result of Bitwise AND |
Gold Member? |
|---|---|---|---|
|
000 (0) |
100 (4) |
000 (0) |
FALSE |
|
001 (1) |
100 (4) |
000 (0) |
FALSE |
|
010 (2) |
100 (4) |
000 (0) |
FALSE |
|
011 (3) |
100 (4) |
000 (0) |
FALSE |
|
100 (4) |
100 (4) |
100 (4) |
TRUE |
|
101 (5) |
100 (4) |
100 (4) |
TRUE |
|
110 (6) |
100 (4) |
100 (4) |
TRUE |
|
111 (7) |
100 (4) |
100 (4) |
TRUE |
Note: Equivalent decimal values are shown in parentheses.
You can also use a bit mask to test the value of a bit set or more than one bit at a time. Assume that you want to know whether the account is disabled and the password has expired. To test these bits, specify a bit mask of 011 (binary) or 3 (decimal). The resulting mask attribute mapping is defined as follows:
AccountStatus:3
A bitwise AND operation on AccountStatus is performed on the bit mask and tests whether the result is equal to the bit mask. An equal result means the value of both tested bits is one and both flags are TRUE. The following table shows the results:
|
Account Status |
Bit Mask |
Result of Bitwise AND |
Both Flags Set? |
|---|---|---|---|
|
000 (0) |
011 (3) |
000 (0) |
FALSE |
|
001 (1) |
011 (3) |
001 (1) |
FALSE |
|
010 (2) |
011 (3) |
010 (2) |
FALSE |
|
011 (3) |
011 (3) |
011 (3) |
TRUE |
|
100 (4) |
011 (3) |
000 (0) |
FALSE |
|
101 (5) |
011 (3) |
001 (1) |
FALSE |
|
110 (6) |
011 (3) |
010 (2) |
FALSE |
|
111 (7) |
011 (3) |
011 (3) |
TRUE |
Note: Equivalent decimal values are shown in parentheses.
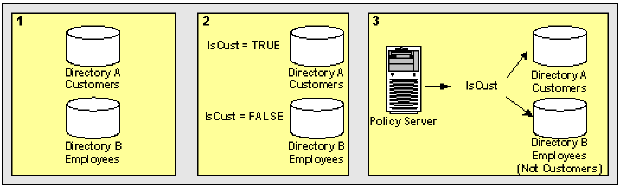
This use case represents a scenario in which one user directory stores only customers, while another user directory stores only employees.
Note: Review the advanced user attribute mapping examples, which detail how to use different attribute mapping types to identify the same user attribute across different directory types.
The following illustration details how two constant attribute mappings can represent different values for different user directories.
This use case shows how you can use an expression attribute mapping to simplify references to multiple user attributes in one directory. A protected resource needs the sort name of each user (last name,first name). The user directory does not uniquely reference this attribute. Instead, the directory does store the last name of each user as surname and the first name of each user as givenname.
The following illustration details how an expression attribute mapping can create a common view of the same user information.
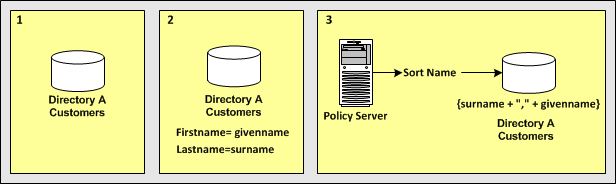
In the single user directory, a common name is mapped to an expression that creates the sort name using the user attribute names in the directory.
{surname + "," + givenname}
Note: The expression conforms to the syntax rules of a CA SiteMinder® expression. For complete syntax information, see the Attributes and Expression Reference appendix in the SiteMinder Policy Server Configuration Guide in the SiteMinder bookshelf.
Reference SortName when defining assertion attributes or NameID attributes that require the sort name of users without concern for the directory-specific schema.
The following examples show more complex user attribute mapping configurations.
The example deployment is a retail clothing company that uses two user directories of different types:
An internal LDAP user directory for employees only.
An ODBC user directory for customers only.
Each user attribute mapping is specific to the user directory for which it is defined.
The following table details how Directory A and Directory B identify the same user information. The accompanying use cases explain how to use different attribute mappings to define a common view of the same user information. The common view serves as a universal schema, which makes the directories operationally identical.
|
Attribute Description |
Directory A Attributes (LDAP) |
Directory B Attributes (ODBC) |
|
First name of each user |
givenname |
u_first_name |
|
Last name of each user |
surname |
u_last_name |
|
Sort name of each user (last name, first name) |
The user directory does not uniquely store the user attribute. |
sort_name |
|
User as a customer |
group:cn=customer,ou=groups,o=acme.com |
Users are always customers. |
|
Status of a user account |
AccountStatus attribute (a set of flags). Second bit is a disabled account. |
u_disabled |
Use two alias attribute mappings to represent the first name user attribute in Directory A and Directory B.
Deployment
User Directory A identifies the first name of users with givenname. Directory B identifies the first name of users with u_first_name.
Solution
FirstName
Alias
givenname
FirstName
Alias
u_first_name
When referencing users in Directory A, the FirstName is mapped to givenname. When referencing users in Directory B, the FirstName maps to u_first_name.
Use two alias attribute mappings to represent the last name user attribute in Directory A and Directory B.
Deployment
User Directory A identifies the last name of users with surname. Directory B identifies the last name of users with u_last_name.
Solution
LastName
Alias
surname
LastName
Alias
u_last_name
When referencing users in Directory A, the common view determines that the last name of users is identified by surname. When referencing users in Directory B, the common view determines that the last name is identified by u_last_name.
Use an expression attribute mapping and an alias attribute mapping to represent the sort name of a user in Directory A and Directory B.
Deployment
Solution
SortName
Expression
(surname + "," + givenname)
Note: The expression must conform to the syntax rules of an expression.
SortName
Alias
sort_name
When referencing users in Directory A, the sort name is calculated based on the specified expression. When referencing users in Directory B, the sort name is represented by the attribute sort_name.
Use a group and a constant attribute mapping to identify customers in Directory A and Directory B.
Deployment
cn=Customers,ou=Groups,o=acme.com
Solution
IsCustomer
Group
cn=Customers,ou=Groups,o=acme.com
IsCustomer
Constant
TRUE
When referencing Directory A, a user is considered a customer if they belong to cn=Customers,ou=Groups,o=acme.com. When referencing Directory B, every user is a customer.
Use a mask attribute mapping and an expression attribute mapping to identify user accounts that are disabled in Directory A and Directory B.
Deployment
Solution
IsDisabled
Mask
AccountStatus:2
The definition indicates that the bit pattern is stored in AccountStatus, and the bit mask is 2 (decimal).
IsDisabled
Expression
(u_disabled = "y")
u_disabled is a Boolean expression.
When referencing Directory A, the bit pattern determines if a user is disabled. When referencing Directory B, the expression determines if a user is disabled.
After you define user attribute mappings for your user directories, add the user attribute mapping to the assertion configuration for the asserting-to-relying party partnership. The mapping helps the asserting party include the right attributes in the assertion, regardless of the different attributes for each directory type.
The Name ID type can be a user attribute in the assertion configuration.
Follow these steps:
Specify any name for the name/value pair of an assertion attribute.
Choose the format that indicates how to interpret the attribute name.
User attribute
Always select the user attribute type as the value for this field.
Enter the value from the Name field in the user mapping section of the User Directory dialog.
Example: If the Name you assigned to a mapping is FullName, enter FullName in this field.
|
Copyright © 2014 CA.
All rights reserved.
|
|