

A deployed CA SiteMinder® system can integrate with CA SiteMinder® Federation Standalone using the CA SiteMinder® Connector, a software component included with CA SiteMinder® Federation Standalone. The Connector enables the following interaction between federation and web access management deployments:
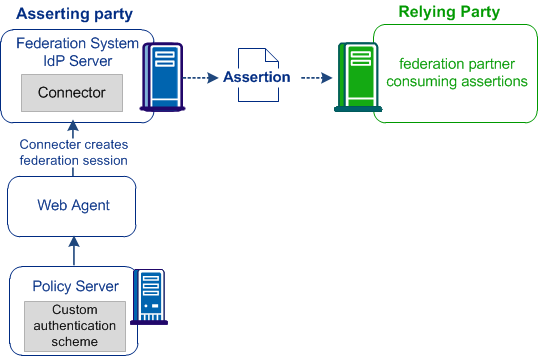
At the asserting party, a user arrives at CA SiteMinder® Federation Standalone but has no session. The Connector communicates with CA SiteMinder® to establish a CA SiteMinder® session. Based on the contents of the CA SiteMinder® session, the Connector creates a federation session. Using this session information, a SAML assertion is generated for the user.
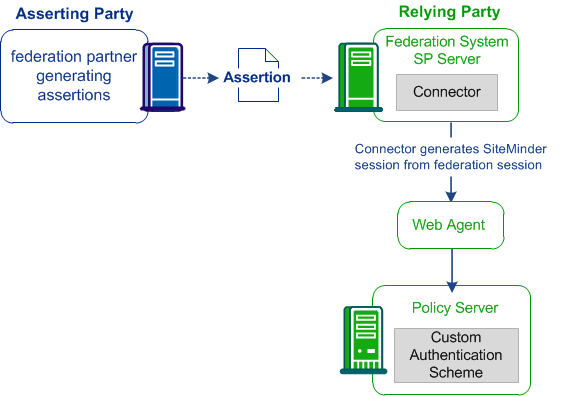
At the relying party, a user authenticates with CA SiteMinder® Federation Standalone and a federation session is generated. The Connector passes on the federation session with the user name to CA SiteMinder®, which generates a CA SiteMinder® session from the federation session. The user is now identified and is not rechallenged for credentials. CA SiteMinder® determines the authorization privileges for the requested resources at the relying party.
The following figure shows the configuration process when integrating with the Connector:
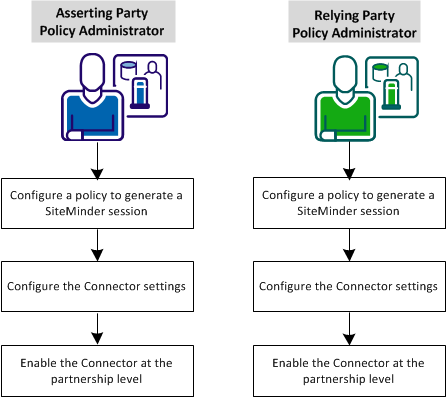
Complete the following configuration steps:
The CA SiteMinder® Connector enables the following integrations:
At the asserting party, a user arrives at CA SiteMinder® Federation Standalone but has no session. The Connector communicates with CA SiteMinder® to establish a CA SiteMinder® session. The use of the session information results in a federation session and the generation of a SAML assertion for the user. With this assertion, the user can access protected federated resources at the relying party.
At the relying party, a user authenticates with CA SiteMinder® Federation Standalone and a federation session is generated. The Connector passes on the federation session with the user name to CA SiteMinder®, which generates a CA SiteMinder® session. By establishing this session, these users do not get rechallenged when accessing a protected resource. The user is now identified and access privileges for the user at the relying party can be determined.
The FEDSESSION cookie uses the following timeout settings:
You cannot change these timeout settings in UI.
The Connector requires configuration in the CA SiteMinder® environment and in the CA SiteMinder® Federation Standalone environment, as shown in the following diagrams.
This graphic shows the Connector at the asserting party:
This figure shows the Connector at the relying party.
The CA SiteMinder® Connector enables CA SiteMinder® Federation Standalone to work with an existing Policy Server. The first step is to configure a policy. At the asserting party, the policy generates a federation session. At the relying party, the policy generates a CA SiteMinder® session. Though this policy functions as any other policy, its main objective is to trigger a session, not to protect resources.
Note: Configure a policy at the asserting and the relying party.
The policy requires that you configure the typical policy objects; however, you apply a custom CA SiteMinder® Connector authentication scheme. This policy is specific to the Connector setup.
To configure the Policy Server objects, see the Policy Server Configuration Guide.
Important! Complete the following steps at the Policy Server before configuring the Connector.
Follow these steps:
Note: The name is case-sensitive on UNIX platforms.
Important! Do not select the option for supporting 4.x agents.
The Host Configuration Object defines the connection between a trusted host and the Policy Server. To integrate the federation system and the Policy Server, the Host Configuration Object defines the Policy Server to which the federation system can connect.
For the federation system to connect to one or more Policy Servers in an existing Host Configuration Object, use that object. Otherwise, create one for the federation-to-Policy Server-connection.
smauthsmconnector
This value is case-sensitive.
alphanumeric string
The value for this field must match the value Shared Secret value in the Connector settings in the Administrative UI.
Specify the Web Agent from the previous step.
Specify a dummy directory, such as /federation/. This directory does not have to exist on a web server.
Enter the name that you gave to the custom authentication scheme created previously.
*
Web Agent—Get and Post
Specify the users from the user directory that the federation system and CA SiteMinder® share.
Add the rule that is created for the Connector.
You now have a policy that generates a CA SiteMinder® session when communicating with CA SiteMinder® Federation Standalone.
For the Connector to interact with CA SiteMinder®, configure the Connector settings in the CA SiteMinder® Federation Standalone Administrative UI. All partnerships that use the Connector use a single configuration and connect to a single CA SiteMinder® environment.
Follow these steps:
The Configure Deployment Settings dialog opens.
Important! If the Connector is disabled at the global level, CA SiteMinder® Federation Standalone ignores the check box at the partnership level.
Note: Click Help for a description of fields, controls, and their respective requirements.
This step registers CA SiteMinder® Federation Standalone as an Agent with the CA SiteMinder® Policy Server.
Note: You can configure failover support for the host registration process by specifying more than one Policy Server. If the registration with the primary Policy Server fails, the registration process tries with the next Policy Server specified until the registration process completes successfully.
Important! Select Save specifically in the CA SiteMinder® Connector Settings section after registering the host.
Use the stop and start shortcuts as follows. If you logged in as a network user and not a local administrator, right-click the shortcut and select Run as administrator.
a. Open a command window.
b. Run the following scripts:
federation_install_dir/fedmanager.sh stop
federation_install_dir/fedmanager.sh start
Note: Do not stop and start the services as the root user.
The CA SiteMinder® Connector configuration is complete.
Before you enable the Connector, verify:
Enable the Connector for the partnership where CA SiteMinder® is deployed:
Whether you are modifying an existing partnership of configuring a new partnership, the standard partnership configuration steps apply; there are no unique configuration procedures. However, specify the target resources at the relying party in the using the following guidelines:
Follow these steps:
The Partnership dialog opens.
The configuration fields become available.
If you select this check box, the user directory for the CA SiteMinder® Federation Standalone and the CA SiteMinder® deployment must be the same physical directory. The name for both of these directories must be the same for user store lookups. If you clear the check box, the Universal ID is the attribute that finds the user record. If the Universal ID is used, the directories do not have to be the same. If you rely on the Universal ID, each user must have a unique Universal ID. If the Universal IDs are not unique, the system accessing the user record can retrieve the wrong record.
To disable the Connector, you can do so at the partnership level or globally in the Deployment Settings.
|
Copyright © 2014 CA.
All rights reserved.
|
|