

The Deployment Settings let you do the following:
The Deployment Settings shows the status of the deployment mode and FIPS mode that you selected when installing and configuring CA SiteMinder® Federation Standalone. Additionally, you can specify valid federation domains, and can set a prefix to protect HTTP headers in proxy mode.
The process for modifying each setting differs.
Valid Federation Domains and HTTP Header Prefix
Modify the Valid Federation Domains and HTTP Header Prefix entries from the UI. Changing these settings is optional.
Follow these steps:
FIPS Mode Changes
To change the FIPS Mode, run the Installation wizard again and choose a new setting.
Important! Anytime you change the FIPS mode, restart CA SiteMinder® Federation Standalone.
Deployment Mode Changes
To change the Deployment Mode, run the Configuration wizard again and change the mode.
In a proxy mode deployment at the relying party, CA SiteMinder® Federation Standalone passes identity attributes from the SAML assertion to backend applications using HTTP headers. In most cases, the headers are secure. However, if an unauthorized user knows an assertion attribute name they can set this name as a header in a browser and gain access to the target application. The target application sees an expected header value and grants access to the resource without CA SiteMinder® Federation Standalone consuming an assertion.
By specifying a value for the HTTP Header Prefix setting, you can protect against the following scenario:
To set the HTTP Header Prefix
You only see this field if you enabled Proxy Mode when installing CA SiteMinder® Federation Standalone.
The CA SiteMinder® Connector lets CA SiteMinder® Federation Standalone integrate with a CA SiteMinder® environment for federated communication.
At the asserting party, the CA SiteMinder® Connector can work with CA SiteMinder® as a third-party WAM for delegated authentication. At the relying party, CA SiteMinder® can protect the server where the target resources reside. If CA SiteMinder® is performing access control, the CA SiteMinder® Connector contacts the Policy Server to establish a CA SiteMinder® session so that CA SiteMinder® grants the user access to the target resource.
For CA SiteMinder® Federation Standalone to operate with CA SiteMinder®, configure the CA SiteMinder® Connector settings in the Administrative UI.
All partnerships that use the CA SiteMinder® Connector use a single configuration and connect to a single CA SiteMinder® environment. Define the Connector configuration in the Deployment Settings of the Administrative UI. To enable the Connector for a given partnership, enable it at the partnership level. Disable the Connector at the partnership level or globally by disabling it in the Deployment Settings.
Important! If the Connector is disabled at the global level, CA SiteMinder® Federation Standalone ignores the check box at the partnership level.
Follow these steps:
The Partnership dialog opens.
The configuration fields become available.
If you select this check box, the user directory for the CA SiteMinder® Federation Standalone deployment and the CA SiteMinder® deployment must be the same physical directory. The name for both of these directories must be the same for user store lookups. If you clear the check box, CA SiteMinder® Federation Standalone uses the Universal ID to find the user record so the directories do not have to be the same. If you rely on the Universal ID, each user must have a unique Universal ID. If the Universal IDs are not unique, the system accessing the user record can retrieve the wrong record.
The Configure Deployment Settings dialog opens.
Note: Click Help for a description of fields, controls, and their respective requirements.
This step registers CA SiteMinder® Federation Standalone as an Agent with the CA SiteMinder® Policy Server.
Note: You can configure failover support for the host registration process by specifying more than one Policy Server. If the registration with the primary Policy Server fails, CA SiteMinder® Federation Standalone moves to the next Policy Server specified until the registration process completes successfully.
Selecting Save in the CA SiteMinder® Connector Settings section is necessary after registering the host.
Use the stop and start shortcuts as follows. If you logged in as a network user and not a local administrator, right-click the shortcut and select Run as administrator.
a. Open a command window.
b. Run the following scripts:
federation_install_dir/fedmanager.sh stop
federation_install_dir/fedmanager.sh start
Note: Do not stop and start the services as the root user.
The CA SiteMinder® Connector configuration is complete.
CA SiteMinder® Federation Standalone supports single sign-on security zones. Single sign-on security zones provide configurable trust relationships between groups of applications within the same cookie domain.
Although single sign-on is enforced within the same zone, a user may be rechallenged when entering a different zone, depending on the trust relationship defined between the zones. Security zones included in a trusted relationship do not rechallenge a user that has a valid session in any zone in the group.
Security zone affiliation is reflected in cookie names. For CA SiteMinder® Federation Standalone, the default session and identity cookies are named FEDSESSION and FEDPROFILE.
Your federation partner possibly has an application that uses its own session or identity cookie. The names of the partner cookies can conflict with the names of CA SiteMinder® Federation Standalone's cookies. For example, if you are communicating with a CA SiteMinder® site, cookies named FEDSESSION and FEDPROFILE may exist because CA SiteMinder® generates its own session and identity cookies. In this case, you can change the global cookie zone prefix for CA SiteMinder® Federation Standalone so its cookies get renamed.
Note: If you have an application that is using a CA SiteMinder® Federation Standalone SDK, the values configured for the Global Cookie Zone and Encryption Password settings must match what the SDK uses. Be sure to share the values of these settings with the appropriate parties in your organization. At the asserting party, the SDK and web access management system need these values. At the relying party, CA SiteMinder® Federation Standalone and the target system that hosts the application need to know these values.
For additional information, see the CA SiteMinder® Federation Standalone Java SDK Guide or the .NET SDK Guide.
The other cookie parameters in this group box are the open format cookie settings. The open format cookie settings are used only for the open format cookie method of delegated authentication and apply on a global level not on a partnership basis.
Note: At the relying party, the configuration of this cookie data is done at the partnership level and not at a global level.
To change the cookie settings
The Configure Deployment Settings dialog is displayed.
Note: Click Help for a description of fields, controls, and their respective requirements.
Several administrators in your company can be responsible for different aspects of federation management. Assign the administration of CA SiteMinder® Federation Standalone to multiple people in your organization to establish accountability and separation of responsibilities.
A default administrator account is always available to manage CA SiteMinder® Federation Standalone. After you add new administrators, optionally, disable the default administrator account.
Create and maintain new administrative users through the Administrative UI.
The following graphic shows the configuration tasks for configuring administrators:
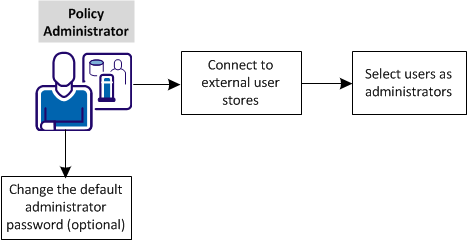
Complete these tasks:
Create the connections to LDAP and ODBC external user stores. This step is required before you configure multiple administrators.
LDAP and ODBC are the two types of directories that the federation system supports.
Follow these steps:
You can select Action, Modify to verify the configuration of an existing directory connection.
Note: Click Help for a description of fields, controls, and their respective requirements.
The universal ID value must be unique to identify individual users in a directory. For example, enter uid as a universal ID for an LDAP directory because each user has a uid. Do not use an attribute such as a job title because many users have the same title.
(uid=
)
You can click View Contents to list the contents of the user directory.
Note:
If your settings are valid, you are redirected to the View User Directories dialog.
The connection to the directory is configured.
After you establish connections to external user stores, select users to serve as administrators.
Follow these steps:
Note: Click Help for a description of each privilege.
You can change the privileges of the administrator and can enable/disable the administrator.
Multiple administrators are now available to divide ederation management tasks.
For security reasons, change the password that gives the default administrator access to the Administrative UI. This task is optional.
Two methods are available to change the administrator password:
If the administrator user account is locked or the administrator is not available, reset the password from the command line.
|
Copyright © 2014 CA.
All rights reserved.
|
|