

This section contains the following topics:
How to Configure Load Balancing
Load balancing distributes communication activity evenly across a network so that no single device is over burdened. CA SiteMinder® Federation Standalone is intended as a standalone endpoint and has no built-in support for load balancing. However, it is possible to enable a simple load-balancing deployment in a network using CA SiteMinder® Federation Standalone. SSL-enabled load balancing is optional, but it is recommended for sending sensitive data.
The following diagram shows a non-SSL load-balancing deployment.

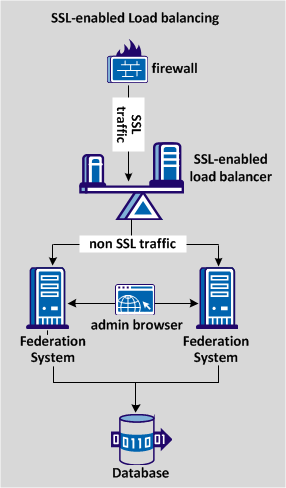
The following diagram shows an SSL load-balancing deployment, distributing traffic across two systems that use the same database store.
Complete the following configuration steps for load balancing traffic:
Configure the load balancer to work in a network with CA SiteMinder® Federation Standalone. Use the load balancer host and port to redirect a user who requests a resource that resides on the CA SiteMinder® Federation Standalone system. Use of the load balancer host and port applies to all resources on the CA SiteMinder® Federation Standalone system.
Note: This procedure assumes that the load balancer administrator knows how to set up the system in the deployment.
Follow these steps:
These URLs enable the load balancer to balance traffic between the federation systems.
If the load balancer is SSL-enabled, all federation traffic comes in to the load balancer over SSL. However, the load balancer sends the traffic to the CA SiteMinder® Federation Standalone systems over a non-SSL (HTTP) connection.
The load balancer is now configured to work with CA SiteMinder® Federation Standalone systems.
To use load balancing across a federation deployment, set up two or more CA SiteMinder® Federation Standalone systems.
Note: The procedure assumes that all systems are version 12.52 SP1.
Follow these steps:
Note: Whether the prodcut is run in standalone or proxy mode, the servers must use the same mode.
Each federation system must use the same virtual host name. The virtual host name is the host that you specify for the Server Name in the Apache configuration when you run the Configuration Wizard.
If the product uses more than one virtual host or domain, modify the server.conf file to include the additional entries.
To modify the server.conf file
<VirtualHost name="default">
hostnames="defaultbaseurl.example.com:80, newbaseurl.example.com:80"
</VirtualHost>
Note: Specify multiple host_name:port entries for the hostnames setting, separating each entry with a comma.
Example:
<VirtualHost name="default"
hostnames=lb5.example.com:80
</VirtualHost>
Note: Replicate any change to the certificate configuration on one system to all other systems. Make configuration changes from the Certs and Keys page in the UI. Changes include adding or removing certificates, keys, or CRL data.
Access the Administrative UI locally, without going through the load balancer. If the other systems are up and running, enable administration on only one system. If the administration system is disabled at any time, log in a different system and reenable administration.
Now that all federation systems are pointing to the same data store, the configured load balancer is able to balance traffic between the systems.
If the load balancer uses SSL, we recommend that you configure the system to redirect traffic over an SSL connection. To redirect traffic, modify the following two files on each federation system:
Note: Modify these files on all federation systems that are redirecting traffic.
Follow these steps:
HttpsPorts="443"
Specify the port on which the load balancer is listening.
GetPortFromHeaders="YES"
Example:
ServerName lb5.example.com:443
UseCanonicalName on
Federation system now redirects traffic over an SSL connection.
|
Copyright © 2014 CA.
All rights reserved.
|
|