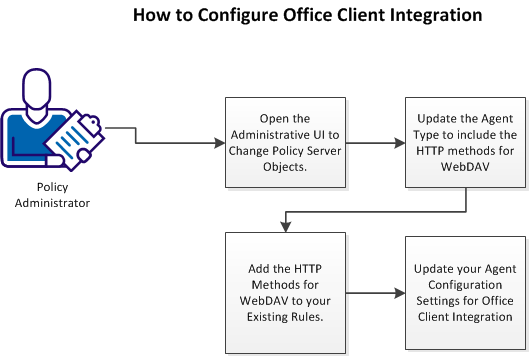

Office Client Integration lets users collaborate on Microsoft Office documents stored in SharePoint. When users open a Microsoft Office document on SharePoint, they use the related Microsoft Office application to edit the document.

Follow these steps:
Change the objects on your Policy Server by opening the Administrative UI.
Follow these steps:
https://host_name:8443/iam/siteminder/adminui
Specifies the fully qualified Administrative UI host system name.
Note: If your superuser account password contains dollar‑sign ($) characters, replace each instance of the dollar-sign character with $DOLLAR$. For example, if the CA SiteMinder® superuser account password is $password, enter $DOLLAR$password in the Password field.
To use the Office Client Integration feature, modify the Agent type to include the methods for WebDAV.
Follow these steps:
The Create Agent Type search pane appears.
Web Agent
The Web Agent type appears in the list.
The Modify Agent Type: Web Agent pane appears.
A new action field appears at the end of the list.
Head
A new action field appears at the end of the list.
OPTIONS
PROPFIND
PROPPATCH
COPY
DELETE
MOVE
LOCK
UNLOCK
The Modify Agent type task is submitted for processing. A confirmation screen appears.
The Agent type settings for your SharePoint resources are updated.
To use the Office Client Integration feature with the CA SiteMinder® Agent for SharePoint, update the web agent actions in any rules protecting SharePoint sites.
Follow these steps:
The Modify Rule screen appears.
Modify Rule: Name screen appears.
The rule is updated, and the confirmation screen appears.
The parameter settings in the Agent Configuration Object that is associated with your CA SiteMinder® Agent for SharePoint control how Office Client Integration operates on your CA SiteMinder® Agent for SharePoint.
Follow these steps:
The Modify Agent Configuration: Name pane opens.
Specifies the hostnames of the SharePoint servers that the Agent for SharePoint protects on which you want to permit Office Client Integration. The default parameter is blank and listed as plain. If there are multiple host entries, use the multivalue option button to add multiple hosts.
Add a port number to the value if the Agent for SharePoint operates on a nondefault port (any port except 80 or 443).
To use this parameter, verify that the SharePoint resources that CA SiteMinder® protects also have their Office Client Integration enabled on the SharePoint central administration server.
Because Office Client Integration requires a persistent FedAuth cookie, verify that your SharePoint server is not configured to use session cookies. By default, UseSessionCookies in SharePoint is set to NO.
Default: None
Limits: Multiple values are allowed. Use fully qualified domain names for all values.
Example: agent_for_sharepoint_host_name.example.com (default ports of 80 or 443)
Example: agent_for_sharepoint_host_name.example.com:81 (with a nondefault port number for HTTP)
Example: agent_for_sharepoint_host_name.example.com:4343 (with a nondefault port number for HTTPS)
Specifies the hostnames of the SharePoint servers that the Agent for SharePoint protects on which you want to prohibit Office Client Integration. The default parameter is blank and listed as plain. If there are multiple host entries, then switch over to a multi—value parameter. The URL in this parameter requires a port number (even for a default port such as 80 or 443).
This setting prevents SharePoint administrators from circumventing CA SiteMinder® settings regarding Office Client integration.
Limit: Multiple values are allowed.
Example: agent_for_sharepoint_host_name:port_number
Specifies a list of Microsoft Office user-agent strings for which the Agent for SharePoint allows access. This list is populated automatically with the default values when the Agent for SharePoint starts. The user-agent strings in this parameter act as a whitelist. Changes to this parameter override the default settings. Access is denied to clients whose user-agent string does not appear in the list.
For example, setting the value to Microsoft Office allows access to all versions of Microsoft Office products that are associated with that user-agent string. Conversely, setting the value to Microsoft Office/12.0 allows access to only those versions of Microsoft Office products that are associated with that user-agent string.
Default: Microsoft Office, MS FrontPage, MSFrontPage, Microsoft Data Access Internet Publishing Provider Protocol Discovery, Test for Web Form Existence, Microsoft-WebDAV-MiniRedir
Limits: Multiple values are allowed.
Note: Microsoft (not CA Technologies) defined the user-agent strings in the previous parameter. For more information about these user-strings, search the Microsoft Developer Network (MSDN) library website for information about the user-string that you want.
Note: Because the CA SiteMinder® Agent for SharePoint is a proxy-based solution, this setting is required for Office Client Integration.
The new values appear next to the parameters in the list.
The Create Agent Configuration Task is submitted for processing and the confirmation message appears.
|
Copyright © 2014 CA.
All rights reserved.
|
|