

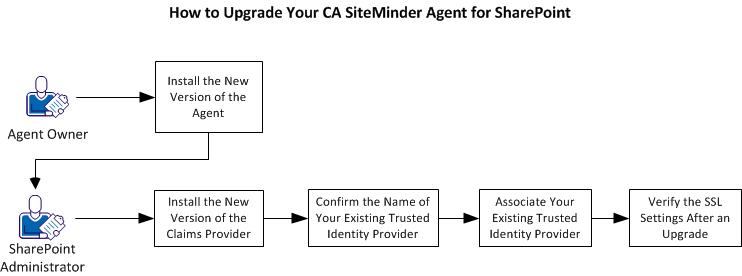
Upgrading your CA SiteMinder Agent for SharePoint from a previous version to 12.51 involves installing the new version of the software on your existing components.
Note: The upgraded product uses any existing SharePoint connection and the trusted identity provider from your previous version. You do not have to re-create these items. Associate the upgraded claims provider with your existing trusted identity provider.
Follow these steps:
The first step of the upgrade process is installing the new version of the Agent. Pick the appropriate procedure for your operating environment from the following list:
Installing a new version of the agent upgrades the product from the previous version.
The default installation location for the agent on 32-bit Windows operating environments is: C:\Program Files\CA\Agent-for-SharePoint. On 64-bit Windows operating environments, the default installation location is C:\CA\Agent-for-SharePoint.
Important! The Agent for SharePoint cannot be installed on a computer that hosts any other web server. The Agent for SharePoint operates as a stand-alone proxy-based solution.
To run the agent installer on Windows operating environments, you need local Administrator privileges.
Note: We recommend installing the agent on an NTFS file-system partition.
Follow these steps:
ca-sp2010agent-version-operating_environment.exe
The installation program starts.
Note: The installer displays all Java executables that are installed in the system. Pick a Java component and version that is equal to or greater than the one shown by the installer. If the installer does not detect any Java executables by default, then browse and select the appropriate path. For more information about the required Java executables or other third-party software requirements, see the platform support matrix.
Installing a new version of the agent upgrades the product from the previous version.
The default installation location is user_home/CA/Agent-for-SharePoint. The folder where you install the agent requires sufficient permissions (755). Do not install the agent under the /root folder, because its default permissions (750) are insufficient.
Important! The Agent for SharePoint cannot be installed on a computer that hosts any other web server. The Agent for SharePoint operates as a stand-alone proxy-based solution.
Note: On the Solaris or Linux operating environments, the agent runs under the "nobody" user account. If you prefer not to run the agent under this user account, create an alternate user and assign the necessary permissions. Do not run this program as a root user.
Follow these steps:
Note: The installer displays all Java executables that are installed in the system. Pick a Java component and version that is equal to or greater than the one shown by the installer. If the installer does not detect any Java executables by default, then browse and select the appropriate path. For more information about the required Java executables or other third-party software requirements, see the platform support matrix.
The next step of the upgrade process is installing a new version of the claims provider on your SharePoint central administration server. This installation upgrades the claims provider from the previous version.
If you are not the user who installed or configured SharePoint, you need one of the following privileges to run the Claims Provider installer:
If you are installing your Claims provider on a new SharePoint farm, install the claims provider on your SharePoint central administration server. If you add any additional SharePoint servers to your farm later, install the claims provider on each SharePoint server you add.
Follow these steps:
ca-spclaims-version-win64.exe
The installation program starts.
The Claims provider is successfully installed.
Confirm the name of your existing trusted identity provider before associating it with your upgraded claims provider.
Follow these steps:
Get-SPTrustedIdentityTokenIssuer
The name of your existing trusted identity provider appears. This provider is the one which you want to associate with your upgraded claims provider.
The next step of upgrading is associating the trusted identity provider with the upgraded claims provider.
Note: The upgraded product uses any existing SharePoint connection and the trusted identity provider from your previous version. You do not have to re-create these items. Associate the upgraded claims provider with your existing trusted identity provider.
The Update-SMTrustedIdentityTokenIssuer command updates the claims provider of a trusted identity token issuer to CASiteMinderClaimProvider.
Follow these steps:
The SharePoint 2010 Management Shell command prompt appears.
C:\Program Files\CA\SharePointClaimsProvider\scripts
Update-SMTrustedIdentityTokenIssuer.ps1 -TrustedIdentityTokenIssuer “Name_of_Trusted_Identity_Provider_registered_with_SharePoint”
Specifies the name of the CA SiteMinder trusted identity token issuer (trusted login provider) to update.
Example:
.\Update-SMTrustedIdentityTokenIssuer.ps1 -TrustedIdentityTokenIssuer “SiteMinder Federation”
The SharePoint central administration server is updated with the new claims provider of the trusted identity token issuer.
Verify your SSL settings after the upgrade. In some situations, the upgrade did not always change the settings in the following file:
Agent-for-Sharepoint_home\httpd\conf\spsapachessl.properties
Follow these steps:
apache.ssl.enabled=
apache.ssl.enabled=Y
apache.ssl.enabled=N
For example, if you were using SSL before your upgrade, verify that the value after the equal sign is Y.
The SSL settings are verified.
|
Copyright © 2013 CA.
All rights reserved.
|
|