

Enhanced Session Assurance with DeviceDNA™ helps prevent unauthorized users from hijacking legitimate sessions with stolen cookies. The session clients are validated using the unique DeviceDNA™ that the product collects from the system of the user. This validation assures that the client who initiated the session is the same client that is requesting access. Users lacking valid DeviceDNA™ are denied access to protected resources.
The following graphic describes how to configure Enhanced Session Assurance with DeviceDNA™ during an upgrade: 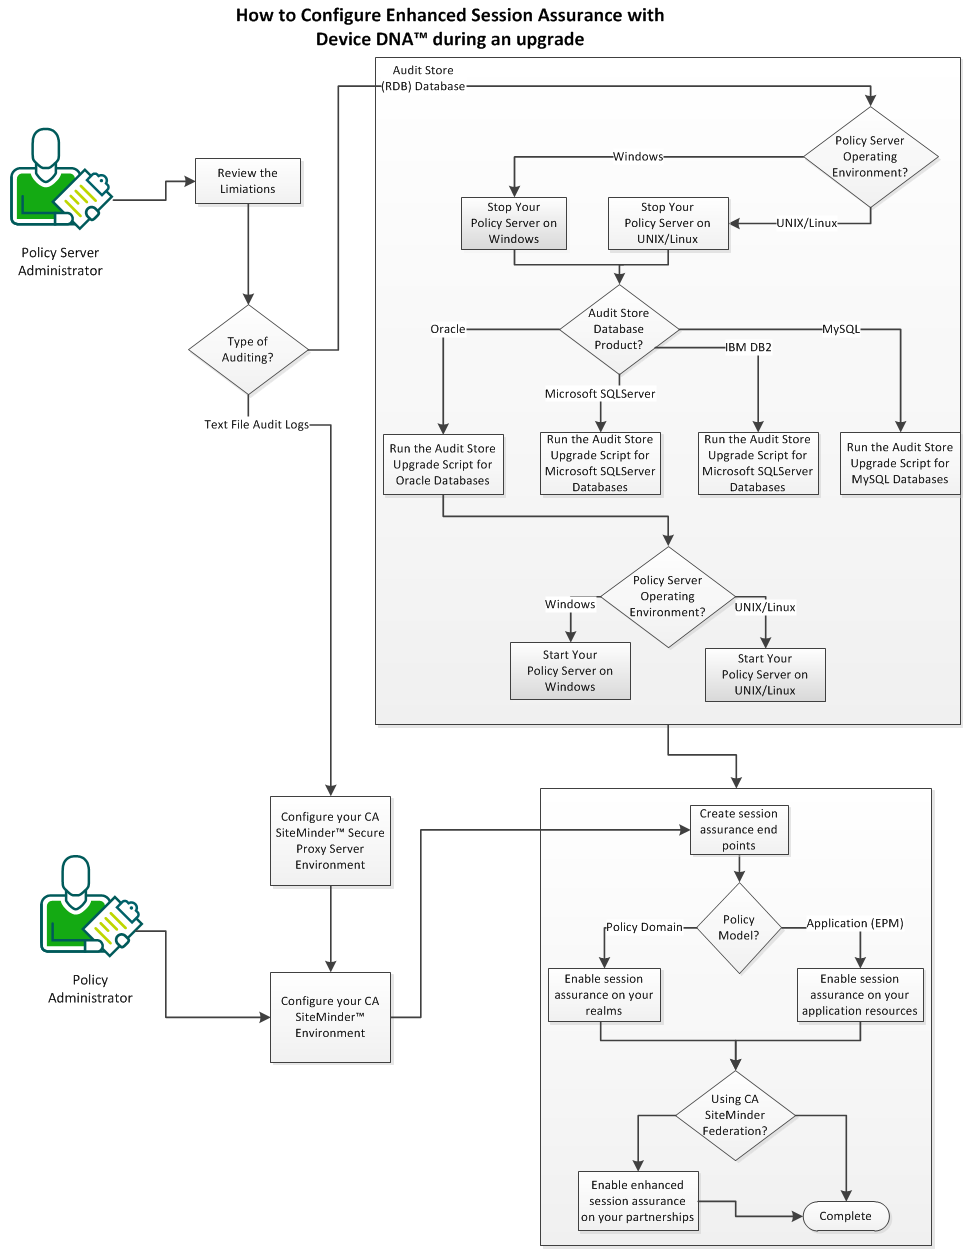
Follow these steps:
Enhanced Session Assurance with DeviceDNA™ does not support the following items:
Web 2.0 applications are built on technologies like AJAX which create web requests that cannot be re‑directed to the CA SiteMinder® SPS. Web 2.0 clients include non‑browser‑based clients (such as a Flickr client on a mobile device). In both cases, some requests could occur which cannot be re‑directed to the CA SiteMinder® SPS instance which hosts the authentication flow application. Because of this situation, Enhanced Session Assurance with DeviceDNA™ cannot support for Web 2.0 clients. The login page for Web 2.0 applications can be protected. However, not all requests (such as those involving AJAX) can be protected Enhanced Session Assurance with DeviceDNA™.
Agents that are created with the CA SiteMinder® SDK do not support Enhanced Session Assurance with DeviceDNA™.
The DeviceDNA™ scripts on the CA SiteMinder® SPS are Javascripts that extract the information specific to the web clients. This client information associates a session with the device or client. Without support for JavaScript, the DeviceDNA™ cannot be collected and thus Enhanced Session Assurance with DeviceDNA™ cannot associate the session with the device or client. Enhanced Session Assurance with DeviceDNA™ is not supported for clients like Telnet or Lynx.
Enhanced Session Assurance with DeviceDNA™ operates using re‑directs to the Authentication Flow application on the CA SiteMinder® SPS. This application contains the DeviceDNA™ scripts. The Authentication Flow application currently does not support POST data. Therefore, the POST requests are not re‑directed to the Authentication Flow application.
Any shared workstation has the same DeviceDNA™ signature for every user. For example, suppose that one user hijacks a valid SMSESSION cookie from another user of the shared workstation. If the hijacker replays the stolen SMSESSION cookie from the same shared workstation, the product cannot detect the difference. Enhanced Session Assurance with DeviceDNA™ provides protection when a hijacker attempts to replay the stolen SMSESSION cookie from a different device.
Web service client applications handle the authentication and authorization web services (which push back any redirects or responses they receive from the Agent API calls). However, the calling client cannot handle the redirects that are involved in Enhanced Session Assurance with DeviceDNA™ flow.
The following configurations do not support Enhanced Session Assurance with DeviceDNA™:
The following agent configuration parameters do not support Enhanced Session Assurance with DeviceDNA™:
Note: Do not set these parameters when using Enhanced Session Assurance with DeviceDNA™. The target URL that these parameters typically contain is already included in a token request that Enhanced Session Assurance uses with DeviceDNA™.
Stop your Policy Server before continuing. Stopping a Policy Server has the following results:
Note: Use an account with administrator privileges.
The Policy Server stops and the console closes.
Stopping a Policy Server has the following results:
Follow these steps:
installation_path/siteminder/stop-all
The Policy Server logs all UNIX executive activity in the installation_directory/log/smexec.log file. Log entries are always appended to the existing log file.
After you stop the Policy server, run the appropriate audit‑store upgrade script for your database vendor. Pick the script from the following list:
After you stop the Policy Server, upgrade the audit log schema. This upgrade is accomplished using a script.
Follow these steps:
Note: We recommend that you do not upgrade a CA SiteMinder schema with the SYS or SYSTEM users. If necessary, create an Oracle database user, such as SMOWNER, and upgrade the schema as that user.
$NETE_PS_ROOT/db/SQL/sm_oracle_logs_upgrade_12.5_to_12.51.sql
$NETE_PS_ROOT/db/SQL/sm_oracle_logs_upgrade_12.51_to_12.52.sql
Note: Some environment variables could possibly not function in the SQL utility that Oracle provides. If you experience problems importing the script using the utility, specify an explicit path.
The audit store schema is upgraded.
After you stop the Policy Server, upgrade the audit log schema. This upgrade is accomplished using a script.
Follow these steps:
installation_directory\db\SQL\sm_mssql_logs_upgrade_12.5_to_12.51.sql
installation_directory\db\SQL\sm_mssql_logs_upgrade_12.51_to_12.52.sql
Specifies the location in the file system where the Policy Server is installed.
The audit store schema is upgraded.
Upgrade the CA SiteMinder® audit log schema. This upgrade is accomplished using a script.
Follow these steps:
installation_directory\db\tier2\DB2\
Specifies the location in the file system where the Policy Server is installed.
sm_db2_log_upgrade_12.5_to_12.51.sql
Note: For more information executing a query, see the IBM documentation.
The audit store schema is upgraded.
sm_db2_log_upgrade_12.51_to_12.52.sql
Note: For more information executing a query, see the IBM documentation.
The audit store schema is upgraded.
Upgrade the CA SiteMinder® audit log schema. This upgrade is accomplished using a script.
Follow these steps:
installation_directory\db\tier2\MySQL.
Specifies the location in the file system where the Policy Server is installed.
sm_mysql_logs_upgrade_12.5_to_12.51.sql
DROP FUNCTION IF EXISTS `databaseName`.`getdate` $$
CREATE FUNCTION `databaseName`.`getdate` () RETURNS DATE
sm_mysql_logs_upgrade_12.51_to_12.52.sql
DROP FUNCTION IF EXISTS `databaseName`.`getdate` $$
CREATE FUNCTION `databaseName`.`getdate` () RETURNS DATE
The audit store schema is upgraded.
Start the Policy Server. Starting Policy Server has the following results:
Follow these steps:
The console opens with the Status tab selected.
The Policy Server starts.
Starting Policy Server has the following results:
Start all Policy Server processes, with one of the following actions:
installation_path/siteminder/start-all
The Policy Server logs all UNIX executive activity in the installation_directory/log/smexec.log file. Log entries are always appended to the existing log file.
Enhanced Session Assurance with DeviceDNA™ requires a CA SiteMinder® SPS to operate.
Note: For more information about installing or upgrading the CA SiteMinder® SPS, see the CA SiteMinder® SPS Administration Guide, An installation video is also available online.
.sac
JVM_HOME\lib\security
JVM_HOME/lib/security
Defines the location where Java Runtime Environment (JRE) is installed in JDK of your installation.
The JVM is configured.
Enhanced Session Assurance with DeviceDNA™ requires certain components and settings in your CA SiteMinder® environment.
Follow these steps:
Enhanced Session Assurance with DeviceDNA™ silently redirects users to the authentication flow application end points hosted on the CA SiteMinder® SPS to collect DeviceDNA™ information. This DeviceDNA™ information validates their sessions.
For performance reasons, we recommend creating one end point for each geographic area in your organization. For example, if you have offices in New York and Chicago, create an end point for each office.
Configure these end points on your CA SiteMinder® SPS before adding Enhanced Session Assurance with DeviceDNA™ to your policies or applications.
Follow these steps:
Specifies the name of the CA SiteMinder® SPS server which collects the DeviceDNA™ to authenticate users.
Specifies the port number on which the CA SiteMinder® SPS is listening for redirections. Configure this port for a secure connection (using SSL).
Default: 443
Specifies the URL of the CA SiteMinder® SPS to which the users are silently re‑directed. This server collects the DeviceDNA™ of the user. The product uses DeviceDNA™ to validate the sessions that are associated with the user.
Specifies the number of seconds for which the DeviceDNA™ that is associated with a user remains valid. Users without valid DeviceDNA™ are re–directed to the Enhanced session assurance end point where the server obtains current DeviceDNA™ for the user.
The DeviceDNA™ refresh‑interval governs the collection of DeviceDNA™. Any request occurring after the expiration of DeviceDNA™ refresh‑interval is re‑directed to the Authentication Flow application to re‑collect the DeviceDNA™.
The DeviceBinder is a session property that identifies the user that is associated with the session. The DeviceBinder and the client side Device ID have been linked during the authentication process. A unique DeviceHash and an expiration time form this property.
Default: 300 seconds (5 minutes)
To protect resources in realms using Enhanced Session Assurance with DeviceDNA™, add one session assurance end point to the realm.
Note: Your realms do not need to be persistent for Enhanced Session Assurance with DeviceDNA™ to work.
Follow these steps:
To protect components in applications using Enhanced Session Assurance with DeviceDNA™, add one enhanced session assurance end point to the component of the associated application.
Follow these steps:
A list of applications appears.
The Modify Application: dialog appears.
A list of end points appears.
The Modify Application dialog closes and a confirmation message appears.
If you use CA SiteMinder® Federation, you can also enable Enhanced Session Assurance with DeviceDNA™ on the following partnerships:
Follow these steps:
Protects the resources that are specified in the realm (of the Policy domain model) or the component (of the application model). You can also protect the authentication requests of certain CA SiteMinder® Federation partnerships. The session assurance end point collects the DeviceDNA™ from the user and validates the session.
Limits: This feature requires session assurance end points.
A list of end points appears.
|
Copyright © 2013 CA.
All rights reserved.
|
|