

The Policy Server uses the session store to persist dynamic user information after a user is authenticated. The stored information includes authentication context information, SAML attributes, third-party IdPs that authenticate users, and claims from an OAuth authentication. The Policy Server can use this information for generating user tokens or making policy decisions.
For federated single sign-on, the Policy Server can add the attributes from the session store to an assertion to customize the requested application.
Session attributes are stored for the following deployments:
A local system or an external third party authenticates users, but the system regards it as a local authentication. Local authentication deployments require that the authentication mode is local in the single sign-on configuration. Also, an access policy must protect the authentication URL. The authentication scheme in the policy is configured to persist session attributes.
An external third party can authenticate a user. The third-party partner returns user information, which gets stored in the session store.
The following figure shows the steps that are required to configure session attributes and add then to assertions.
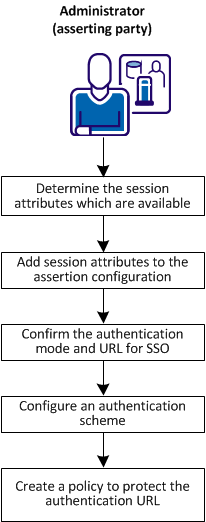
Complete the following steps for session attribute support:
As the federation administrator, identify the session attributes used by the partnership. Work with the authentication source, such as a database or user directory so you are familiar with the available attributes.
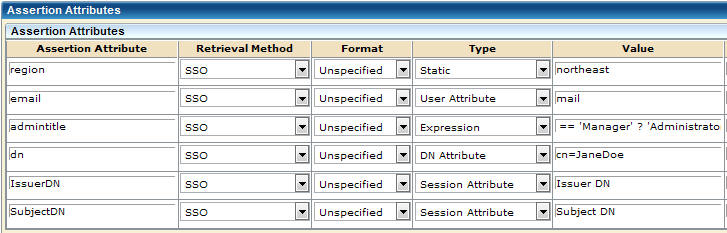
Add session attributes to the assertion configuration. The configuration is at the asserting party, such as the IdP-to-SP partnership.
Follow these steps:
IssuerID
SSO
Unspecified
Session Attribute
IssuerID
Click Help for detailed information about the attribute table.
The last two entries of the following graphic show examples of session attribute entries. This screen is for a SAML 2.0 partnership. The SAML 1.1 screen is similar, but the Retrieval Method and Format columns are missing. A Namespace column exists instead.
Confirm that the partnership has the authentication mode and authentication URL set correctly.
Note: This procedure assumes that the other necessary SSO settings are configured.
Follow these steps:
Local
This URL must point to the redirect.jsp file, for example:
http://myserver.idpA.com/siteminderagent/redirectjsp/redirect.jsp
myserver
Identifies the web server with the Web Agent Option Pack or the SPS federation gateway. The redirect.jsp file is included with the Web Agent Option Pack or SPS federation gateway that is installed at the asserting party.
Protect this resource with a policy.
Configure the authentication scheme that protects the authentication URL. Enable the scheme to persist session attributes. This procedure is required for the system to store session attributes.
Follow these steps:
The Create Authentication Scheme page appears.
For example, an X.509 certificate authentication scheme requires a SubjectDN and IssuerID for the certificate. An OAuth authentication scheme requires information such as first and last name. This information can be persisted in the session store and added to an assertion.
The authentication scheme templates that you can use are:
Note: Click Help for a description of fields, controls, and their respective requirements.
Use the authentication scheme that persists session attributes in a policy that protects the authentication URL. When the user requests the protected resource, the policy triggers the necessary actions to authenticate the user. The system stores the credentials that the user provides as session variables.
Begin by creating a policy domain for the asserting party and assigning users. You can also modify an existing asserting party domain.
Follow these steps:
The Domains page appears.
You can select one or more user directories from the Available Members list. To select more than one member at one time, hold down the Ctrl key while you click the additional members. To select a block of members, click the first member then hold down the Shift key while you click the last member in the block.
Note: To create a user directory and add it to the domain, click Create.
The domain is configured.
For the federation domain, create a realm and associate it with a Web Agent.
Follow these steps:
The Realms page appears.
Specify a name that indicates the realm is for an SSO authentication URL.
/siteminder/redirectjsp/redirect.jsp
Protected
Select the authentication scheme that you configured to protect the authentication URL. This scheme is the one you configured to persist session attributes.
The realm and rule configuration is complete.
Create a policy that protects the authentication URL. The policy components work together and protect the resource.
After you create the policy, add users and rules.
Follow these steps:
A list of domains that match the search criteria appears.
The Policies page appears.
From within each user directory group box, choose Add Members, Add Entry, or Add All. Depending on which method you use, a dialog box opens enabling you to add users.
Note: If you select Add Members, the User/Groups pane opens. The individual users are not displayed automatically. To find a specific user within one of the directories, use the search utility.
You can edit or delete a user or group by clicking the right arrow (>) or minus sign (-), respectively.
You are not required to configure a response for the rule.
The policy configuration is complete.
The assertion attribute, single sign-on, and policy configuration work together to make session attribute available for assertions.
|
Copyright © 2013 CA.
All rights reserved.
|
|