

Policy Server Guides › Policy Server Configuration Guide › Policies › Advanced Policy Options › How to Require Re-authentication for Sensitive Resources
How to Require Re-authentication for Sensitive Resources
CA SiteMinder® defines sensitive resources as those resources for which you always want to require users to re‑authenticate before they access. The transfer money section of an online banking website is one possible example of a sensitive resource. Normally, once a user logs in, they would not have to re‑authenticate to transfer money.
By defining the transfer-money section as a sensitive resource, users must provide their credentials before accessing that section.
This sensitive resource protection prevents an unauthorized user from transferring money in case the user stepped away from their system without logging out first.
The sensitive resource protection prevents unauthorized users from accessing the transfer-money section without being challenged to confirm their identity.
The following graphic describes how to require re‑authentication for sensitive resources:
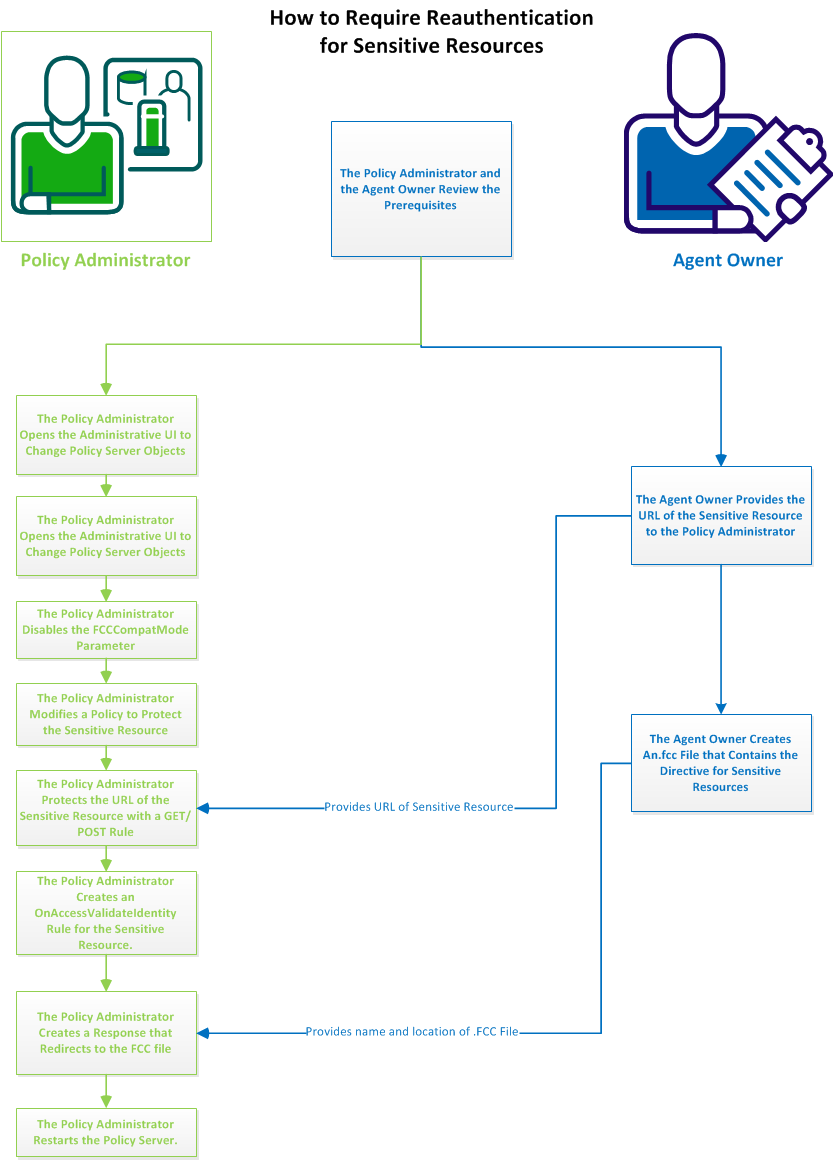
Follow these steps:
- The policy administrator and the agent owner review the prerequisites.
- The agent owner creates an.FCC file that contains the directive for sensitive resources.
- The policy administrator opens the Administrative UI to change Policy Server objects.
- The policy administrator disables the FCCCompatMode parameter.
- The policy administrator modifies a policy to protect the sensitive resource.
- The policy administrator protects the URL of the sensitive resource with a GET/POST rule.
- The policy administrator creates an OnAccessValidateIdentity rule for the sensitive resource.
- The policy administrator creates a response that redirects to the .FCC file (from Step 2).
- The policy administrator restarts the Policy Server.
The Policy Administrator and the Agent Owner Review the Prerequisites
The policy administrator and agent owner work together to require re‑authentication for sensitive resources.
This scenario assumes that the following components exist in the environment:
- A Policy Server that is installed and configured with the following components:
- A policy domain with a user directory connection, realm, rule, and policy.
- An .FCC authentication scheme.
- An agent that is configured for an .FCC authentication scheme.
- A session store that is fully configured and operating.
- Disabling the FCCCompatMode parameter.
The agent owner has the following tasks:
- Provides the policy administrator with the URLs corresponding to the sensitive resources. The policy administrator creates rules to protect the sensitive resources.
- Creates an .FCC file by which reauthenticates users requesting access to sensitive resources. The agent owner provides the name of this .FCC file to the policy administrator. The policy administrator uses the name of the .FCC file to create the response. This response re‑directs users to the new .FCC file for re‑authentication when they request sensitive resources.
The policy administrator has the following tasks:
- Modifies an existing policy by adding components to protect the sensitive resources.
- Restarts the Policy Server.
The Agent Owner Creates an .FCC File That Contains the Directive for Sensitive Resources
The following graphic describes the agent owner tasks when requiring re‑authentication for sensitive resources:

Authenticating the users who request access to sensitive applications requires an additional .FCC file. One .FCC file handles the original login of the user. The second .FCC file collects the credentials of the user when they are challenged before accessing a sensitive resource.
Follow these steps:
- Log on to the web server on which the agent protecting the sensitive resources operates.
- Locate the .FCC file that you use for login. The .FCC files are located in the following directory:
web_agent_home/samples/forms
- web_agent_home
-
Indicates the directory where the CA SiteMinder® Agent is installed.
Default (Windows 32-bit installations of CA SiteMinder® Web Agents only): C:\Program Files\CA\webagent
Default (Windows 64-bit installations [CA SiteMinder® Web Agents for IIS only]): C:\Program Files\CA\webagent\win64
Default (Windows 32-bit applications operating on 64-bit systems [Wow64 with CA SiteMinder® Web Agents for IIS only]): C:\Program Files (x86)\webagent\win32
Default (UNIX/Linux installations): /opt/ca/webagent
- Duplicate the FCC file that you use for your login form. Save the duplicate with a unique file name. For example, if you use the login.fcc file for your login form, rename the duplicate file to sensitive_login.fcc.
- Open the duplicate file with a text editor.
- Locate the following section:
<!-- SiteMinder Encoding=ISO-8859-1; -->
@username=%USER%
@smretries=0
- Add the following line (after the last line that begins with the @ symbol).
@validateuser=1
- Save the file and close the text editor.
- Record the location of the file and inform the policy administrator.
- Repeat Steps 1 through 8 on each web server that protects the sensitive resource.
Important! Use the same file name and location for each web server.
The Policy Administrator Opens the Administrative UI to Change Policy Server Objects
The following graphic describes the policy administrator tasks when requiring re‑authentication for sensitive resources:
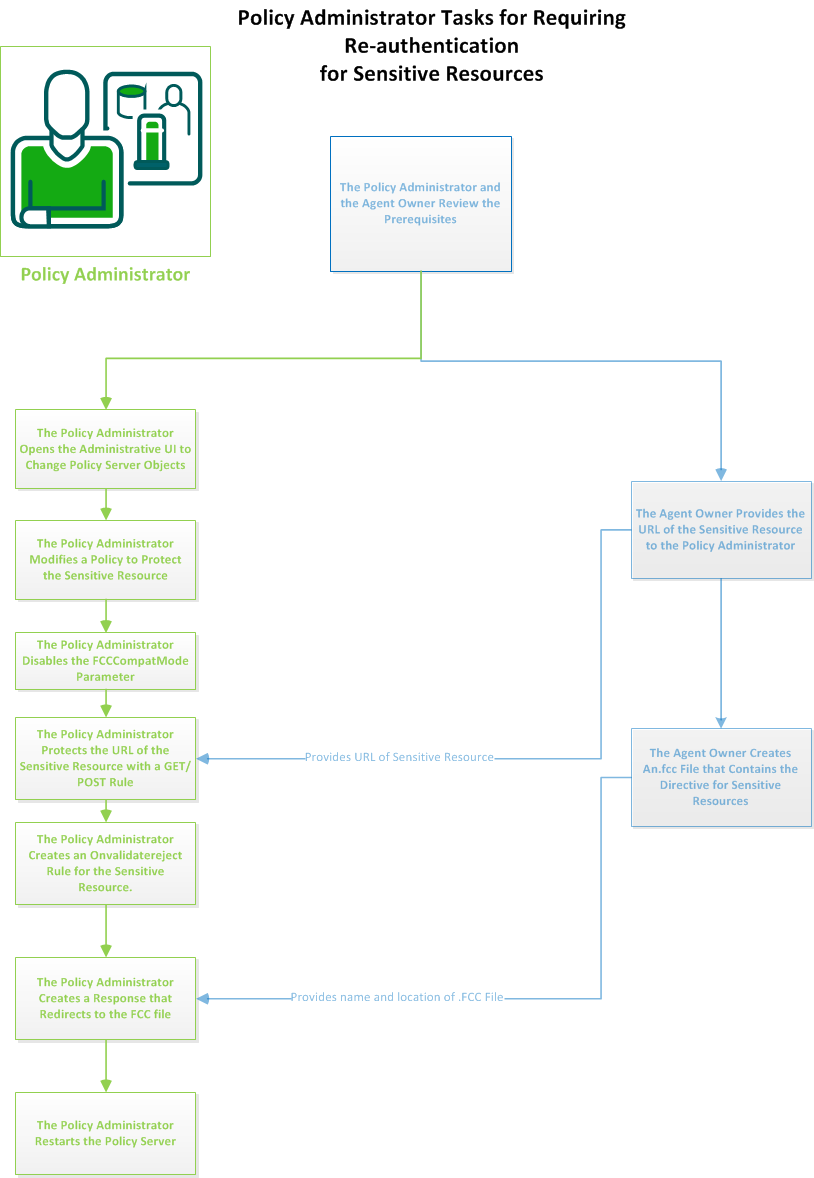
Change the objects on your Policy Server by opening the Administrative UI.
Follow these steps:
- Open the following URL in a browser.
https://host_name:8443/iam/siteminder/adminui
- host_name
-
Specifies the fully qualified Administrative UI host system name.
- Enter your CA SiteMinder® superuser name in the User Name field.
- Enter the CA SiteMinder® superuser account password in the Password field.
Note: If your superuser account password contains dollar‑sign ($) characters, replace each instance of the dollar-sign character with $DOLLAR$. For example, if the CA SiteMinder® superuser account password is $password, enter $DOLLAR$password in the Password field.
- Verify that the proper server name or IP address appears in the Server drop-down list.
Select Log In.
The Policy Administrator Disables the FCCCompatMode Parameter
Agents use an FCCCompatMode configuration parameter for backward compatibility with older versions of the product. For newer versions of the product (such as 12.52), this parameter must be disabled for better security when using certain features.
Note: This procedure assumes you configure your agents centrally, using an agent configuration object on a Policy Server. If you use the local agent configuration method instead, disable the FCCCompatMode parameter in your LocalConfig.conf file.
Follow these steps:
- From the Administrative UI, click Infrastructure, Agent Configuration Objects.
- Click the edit icon next to the agent configuration object that you want.
- Locate the following parameter:
- FCCCompatMode
-
Enable an FCC/NTC to serve up forms for resources that 4.x Web Agents protect or third-party applications.
Note: SMUSRMSG is supported for the custom authentication scheme only when FCCCompatMode set to yes.
Limits: yes, no
Default: (traditional agents) Yes
Default: (framework agents) No
Important! Setting this parameter to no removes support for version 4.x of the Netscape browser.
- Verify that the value is set to no. If the value is yes, continue with the following steps:
- Click the edit icon to the left of the parameter.
The Edit parameter dialog appears.
- Highlight the Value field, and then type no.
- Click OK.
The Edit parameter dialog closes.
- Click Submit.
The FCCCompatMode parameter is disabled and a confirmation message appears.
The Policy Administrator Modifies a Policy to Protect the Sensitive Resource
Modifying the policy is the first step that the policy administrator takes toward protecting sensitive resources. This modification designates some of the resources that the policy protects are considered sensitive.
Follow these steps:
- From the Administrative UI, click Policies, Domain, Domains.
- Click the edit icon that corresponds to the domain containing the sensitive resources.
- Click the Policy tab.
The Modify Policy: screen appears with the General tab selected.
- Click the Validate Identity check box.
- Click OK.
- Click Submit.
A confirmation message appears.
- Continue with the next stop of creating a GET/POST rule in the policy.
The Policy Administrator Protects the URL of the Sensitive Resource with a GET/POST Rule
Protecting the URL (of the sensitive resource) with a GET/POST rule is the next step that the policy administrator takes toward protecting sensitive resources. This rule designates that the URL protected by the policy is considered sensitive.
Follow these steps:
- From the Administrative UI, click Policies, Domain, Domain Policies.
- Click the edit icon that corresponds to the policy containing the URL of sensitive resource.
- Click the Rules tab.
- Click Add Rule.
The Available Rules dialog appears.
- Click Create.
- Click the option button for the realm under which you want to create the rule, and then click Next.
- Create the GET/POST rule with the following steps:
- Enter a name and an optional description.
- Click the Resource field and enter the URL of the sensitive resource. The following example defines an HTML page named transfer_funds as the sensitive resource:
transfer_funds.html
- Verify that the Web Agent actions option button is selected.
- Click the following items under the Action list:
- (Optional) define any time restrictions that you want.
- Click Finish.
The Available rules dialog appears. The new GET/POST rule appears in the list.
- Click OK.
- Click Submit.
The rule is added to the policy, and a confirmation message appears.
- Continue with the next stop of creating an OnValidateReject rule in the policy.
The Policy Administrator Creates an OnAccessValidateIdentity Rule for the Sensitive Resource
Creating an OnAccessValidateIdentity rule in the policy is the next step that the policy administrator takes toward protecting sensitive resources. This rule rejects the current credentials of the user which started the session. This rejection forces the user to re‑authenticate before accessing the sensitive resource.
Follow these steps:
- From the Administrative UI, click Policies, Domain, Domain Policies.
- Click the edit icon that corresponds to the policy containing the URL of sensitive resource.
- Click the Rules tab.
- Click Add Rule.
The Available Rules dialog appears.
- Click Create.
- Click the option button for the realm under which you want to create the rule, and then click Next.
- Create the OnAccessValidateIdentity rule with the following steps:
- Enter a name and an optional description.
- Click the Resource field and enter the URL of the sensitive resource. The following example defines an HTML page named transfer_funds as the sensitive resource:
transfer_funds.html
- Click the Authorization events option button.
- Click the following item under the Action list:
OnAccessValidateIdentity
- (Optional) define any time restrictions that you want.
- Click Finish.
The Available rules dialog appears. The new OnAccessValidateIdentity rule appears in the list.
- Click OK.
- Click Submit.
The rule is added to the policy, and a confirmation message appears.
- Continue with the next stop of creating a redirect response to the .FCC file.
The Policy Administrator Creates a Response That Redirects to the .FCC File
Creating a response is the next step that a policy administrator takes to require re‑authentication for sensitive resources. The OnAccessValidateIdentity rule rejects the credentials that the user provided originally. The response re‑directs the user to the new FCC form. Users requesting sensitive resources re‑authenticate using the new FCC form.
Follow these steps:
- From the Administrative UI, click Policies, Domain, Domain Policies.
- Click the edit icon that corresponds to the policy containing the URL of sensitive resource.
- Click the Rules tab.
- Locate the OnAccessValidateIdentity rule, and click the Add Response button next to it.
- Click Create.
The Create Response screen appears.
- Create a response with the following steps:
- Type a name and an optional description.
- Verify that the following items appear:
- The SiteMinder option button selected.
- That Web Agent appears in the Agent Type drop-down list.
- Click Create Response Attribute.
- Click the Attribute drop-down list and select the following item:
- WebAgent-OnValidate-Redirect
- Click the Variable Value field, and then enter the URI for the .FCC file that contains the directive for sensitive resources. Obtain this URI from the agent owner. The following example shows a URI for a file named sensitive_login.fcc:
/samples/forms/sensitive_login.fcc
- Click OK.
The Create Response screen appears with the response attribute from Step 6c in the list.
- Click OK.
- Click Submit.
The response and response attribute are added to the rule, and a confirmation message appears.
- Continue with the next step of restarting the Policy Server.
The Policy Administrator Restarts the Policy Server
You restart the Policy Server for certain settings to take effect.
Follow these steps:
- Open the Policy Server Management Console.
- Click the Status tab, and click Stop in the Policy Server group box.
The Policy Server stops as indicated by the red stoplight.
- Click Start.
The Policy Server starts as indicated by the green stoplight.
Note: On UNIX or Linux operating environments, you can also execute the stop-all command followed by the start-all command to restart the Policy Server. These commands provide an alternative to the Policy Server Management Console.
Copyright © 2013 CA.
All rights reserved.
|
|