Previous Topic: How to Enable SAML 2.0 Attribute Query SupportNext Topic: User Consent at a SAML 2.0 IdP


How to Retrieve User Attribute Values from a Third-Party Source

In a SAML 2.0 federated environment, a Service Provider sometimes requires information about a user that is not provided in the assertion. The Service Provider can request the values of predetermined user attributes. If the Identity Provider does not have these values, it can request the values from a third party. In a CA SiteMinder® environment, this feature is referred to as a proxied attribute query.

The following diagram illustrates the process for enabling a proxied attribute query:

Tasks to configure a proxied attribute query

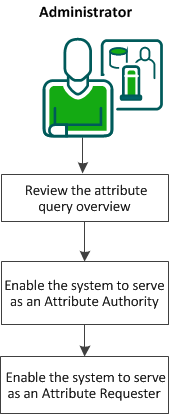
To enable a proxied attribute query, complete the following tasks:

  1. Review the proxied attribute query overview.
  2. Enable the system to serve as an Attribute Authority.
  3. Enable the system to serve as an Attribute Requester.
Proxied Attribute Query Overview

The proxied attribute query feature is based on the SAML 2.0 Assertion Query/Request profile and extends the search for user attributes. The Attribute Authority first searches the user directory and the session store for attributes. If the attribute is not found and the user initially authenticated at a third-party IdP, the request can be forwarded to the third-party IdP.

To implement a proxied attribute query, a single CA SiteMinder® system acts as a relay point between two remote systems. To relay the request from one remote system to another, the single system takes on two roles. The system first serves as the Attribute Authority for the original Attribute Requester. The system also serves as an Attribute Requester to the third-party IdP. As the Attribute Requester, the system proxies the attribute query to the original IdP.

The following figure shows how a single system processes the proxied query:

Diagram of the proxied query attribute flow

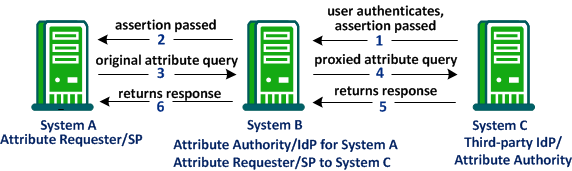
The following steps explain the flow of a proxied attribute query:

  1. The user initially authenticates at the System C, the third-party IdP. System C generates an assertion and passes it to System B.
  2. System B sends the assertion to System A, completing the initial single sign-on transaction between Systems A, B, and C. This single sign-on transaction is necessary to process a proxied attribute query.
  3. After System A receives the assertion, the system determines that it needs other attributes that are not in the assertion. As the Attribute Requester, System A sends an attribute query to its Attribute Authority/IdP, System B.
  4. System B determines that System A requires attributes that are not in its user directory or session store. To retrieve the attributes, System B generates a new query request. It sends the new query to System C, the third-party IdP, where the user originally authenticated. This new query is the proxied query.
  5. System C returns a response with the attributes to System B. System B saves the attributes in its session store.
  6. System B, in its role as the Attribute Authority, returns its own response with the attributes to System A.

Important! The configured attribute names and the name format (unspecified, uri, or basic) at System A must match the names of these attributes at System C. This information is communicated before any transactions occurs.

Enable the System to Serve as an Attribute Authority (IdP->SP)

To implement a proxied query transaction, configure two partnerships on the same CA SiteMinder® system:

For CA SiteMinder® to serve as an Attribute Authority, modify an existing IdP-to-SP partnership or create a partnership. In this partnership, CA SiteMinder® is the local IdP/Attribute Authority and the remote partner is the SP/Attribute Requester.

Note: This system also serves as the Attribute Requester in the SP-to-IdP partnership.

Follow these steps:

  1. Log in to the Administrative UI.
  2. Select Federation, Partnership Federation, Partnerships.
  3. Select the IdP-to-SP partnership that you want to modify or create a new one.
  4. Navigate to the SSO and SLO step of the partnership wizard.
  5. Select Enable in the Attribute Service section of the dialog.
  6. Enter a number of seconds for the Validity Duration.

    Note: Click Help for a description of fields, controls, and their respective requirements.

  7. (Optional) Specify whether to require that the attribute query is signed, and the signing requirements for attribute assertions and responses.
  8. Select Enable Proxied Query.
  9. Enter the search specifications for the appropriate user directory name space in the User Lookup section. The Attribute Authority uses this search specification to disambiguate the user.

    An example for an LDAP user directory is uid=%s. At least one search specification is required.

  10. (Optional) Specify Partnership as the Protection Type in the Back Channel section. Select an authentication method. For more information about the back channel, click Help.
  11. Save and activate the partnership.

The system can now serve as an Attribute Authority to the original Attribute Requester.

Enable the System to Serve as an Attribute Requester (SP->IdP)

To implement a proxied query transaction, configure two partnerships on the same CA SiteMinder® system:

Note: Partnership federation supports the SP as an Attribute Requester only for the proxied attribute query feature.

For CA SiteMinder® to serve as an Attribute Requester, modify an existing SP-to-IdP partnership or create a partnership. In this partnership, CA SiteMinder® is the local SP/Attribute Requester and the remote third party is the remote IdP/Attribute Authority.

Note: This system also serves as the Attribute Authority in the IdP-to-SP partnership.

Follow these steps:

  1. Log in to the Administrative UI.
  2. Select Federation, Partnership Federation, Partnerships.
  3. Select the SP-to-IdP partnership that you want to modify or create a new one.
  4. Navigate to the SSO and SLO step of the partnership wizard.
  5. Select Enable and Enable Proxied Query in the Attribute Requester Service section.
  6. Provide a URL for the remote IdP in the Attribute Services section.
  7. Provide the format, type, and value for the Name ID.

    Note: Click Help for a description of fields, controls, and their respective requirements.

  8. (Optional) Select an authentication type for the back channel. For information about the back channel, click Help.
  9. Save and activate the partnership.

The Service Provider can now serve as an Attribute Requester.