

HTML Forms authentication schemes provide a method for authenticating user identities using credentials gathered in a custom HTML form. This flexible means of credential collection allows you to:
For example, a custom form can be used to collect a name and a secret phrase for users who forget their password.
Note: HTML Forms authentication schemes are supported with multibyte characters.
To configure CA SiteMinder® to validate user identities using HTML Forms authentication, the policy administrator and agent owner must both perform configuration processes. This scenario describes the process that a policy administrator must follow to configure HTML Forms authentication.
Note: For information about how to configure a CA SiteMinder® agent to support HTML Forms authentication, see the companion scenario: Configure a Web Agent to Support HTML Forms Authentication.
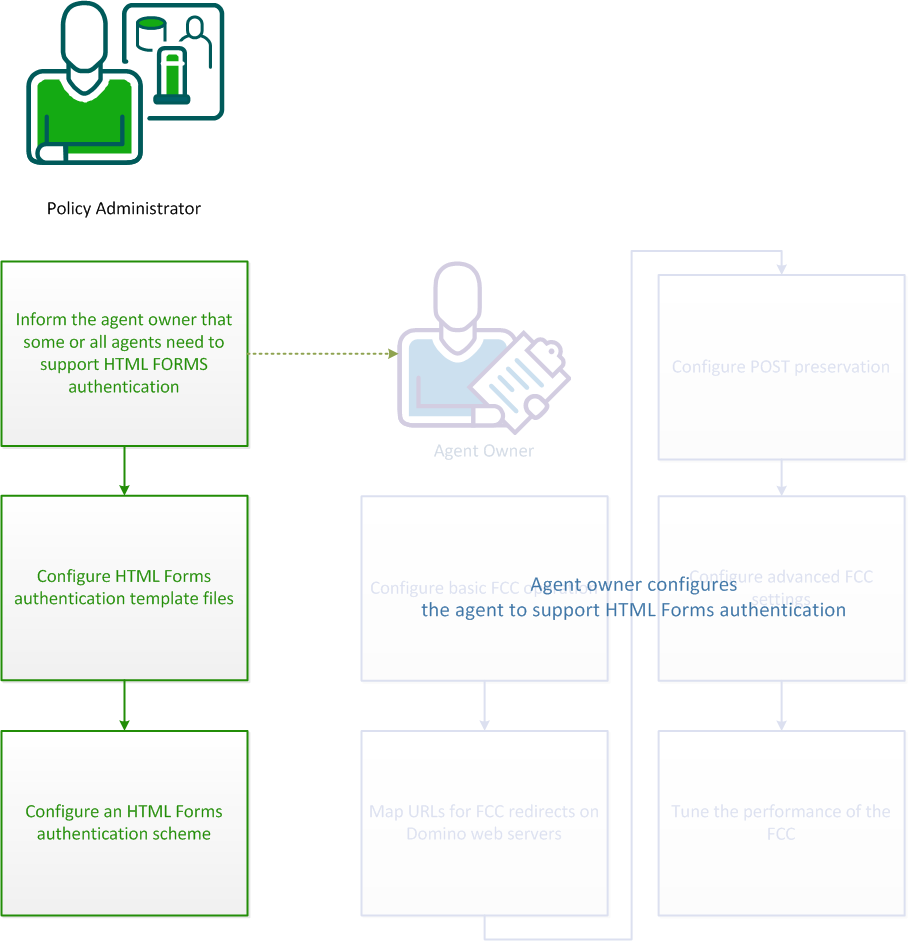
In addition to the steps outlined in this scenario, the agent owner must configure agents to validate identities using the HTML forms authentication scheme.
Inform the agent owner or owners responsible for the agents to configure agents to use the HTML forms authentication scheme.
Web Agents feature a Forms Credential Collector (FCC) component that handles HTML forms authentication. When a user requests a resource that an HTML forms scheme protects, the Agent redirects the user to a forms authentication template file.
The forms authentication template file invokes the FCC. The FCC then generates a browser page that is based on the contents of the forms authentication template file. The template file resides in the namespace of the web server and is accessed like any HTML file.
Forms authentication template files are written in a simple mark-up language that includes HTML and some custom notation.
The template FCC files are located in the following directories:
To use these sample forms authentication template files, specify the appropriate target directory when you configure the HTML Forms Authentication scheme.
Agents also also provide localized sample forms authentication template files for several other languages. By default, CA SiteMinder® uses the English forms authentication template files. For information about how to configure CA SiteMinder® to use localized forms authentication template files, see How to Enable FCC Internationalization.
Secure versions of the HTML forms authentication templates are also available. The secure HTML forms authentication templates differ from the standard versions in the following ways:
Default secure template files which you can customize are located in the following directories:
To use the secure versions of the HTML forms authentication templates, copy the files from the secureforms directory to the following location, replacing the standard versions there:
A set of secure forms for the US English (en-US) locale is also available in the following directories:
To use the secure versions of the US English locale forms, copy the files from the secureforms_en-US directory to the following location, replacing the standard versions there:
The default extension for forms authentication template files is .fcc. Forms authentication template files are therefore sometimes referred to as .fcc files. However, you can use a different extension.
Follow these steps:
Note: For more information, see the Web Agent Installation Guide.
Note: For more information about Web Agent configuration parameters, see the Web Agent Configuration Guide.
Forms authentication template (.fcc) files are written using standard HTML tags and a small amount of proprietary notation that is required to verify attributes and take advantage of custom features.
Important! If you create or edit an .fcc file on a Windows system and move that file to a UNIX system, the file can have newline characters that are incompatible with UNIX systems. Non-UNIX newline characters on a UNIX system cause .fcc files to fail during authentication. When moving files from Windows text editors to UNIX systems, examine the files and remove the appended characters. To avoid this situation, create and edit .fcc files for use in a UNIX environment on a UNIX system.
The first part of the FCC contains directives that are used when executing a POST operation on the .fcc file. The directives are never passed to the client. They must be at the beginning of the file and are of the form: @name=value.
The name is the name of a variable. The value is the value of the variable. The value can contain strings of the form: %name1%. The FCC replaces this string with the value of the variable that is associated with name1.
The second part of the .fcc file contains HTML code that is returned when a GET operation is performed on the .fcc file. This part can include text in the form "$$name$$", including the quotation marks (") that the FCC replaces with the value that is associated with name. The name is not case-sensitive.
The hidden inputs in the following table hold state for the credential collectors. Include the quotation marks (") with each value.
|
Name |
Dynamic Value |
Data preserved |
|---|---|---|
|
target |
"$$target$$" |
Resource that a user wants to access. |
|
smauthreason |
"$$smauthreason$$" |
Reason for a login failure. |
|
postpreservationdata |
"$$postpreservationdata$$" |
Data that a user submits through a post request. |
|
smagentname |
"$$smagentname$$" |
Agent name that is used for logging the user in. |
At a minimum, an .fcc file must collect the following items:
Important! If users submit post requests to a resource protected by any of the authentication schemes in the following list, use the postpreservationdata input. Otherwise, data that users attempt to post to the requested resource gets lost.
|
Schemes |
|---|
|
Basic Over SSL Authentication Schemes |
|
HTML Forms Authentication Schemes |
|
X.509 Client Certificate Authentication Schemes |
|
X.509 Client Certificate and Basic Authentication Schemes |
|
X.509 Certificate or Basic Authentication Schemes |
|
X.509 Client Certificate and HTML Forms Authentication Schemes |
|
X.509 Client Certificate or HTML Forms Authentication Schemes |
The following example is a valid (though simple) .fcc file:
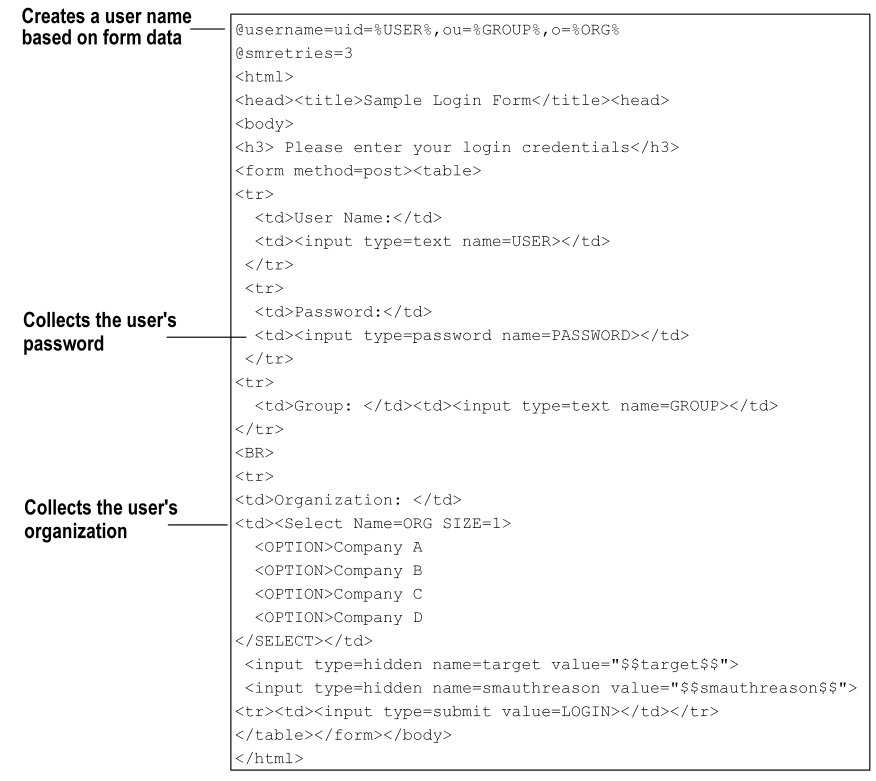
The previous file is the usermap.fcc sample file that is included with the default installation of the Agents. This .fcc file creates a distinguished name (DN) for the user that is based on the information the user enters in the User Name field and the Organization list of the HTML form. This DN is the user name authentication credential. The user password is collected from the Password field of the HTML form. The hidden realm and target input values are also collected so that the user can be directed to the appropriate resource when authentication is complete.
Special Name/Value Pairs
An FCC can interpret a number of special name/value pairs (@directives) that invoke nonstandard processing. The special @directives and their meanings follow:
Name for the login user name.
Password to perform the login.
Resource to access after login.
Colon separated list of response names to include in the namespace. The colon separated list must contain an entry for each header that you want to include in a transaction. For example, if you want to pass the value of header1 and header2 as part of a transaction, include the following line in your FCC:
@smheaders=header1:header2
If there is an error on a POST to the custom form, the user browser is redirected to this page. If this special value is not specified in a .fcc file, the system uses the .unauth file that is associated with the .fcc file as the error page.
Specifies the maximum number of login attempts allowed. If you set this directive to 0, the number of retries is unlimited. If you set the number to 1 or greater, that is the number of retries allowed.
Note: If users log in using a POST to an .fcc form, it may appear that the user is given additional attempts to log in beyond the value of the smretries directive. However, the user is allowed access only if valid credentials are entered in the number of attempts that smretries specifies.
Determines whether data is posted from the Password Services FCC file or from a different FCC file.
Default: 1
Important! We recommend that you use the default value. The SafeWord authentication scheme may not work properly if the default value is changed.
Text that describes why the user was challenged / failed to login.
Reason code that is associated with a login failure.
Set to Yes to save user credentials in a persistent cookie on the user browser.
Colon separated list of names to be saved as persistent cookies.
Another name for smsave.
Colon separated list of names to be saved as transient cookies.
Specifies the agent name that is supplied to the Policy Server when a user enters credentials and submits the form for authentication. If the Agent parameter, FCCCompatMode=NO, specify a value using this directive.
Logs a user out of the system, similar to the LogoffUri parameter. By placing @smlogout=true in your .fcc template, the FCC logs a user out and redirect the user to the target. As such, the @smlogout directive is typically used with the @target directive (@target=<yoururlhere>).
Replaced by the URL encoded value of the named variable.
Note: If you expect the additional attributes or the Password to contain special characters (" . & = + ? ; / : @ = , $ %), URL-encode each additional attribute value in the .fcc template file. The template uses US-ASCII encoding.
Replaced by the URL decoded value the named variable.
Note: The “sm” prefix for name/value pairs is reserved for additional special names that the system requires. When creating names for your login page do not use the “sm” prefix.
How Name/Value Pairs are Generated in FCC Files
The login.fcc template generates a namespace for use in $$name$$ expansions and for use by special name value pairs. If a name is entered more than once the last value wins. Name/value pairs are added to this namespace in the following order:
Localization Name/Value Pairs
The .fcc template files include two localization parameters:
Used to determine the language used in the HTML forms that collect user information or display status messages.
The value that is paired with smlocale corresponds to part of the name of a localization properties file. The localization properties file contains IDs mapped to text strings in the specified language.
smlocale values have the following format:
COUNTRY-LANGUAGE
For example, the value for smlocale for United States English is:
SMLOCALE=US-EN
Contains information that tells the browser what language encoding to use. Changing the default value for this variable overrides the encoding set in the following META tag:
<meta http-equiv="Content-Type" content="text/html;charset=ISO-8859-1">
Collect Additional Attributes
In addition to the username and password, you can collect additional attributes from users, such as an email address or job title.
To collect additional attributes
Note: If you expect the additional attributes or the Password to contain special characters (" . & = + ? ; / : @ = , $ %), URL-encode each additional attribute value in the .fcc template file. The template uses US-ASCII encoding.
Add the following line at the beginning of the file:
@password=PASSWORD=%PASSWORD%&newattr1=%newattr1%&newattr2=%newattr2%
If the additional attributes have special characters, the line should look like the following sample:
@password=PASSWORD=%urlencode(PASSWORD)%&newattr1%=%urlencode(newattr1)%&newattr2=%urlencode(newattr2)%
Represents the first additional attribute.
Represents the second additional attribute.
The value before the equal sign is the attribute name and the value between the percent sign (%) sign is the attribute value.
The FCC parses the names of the new attributes from the attribute values.
Note: Append additional attributes to the @password directive with the ampersand (&) character.
When you add attributes to the template file, consider the following points:
@password=PASSWORD=%PASSWORD%&mail=%address%
or
@password=PASSWORD=%urlencode(PASSWORD)%&mail=%urlencode(address)%
you would add a line to the .fcc file similar to the following:
<input name=”address” type=”text”>
@password=PASSWORD=%PASSWORD%&mail=%address%
or
@password=PASSWORD=%urlencode(PASSWORD)%&mail=%urlencode(address)%
where mail is the name of the LDAP attribute that stores email addresses.
For example, to add the attribute mail (from the example above) to the authentication scheme, enter the following in the Additional Attributes List field:
AL=PASSWORD,mail
Note: The additional attribute names are case-sensitive.
The default behavior of forms-based authentication is to redirect unauthenticated or unauthorized users back to the original login form. You can configure the smretries directive (@smretries) to provide users with additional login attempts. However, the default behavior does not let you display a message that informs users why the login failed.
The Web Agent ships with the DynamicRetry.fcc and DynamicRetry.unauth files. This pair of .fcc files changes the behavior of the redirect. The login page (DynamicRetry.fcc) is configured to send users to the unauthorized page (DynamicRetry.unauth) after one failed login attempt. The unauthorized page is a different template file than the login file. As a result, the unauthorized page can contain a message stating why the login failed. By default, the unauthorized page is configured with a message that informs users that they have entered invalid credentials for the resource they are attempting to access.
Note: You can change this message by opening DynamicRetry.unauth and updating the text in between the h3 tags.
To tell users why login failed, specify the target path to the DynamicRetry.fcc file when configuring the authentication scheme. The default path to the DynamicRetry.fcc file is agent_home\samples\forms\DynamicRetry.fcc
Specifies the Web Agent installation path.
Consider the following limitations when using the DynamicRetry pair of .fcc files:
Note: You can use this method in combination with Password Services to disable users with a password policy after a specified number of failed attempts. More information about password policies exists in the Password Policies.
HTML Forms authentication schemes provide a method for authentication that is based on credentials gathered in a custom HTML form.
You can configure multiple forms-based authentication schemes in the same policy store.
Verify that the following prerequisites are met before configuring an HTML Forms authentication scheme:
Note: This file is not required if the .fcc file uses the smerrorpage directive.
These files are installed automatically when you configure a Web Agent.
Custom Authentication Scheme Library Writing and Installation
The user name and password data that the FCC collects are passed to the Policy Server, which passes them to the Authentication Scheme library.
Unless back-end mapping is required, the SmAuthHTML Authentication Scheme library can be used. SmAuthHTML it is distributed with the Policy Server and already installed on the Policy Server system.
Note: Back-end mapping requires a custom Authentication Scheme library. If you have installed the software development kit, see the API Reference Guide for C.
If you have written a custom Authentication Scheme and you want to gather more data than the username and password, the FCC should pack that data into the username and password fields (each of which must be less than 511 characters long). The custom Authentication Scheme library must then be able to unpack the data and map it to the user name and password.
The FCC can be installed on the same system as the Policy Server.
You can use an HTML Forms authentication scheme to authenticate users with a custom HTML form.
Note: The following procedure assumes that you are creating an object. You can also copy the properties of an existing object to create an object. For more information, see Duplicate Policy Server Objects.
Follow these steps:
The Authentication Schemes page appears.
Verify that the Create a new object of type Authentication Scheme is selected.
The Create Authentication Scheme page appears.
Note: Click Help for descriptions of settings and controls, including their respective requirements and limits.
Scheme-specific fields and controls appear.
Note: Verify that the .fcc file you specify in the Target field complies with the guidelines listed in the prerequisites.
The authentication scheme is saved and can be assigned to a realm.
Enable Non-browser Client Support
You can configure HTML Form schemes that collect Basic (username and password) credentials to authenticate users using nonbrowser HTTP clients. These clients can be developed using Perl scripts, C++, and Java programs that communicate using HTTP protocol.
Custom clients must send the basic credentials with the initial request through an HTTP Authorization header or CA SiteMinder® does not authenticate the users. If the credentials are not sent through an HTTP Authorization header, CA SiteMinder® redirects to the HTML Form scheme without nonbrowser client support.
Follow these steps:
Nonbrowser client support is enabled.
|
Copyright © 2013 CA.
All rights reserved.
|
|