

Federation Guides › Legacy Federation Guide › Configure CA SiteMinder® as a SAML 1.x Consumer › Supply SAML Attributes as HTTP Headers
Supply SAML Attributes as HTTP Headers
An assertion response can include attributes in the assertion. These attributes can be supplied as HTTP header variables so a client application can use them for finer grained access control.
The benefits of including attributes in HTTP headers are as follows:
- HTTP headers are not persistent. They are present only within the request or response that contains them.
- HTTP headers, as supplied by the CA SiteMinder® Web Agent, are not visible in the browser, which reduces security concerns.
Note: The HTTP headers have size restrictions that the attributes cannot exceed. CA SiteMinder® can send an attribute in a header up to the web server size limit for a header. Only one assertion attribute per header is allowed. See the documentation for your web server to determine the header size limit.
Use Case for SAML Attributes As HTTP Headers
During authentication, a series of SAML attributes are extracted from an assertion and supplied as HTTP headers. During the authorization process, these headers are returned to the customer application.
The following flow diagram shows the sequence of events at runtime:
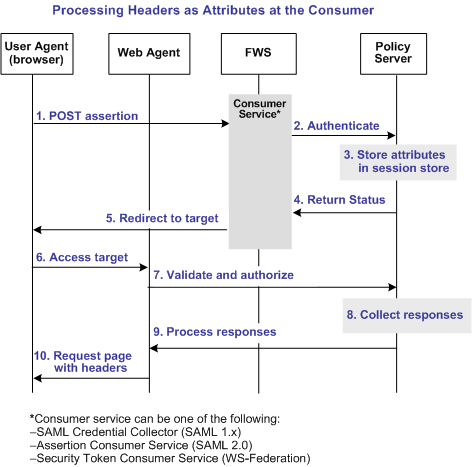
Note: The SPS federation gateway can replace the Web Agent and Web Agent Option Pack to provide the Federation Web Services application functions. In the flow diagram, the Web Agent block would be the embedded Web Agent in the SPS federation gateway. For information about installing and configuring the SPS federation gateway, see the Secure Proxy Server Administration Guide.
To process the attributes as HTTP headers, the sequence of events is as follows:
- After the assertion is generated at the asserting party, it sends the assertion to the appropriate consumer service at the relying party. The delivery mechanism (POST or Artifact or WS-Fed) is irrelevant.
Note: The consumer service can be the SAML credential collector (SAML 1.x), the Assertion Consumer Service (SAML 2.0), or Security Token Consumer Service (WS-Federation).
- The consumer service calls its local Policy Server to use the configured authentication scheme to authenticate the user with the assertion.
- If the authentication scheme redirect mode parameter is set to PersistAttributes, the Policy Server caches the attributes in the session store as session variables.
- The result of the authentication is returned to the consumer service.
- The consumer service redirects the browser to the protected target resource.
- The browser tries to access the target resource.
- The Web Agent calls the Policy Server to validate the user session and to verify that the user is authorized to access the target resource.
- The Policy Server retrieves the attributes by a configured response.
- The Policy Server processes the responses and sends the attributes to the Web Agent.
- The Web Agent sets the HTTP headers as necessary.
Configuration Overview to Supply Attributes as HTTP Headers
Several configuration steps are required to retrieve the SAML attributes cached in the session store and provide them as HTTP headers.
Follow these steps:
- Select PersistAttributes as the redirect mode for the SAML authentication scheme, which enables the SAML Attributes to be returned as HTTP headers.
- Configure an authorization rule for the realm that contains the target resource.
- Set PersistentRealm in the realm protecting the target resource.
- Configure a response that uses the active response type for each SAML attribute to be supplied as a header.
- Create a policy that binds the authorization rule and active response to implement the user of attributes as HTTP headers.
Set the Redirect Mode to Store SAML Attributes
After the relying party authenticates the user with the SAML assertion, the SAML attributes are written to the session store. The browser is then redirected to the target resource.
To redirect the browser with the attribute data
- Log in to the Administrative UI.
- Navigate to the configuration page of the SAML authentication scheme.
- Set the Redirect Mode parameter to Persist Attributes. Locate the Redirect Mode field as follows:
- SAML 1.x
-
The Redirect Mode is in the Scheme Setup section of the main configuration page.
- SAML 2.0
-
Click SAML 2.0 Configuration, SSO. The Redirect Mode is in the SSO section of the page.
- WS-Federation
-
Click WS-Federation Configuration, SAML Profiles. The Redirect Mode is in the SSO section of the page.
- Click Submit to save your changes.
The redirect mode is now set to pass on the attribute data.
Create an Authorization Rule to Validate Users
For the realm containing the protected target resource, create a rule to retrieve the SAML attributes from the session store.
The rule is based on an authorization event (onAccessAccept). The user is already authenticated by the FWS application. The Web Agent cannot reauthenticate the user and then pass on the HTTP headers. The retrieval of the attributes occurs during the authorization stage.
To create an OnAccessAccept Rule for the realm
- Log on to the Administrative UI.
- Navigate to Policies, Domain, Realms.
- Select the realm with the target resource.
- Click Create in the Rules section.
The Create Rule page appears.
- Enter a name and optionally, a description.
- Enter an asterisk (*) in the Resource field.
- Select Authorization events and OnAccessAccept in the Action section.
- Select Enabled in the Allow/Deny and Enable/Disable section.
- Click OK to save the rule.
The authorization rule is now defined for the realm with the protected resource.
Configure a Response to Send Attributes as HTTP Headers
Configure a response that sends the SAML attributes as HTTP headers to the Web Agent. The Web Agent processes the response and makes the header variables available to the client application.
Follow these steps:
- Log on to the Administrative UI.
- Navigate to Policies, Domain, Domains.
- Select the domain for the target resource and click Modify.
- Select the Responses tab.
- Click Create.
The Response dialog opens.
- Enter a name.
- Confirm that the Agent type is a CA SiteMinder® Web Agent.
- Click Create Response Attribute.
The Response Attribute dialog opens.
- Select WebAgent-HTTP-Header-Variable in the Attribute field.
- Select Active Response for Attribute Kind.
- Complete the fields as follows:
- Variable Name
-
Specify the name that you want for the header variable. You assign this name.
- Library Name
-
smfedattrresponse
This value must be the entry for this field.
- Function Name
-
getAttributeValue
This value must be the entry for this field.
- Parameters
-
Specify the name of the attribute as it appears in the assertion.
An agreement between you and your federated partner determines the attributes that are in the assertion.
- Click OK to save the attribute.
- Repeat the procedure for each attribute that is to become an HTTP header variable. You can configure many attributes for a single response.
You return to the Response tab. The attributes that you create are listed in the Attributes List section.
- Click OK to save the response.
You return to the Response tab.
- Click Submit to save the domain.
The response sends the attributes on to the Web Agent to become HTTP headers.
Create a Policy to Implement Attributes as HTTP Headers
To implement the use of SAML attributes as HTTP headers, group together the authorization event rule and active response in a policy.
Follow these steps:
- Log on to the Administrative UI.
- Navigate to Policies, Domain, Domains.
- Select the domain that contains the target resource and click Modify.
- Select the Policy tab and click Create in the Policy section.
The Create Policy dialog opens.
- Enter a descriptive name in the Name field.
- Select the users who are to have access to the protected resource in the Users tab.
- Add the authorization rule that you created previously on the Rules tab.
- Select the authorization rule and click Add Response.
The Available Responses dialog opens.
- Select the active response that you created previously and click OK.
You return to the Rules tab. The response appears with the authentication rule.
- Click Submit to save the policy.
The policy that enables SAML attributes to be used as HTTP headers is complete.
Copyright © 2013 CA.
All rights reserved.
|
|