

To enable Federation Web Services (FWS) for a CA SiteMinder®/WebLogic configuration, deploy the FWS application.
Note: For a list of supported version of WebLogic, see the CA SiteMinder® 12.52 Platform Support Matrix on the Technical Support site.
The following illustration shows a CA SiteMinder® and WebLogic sample configuration. The illustration provides an example of how to use FWS in a sample federated environment.
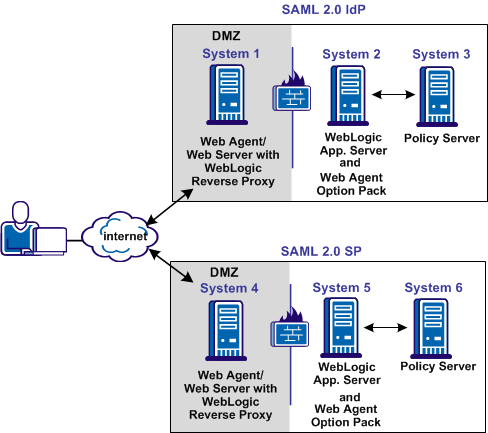
In this environment, deploy the FWS application on System 2 and System 5.
Important! Complete the deployment procedure for the Web Agent at the asserting party and the relying party.
After installing the software components on the systems in the illustration, deploy the FWS application. Deploy the application on System 2 for the asserting party and on System 5 for the relying party.
To deply the FWS application
Important! For the FWS application to work with WebLogic Server, review the weblogic.xml file in the WEB-INF directory. Verify that the prefer-web-inf-classes parameter in the weblogic.xml file is set to true.
For instructions on reviewing the weblogic.xml file, go to Deploy the FWS Application on WebLogic.
After you install the Web Agent Option Pack on a UNIX system, the installation program creates an environment script (ca-wa-opack-env.sh).
Source the environment script so the library path of the application server points to the location of the Web Agent Option Pack /bin directory.
Source the script by entering the following command at the command line:
. ./ca-wa-opack-env.sh
Setting the correct library path lets the option pack and the web or application server to work together.
After you source the script, the library path is set. The variable name for the library path differs depending on the operating system. Example of several library paths:
LD_LIBRARY_PATH=/webagent_option_pack_home/bin
SHLIB_PATH=/webagent_option_pack_home/bin
LIBPATH=/webagent_option_pack_home/bin
Important! The application server startup script can reset the library path. Ensure that the path to the Web Agent Option Pack is the first entry in the path.
The path to the Web Agent Option Pack environment script points to one of the following locations:
If you install the option pack on the same system as the web agent, the script resides in the web agent directory. For any UNIX installation, the default location is /web_agent_home/bin.
The FWS application requires an SmHost.conf file. However, the Web Agent Option Pack does not install this file, so you must create it.
To create an SmHost.conf
For instructions on running smreghost.exe, see the Web Agent Installation Guide.
/webagent_option_pack_home/config
The FWS application requires the WebAgent.conf file. However, the Web Agent Option Pack does not install this file, so you must create it.
To create a WebAgent.conf file
/webagent_option_pack_home/config
Defines the installed location of the Web Agent Option Pack on System 2 or System 5.
The following sample shows a WebAgent.conf file for the FWS application:
# WebAgent.conf - configuration file for the Federation Web Services Application
#agentname="agent_name, IP_address"
HostConfigFile="/webagent_option_pack/config/SmHost.conf"
AgentConfigObject="agent_config_object_name"
EnableWebAgent="YES"
The AffWebServices.properties file contains all the initialization parameters for Federation Web Services. For deploying FWS, set only the parameter that specifies the location of the WebAgent.conf file.
Follow these steps:
web_agent_optionpack_home/affwebservices/WEB-INF/classes
C:\\Program Files\\CA\\webagent_optionpack\\config\\WebAgent.conf
Note: Federation Web Services is a Java component, so the Windows paths must contain double backslashes.
web_agent_optionpack_home/config/WebAgent.conf
sps_home\\proxy-engine\\conf\\defaultagent\\WebAgent.conf
sps_home/proxy-engine/conf/defaultagent/WebAgent.conf
To set up the WebLogic Reverse Proxy plug-in:
For more information, see WebLogic documentation.
This example uses the Apache httpd.conf file.
<IfModule mod_weblogic.c>
WebLogicHost <WebLogic_Machine_IP Address>
WebLogicPort <WebLogic_Machine_Port_Number>
</IfModule>

<Location /affwebservices>
SetHandler weblogic-handler
Debug ALL
</Location>
Deploy the FWS application on System 2 and System 5.
Important! For the FWS application to work with WebLogic Server, review the weblogic.xml file in the WEB-INF directory. Verify that the prefer-web-inf-classes parameter is set to true.
The weblogic.xml file is located in the directory webagent\affwebservices\WEB-INF.
The following code excerpt shows how to set the prefer-web-inf-classes parameter:
<weblogic-web-app>
 <container-descriptor>
  <prefer-web-inf-classes>true</prefer-web-inf-classes>
 </container-descriptor>
</weblogic-web-app>
In addition, verify that the precompile parameter is set to true, as listed following:
<jsp-descriptor>
   <precompile>true</precompile>
<jsp-descriptor>
Follow these steps: to deploy FWS
/webagent_option_pack_home/affwebservices/
For more information about deploying a web application, see the WebLogic documentation.
http://fqhn:port_number/affwebservices/assertionretriever
Defines the fully qualified host name.
Defines the port number of the server where the Federation Web Services application is installed.
For example:
http://myhost.ca.com:81/affwebservices/assertionretriever
If Federation Web Services is operating correctly, you see the following message:
Assertion Retrieval Service has been successfully initialized.
The requested servlet accepts only HTTP POST requests.
This message indicates that Federation Web Services is listening for data activity. The FWS application is now deployed for the WebLogic server.
If Federation Web Services is not operating correctly, a message that the Assertion Retrieval Service has failed displays. If the service fails, review the Federation Web Services log.
Note: For instructions on enabling trace logging for the FWS application, see Trace Logging.
|
Copyright © 2013 CA.
All rights reserved.
|
|