

The following diagram illustrates a sample CA SiteMinder® installation and lists the order in which you install and configure each component.
Review the Report Server and report database checklists to help ensure the following:
Note: For more information, see the Policy Server Release Notes.
Important! Installing to a system where the default Windows security settings have been modified for the local Administrator group is not supported.
Example: export LC_ALL=en_US.UTF-8
Example: export LANG=en_US.UTF-8
Example: export LC_CTYPE=en_US.UTF-8
– AMERICAN_AMERICA.WE8MSWIN1252
– AMERICAN_AMERICA.AL32UTF8
Oracle_Net_client
Specifies the Oracle Net client installation path.
Windows Example: C:\oracle\product\10.2.0\client
UNIX Example: export ORACLE_HOME=/opt/oracle/product/10.2.0/client1
Example: %Oracle_Home%\bin
Example: LD_LIBRARY_PATH=$ORACLE_HOME/lib32:$ORACLE_HOME/lib:$LD_LIBRARY_PATH
Example: export PATH=$ORACLE_HOME/bin:$PATH
Consider the following items before installing the Report Server:
Default location: jboss_home\server\server_configuration\conf
Default location: jboss_home\server\server_configuration\deploy\jbossweb-tomcat55.sar
jboss_home
Specifies the JBoss installation path.
server_configuration
Specifies the name of your server configuration.
Default value: default
Note: If you change either of these files, restart JBoss. For more information, see the Red Hat documentation.
This file is only present if the Administrative UI was installed to the Report Server host system using the stand-alone option.
Default location: administrative_ui_install\webadmin\conf
administrative_ui_installation
Specifies the Administrative UI installation path.
Note: If you change this file, restart the Administrative UI application server.
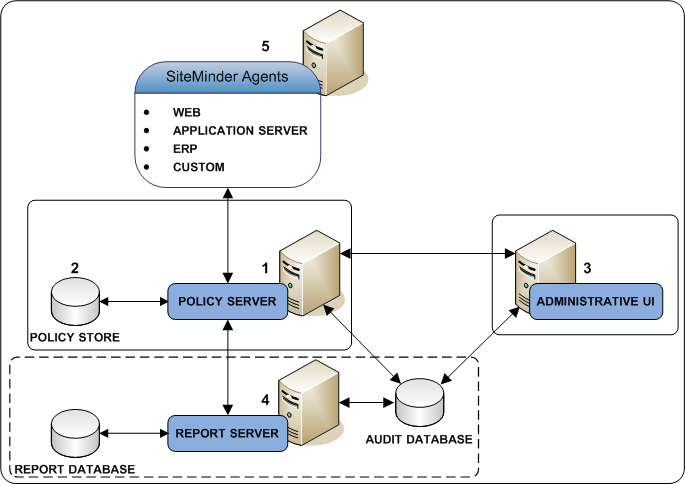
The CA SiteMinder® reporting feature requires that you install and configure a Report Server, a report database, and a CA SiteMinder® audit database to manage CA SiteMinder® policy analysis and audit-based reports. The following diagram details a sample CA SiteMinder® environment and lists the order in which each component is installed or configured:

The following list explains each of the illustrated steps:
Complete the following procedures to install the Report Server:
Review the following sections to identify the information required by the Report Server installer.
Depending on the operating system to which you are installing, the installer requires one or more sets of credentials:
The installer creates a default SAP BusinessObjects Enterprise administrator account (administrator). You use this account to import CA SiteMinder® report templates and to access the BusinessObjects Content Management Console. Determine the password for this account.
The password must meet the following composition criteria:
If you are using the embedded version of MySQL to function as the report database, the installer requires specific information. Use the report database installation worksheet to gather the following information before starting the installation:
The password for the MySQL root user account.
Note: You cannot change the name of the root user account. The installer defaults the name to root.
The name of the report database administrator account.
Installer default: sa
The password of the report database administrator account.
From CA SiteMinder® 12.51, CA SiteMinder® supports CA Business Intelligence 3.3 that lets you use SQLAnywhere as a report database on only the RHEL 6 platform.
If you want to use the embedded version of SQLAnywhere to function as the report database, the installer requires specific information. Use the report database installation worksheet to gather the following information before starting the installation:
The password for the SQLAnywhere root user account.
Note: You cannot change the name of the root user account. The installer defaults the name to root.
The name of the report database administrator account.
Installer default: sa
The password of the report database administrator account.
If you are using Microsoft SQL Server to function as the report database, the installer requires specific information. Use the report database installation worksheet to gather the following information before starting the installation:
The DSN that Report Server is to use to communicate with the report database.
Note: The Report Server is compiled as 32–bit native binary and is designed to use 32–bit data source middleware connectivity. If you are installing to a Windows 64–bit operating system, be sure to create the DSN using odbcad32.exe. This executable is located in the following location:
install_home\Windows\SysWOW64.
Specifies the installation path of the Windows operating system.
The name of the report database administrator account. This account must have the default (DBO) account permissions.
The password of the report database administrator account.
If you are using Oracle to function as the report database, the installer requires specific information. Use the report database installation worksheet to gather the following information before starting the installation:
The service name that the Report Server is to use to communicate with the report database.
The name of the report database administrator account. This account must have the following privileges:
Note: You can also use an administrator account with the CONNECT and RESOURCE roles enabled. Be sure to disable the Admin Option setting for both roles.
The password of the report database administrator account.
CA SiteMinder® only supports the version of Apache Tomcat that is embedded with the Report Server installation. Use the web application installation worksheet to gather the following information before starting the installation:
The port to which Apache Tomcat is to connect and wait for requests.
Installer default: 8080
Identify the port to which Apache Tomcat must redirect requests.
Installer default: 8443
The port to which the Apache Tomcat SHUTDOWN command must be issued.
Installer default: 8005
The following sections detail how to install the Report Server on Windows and UNIX.
Consider the following items before you install the Report Server:
Note: For a list of installation media names, see the Policy Server Release Notes.
install_home\Windows\SysWOW64.
Specifies the installation path of the Windows operating system.
These components require TCP/IP ports to communicate. The installer lets you modify the default settings to prevent port conflicts on the Report Server host system.
chmod -R+x directory
Specifies the directory that contains the installation media.
Follow these steps:
Specifies the Report Server installation executable.
The CA Business Intelligence installation wizard appears and prompts you for a locale.
Note: For a list of installation media names, see the Policy Server Release Notes.
The installer introduction appears.
The CA license agreement appears.
The installer prompts you to install CA sample templates.
Note: CA sample templates are not related to the CA SiteMinder® reporting templates. The CA SiteMinder® Report Server Configuration wizard installs the required reporting templates. You run the wizard after installing the Report Server.
The installer prompts you to save a response file for a silent installation.
An installation summary appears.
The installer installs the components. The CA Business Intelligence Setup wizard appears.
The installer introduction appears.
The SAP BusinessObjects Enterprise license agreement appears.
The installer prompts you to select language packs. English is selected by default.
The installer prompts you for an installation type.
The installer prompts you for the Content Management Server port and the password for the SAP BusinessObjects Enterprise administrator account.
Important! Do not select Configure the SAP BusinessObjects Enterprise Administrator password at a later time.
The installer prompts you for the Server Intelligence Agent node name and port.
The installer prompts you to configure the report (CMS) database.
Important! The Report Server is a CA common component that CA products can share. As such, the installer lets you configure the report database to database types and versions that other products support, but CA SiteMinder® does not. For a list of supported database types and versions, see the CA SiteMinder® 12.52 Platform Support Matrix.
Note: If you are installing on a 64-bit version of Windows, select Consume DSN created under WOW64. The option lets you use a 32–bit DSN.
Note: Do not configure an Auditing Database. This component is not related to CA SiteMinder® audit–based reports. The Content Management Server Auditing Database is used to audit activities specific to the Report Server and is not used for CA SiteMinder®. A CA SiteMinder® audit database is required to run audit–based reports.
The installer prompts you to select a web application server.
Note: CA SiteMinder® only supports the embedded version of Apache Tomcat.
The installer prompts you for Apache Tomcat information.
The installer prompts you to start the installation.
The installer prompts you when the installation is complete.
The Report Server is installed.
Follow these steps:
./installation_media -i console
Specifies the Report Server installation executable.
Note: For a list of installation media names, see the Policy Server Release Notes.
The CA Business Intelligence installer starts and prompts you for a locale.
The installer introduction appears.
The CA license agreement appears.
The installer prompts you for non–root user credentials.
The installer prompts you to specify the path to the CA Shared Components directory.
The installer prompts you to install CA sample templates.
Note: CA sample templates are not related to the CA SiteMinder® reporting templates. The CA SiteMinder® Report Server Configuration wizard installs the required reporting templates. You run the wizard after installing the Report Server.
The installer prompts you to save a response file for a silent installation.
An installation summary appears.
The installer installs the components. The SAP BusinessObjects Enterprise installer prompts you to select an installation language.
The SAP BusinessObjects Enterprise license agreement appears.
The installer prompts you enter the Report Server installation directory.
The installer prompts you to select language packs. English is selected by default.
The installer prompts you for an installation type.
The installer prompts you for an installation type.
Note: Do not clear the Enable servers after installation option.
The installer prompts you for the Content Management Server port and the password for the SAP BusinessObjects Enterprise administrator account.
The installer prompts you to select the type of database that is to function as the report (CMS) database.
Important! The Report Server is a CA common component that CA products can share. As such, the installer lets you configure the report database to database types and versions that other products support, but CA SiteMinder® does not. For a list of supported database types and versions, see the CA SiteMinder® 12.52 Platform Support Matrix.
The installer prompts for additional report database information.
The installer prompts for database information.
The Auditing Database is not related to CA SiteMinder® audit–based reports. The Content Management Server Auditing Database is used to audit activities specific to the Report Server and is not used for CA SiteMinder®. A CA SiteMinder® audit database is required to run audit–based reports.
The installer prompts you to reinitialize the database.
The installer prompts you for a Service Intelligence Agent node name and port.
The installer prompts you to select a web application server.
Note: CA SiteMinder® only supports the embedded version of Apache Tomcat.
The installer prompts you for Apache Tomcat ports.
The installer displays the path of the installation directory.
The installer displays the installation progress and confirms when the installation is complete.
Use the following files to troubleshoot the Report Server installation:
We recommend opening this log first to view reported errors.
We recommend scrolling to the bottom of this file to view reported errors. Search for “BIEK_GetExitCode” to verify the returned value of the “BIEK_GetExitCode” function. If the returned value is not 0, then there is an installation error. Search for the following keywords to determine the cause of the error:
The log files are located in a temporary location during the installation. The TEMP environment property on the system determines the temporary location. If the installation fails, you can locate the log file in this temporary location. After a successful installation, the log files are located at the top level of the Report Server installation directory.
Complete the following procedures to install the report templates:
The Report Server Configuration Wizard requires the following information:
Note: You do not have to configure a CA SiteMinder® audit database before running the Report Server Configuration Wizard.
A worksheet is provided to help you gather and record required information before installing the report templates.
You install the CA SiteMinder® report templates with the Report Server Configuration Wizard. The following sections detail how to run the Report Server Configuration Wizard on Windows and UNIX.
Consider the following items before you install the report templates:
Note: For a list of installation media names, see the Policy Server Release Notes.
Important! (UNIX) The installation media requires executable permissions. Run the following command to add the permission:
chmod +x installation_media
Specifies the name of the Report Server Configuration Wizard installation executable.
To install the report templates on Windows
Specifies the name of the Report Server Configuration Wizard installation executable.
The installer starts.
Note: For a list of installation media names, see the Policy Server Release Notes.
The report templates are installed.
The Report Server is configured to use the CA SiteMinder® report templates.
To install the report templates using a UNIX GUI
./installation_media
Specifies the name of the Report Server Configuration Wizard installation executable.
The installer starts.
Note: For a list of installation media names, see the Policy Server Release Notes.
Note: Oracle is the only supported audit database for a Solaris Report Server. If you installed the Report Server to Solaris, you are not prompted for an audit database type. The Report Server Configuration Wizard automatically installs Oracle-specific report templates.
The report templates are installed.
The Report Server is configured to use the CA SiteMinder® report templates.
To install the report templates using a UNIX console
./installation_media -i console
Specifies the name of the Report Server Configuration Wizard installation executable.
Specifies that installation start in a UNIX console.
The installer starts.
Note: For a list of installation media names, see the Policy Server Release Notes.
Note: Oracle is the only supported audit database for a Solaris Report Server. If you installed the Report Server to Solaris, you are not prompted for an audit database type. The Report Server Configuration Wizard automatically installs Oracle-specific report templates.
The report templates are installed.
The Report Server is configured to use the CA SiteMinder® report templates.
Some of the Report Server services have a default timeout of 10 minutes. The Report Server can take longer than 10 minutes to generate large analysis reports.
Increase the timeout value of the Crystal Reports Job Server service to be sure that large analysis reports are successfully generated.
Follow these steps:
The Central Configuration Manager console appears.
The Crystal Reports Job Server service stops.
The Crystal Reports Job Server Properties dialog appears.
-requesttimeout 6000000
Note: The timeout value is measured in milliseconds. Specifying 6000000 increases the timeout value to one (1) hour.
The Central Configuration Manager appears.
The Crystal Reports Job Server service starts.
The timeout value for the Crystal Reports Job Server service is set to one (1) hour.
Follow these steps:
Specifies the Report Server installation path.
-requesttimeout 6000000
Note: The timeout value is measured in milliseconds. Specifying 6000000 increases the timeout value to one (1) hour.
The timeout value for the Crystal Reports Job Server service is set to one (1) hour.
Registering the Report Server requires access to the Policy Server host system, the Report Server host system, and the Administrative UI host system. The registration process:
Complete the following steps to register the Report Server:
You run the XPSRegClient utility to create a client name and passphrase. A client name and passphrase are:
To run the registration tool
Specifies the Policy Server installation path.
XPSRegClient client_name[:passphrase] -report -t timeout -r retries
-c comment -cp -l log_path -e error_path -vT -vI -vW -vE -vF
Identifies the name of Report Server you are registering.
Limit: The value must be unique. For example, if you have previously used reportserver1, enter reportserver2.
Note: Record this value. This value is required to complete registration process from the Report Server host system.
Specifies the password required to complete the Report Server registration.
Limits: The passphrase
If you do not specify the passphrase in this step, XPSRegClient prompts you to enter and confirm it.
Note: Record this value. This value is required to complete registration process from the Report Server host system.
Specifies that a Report Server is being registered.
(Optional) Specifies how long you have to complete the registration process from the Report Server host system. The Policy Server denies the registration request when the timeout value is reached.
Unit of measurement: minutes
Default: 240 (4 hours)
Minimum Limit: 1
Maximum Limit: 1440 (one day)
(Optional) Specifies how many failed attempts are allowed when you complete the registration process from the Report Server host system. A failed attempt can result from submitting an incorrect passphrase to the Policy Server during the registration.
Default: 1
Maximum Limit: 5
(Optional) Inserts the specified comments into the registration log file for informational purposes.
Note: Surround comments with quotes.
(Optional) Specifies that registration log file can contain multiple lines of comments. The registration tool prompts for multiple lines of comments and inserts the specified comments into the registration log file for informational purposes.
Note: Surround comment with quotes.
(Optional) Specifies where the registration log file must be exported.
Default: siteminder_home\log, where siteminder_home is where the Policy Server is installed.
(Optional) Sends exceptions to the specified path.
Default: stderr
(Optional) Sets the verbosity level to TRACE.
(Optional) Sets the verbosity level to INFO.
(Optional) Sets the verbosity level to WARNING.
(Optional) Sets the verbosity level to ERROR.
(Optional) Sets the verbosity level to FATAL.
The utility lists the name of the registration log file. If you did not provide a passphrase, the utility prompts for one.
The registration tool creates the client name and passphrase.
You can now register the Report Server with the Policy Server. You complete the registration process from the Report Server host system.
Completing the registration process between the Report Server and the Policy Server requires specific information. Gather the following information before running the XPSRegClient utility from the Report Server host system.
You register the Report Server with the Policy Server to create a trusted relationship between both components. You configure the connection from the Report Server host system using the Report Server registration tool.
Follow these steps:
Specifies the Report Server installation location.
Default: (Windows) C:\Program Files\CA\SC\CommonReporting3
Default: (UNIX) /opt/CA/SharedComponents/CommonReporting3
regreportserver.bat -pshost host_name -client client_name -passphrase passphrase -psport portnum -fipsmode 0|1
Important! Before running a CA SiteMinder® utility or executable on Windows Server 2008, open the command line window with administrator permissions. Open the command line window this way, even if your account has administrator privileges.
regreportserver.sh -pshost host_name -client client_name -passphrase passphrase -psport portnum -fipsmode 0|1
Specifies the IP address or name of the Policy Server host system to which you are registering the Report Server.
Specifies the client name. The client name identifies the Report Server instance that you are registering.
Note: This value must match the client name that you specified using the XPSRegClient utility when you registered the Report Server on the Policy Server host system.
Example: If you specified "reportserver1" when using the XPSRegClient utility, enter "reportserver1".
Specifies the passphrase that is paired with the client name. The client name identifies the Report Server instance that you are registering.
Note: This value must match the passphrase that you specified using the XPSRegClient utility when you registered the Report Server on the Policy Server host system.
Example: If you specified CA SiteMinder® when using the XPSRegClient utility, enter CA SiteMinder®.
(optional) Specifies the port on which the Policy Server is listening for the registration request.
(optional) Specifies how the communication between the Report Server and the Policy Server is encrypted.
Default: 0
You receive a message stating that the registration is successful.
(Windows) Follow these steps:
The Central Configuration Manager console appears.
The Report Server stops.
The Report Server is restarted.
(UNIX) Follow these steps:
../setupenv.sh
Specifies the Report Server installation path.
report_server_home
Specifies the Report Server installation path.
$ORACLE_HOME/lib32:$ORACLE_HOME/lib:$LD_LIBRARY_PATH
Example:
export LD_LIBRARY_PATH=$ORACLE_HOME/lib32:$ORACLE_HOME/lib:$LD_LIBRARY_PATH
./stopservers
Specifies the Report Server installation path.
./tomcatshutdown.sh
The Report Server stops.
./startservers
./tomcatstartup.sh
The Report Server is restarted.
You configure the Report Server and Administrative UI connection to configure a trusted relationship between both components. You configure the connection from the Administrative UI.
Note: The Administrative UI can have a trusted relationship with one or more Policy Servers. However, each trusted relationship only allows one Report Server connection. If you must connect to a new Report Server, either delete the current Report Server connection or connect to another Policy Server to configure the connection.
To configure the connection to the Administrative UI
The Create Report Server Connection pane appears.
Note: Click Help for descriptions of settings and controls, including their respective requirements and limits.
Note: This value is the web server port you entered when installing the Report Server.
Note: This value is the password you entered for the default BusinessObjects administrator account when installing the Report Server.
The connection between the Report Server and the Administrative UI is configured.
You have completed installing and registering the Report Server. You can now run policy analysis reports.
Note: Creating and managing audit reports requires a separate audit database.
A CA SiteMinder® audit database is required to run CA SiteMinder® audit–based reports.
Note: Although you can write audit information to a text file, you must store your audit information in a supported ODBC database to create and manage audit-based reports. For a list of the supported versions, see the CA SiteMinder® 12.52 Platform Support Matrix.
Complete the following steps to configure an audit database:
Important! If you are configuring the audit database in Oracle, be sure that the user account you supply does not have the DB role. If the user account has the DB role, audit–based reports do not return correct results.
You register the audit database with the Administrative UI to create a trusted connection between the components. Registering the audit database with the Administrative UI lets CA SiteMinder® administrators create and manage audit-based reports.
Note: The Administrative UI can have a trusted relationship with one or more Policy Servers. However, each trusted relationship only allows one audit database connection. If you must connect to a new audit database, either delete the current connection or connect to another Policy Server to configure the connection.
To register the audit database with the Administrative UI
The Create Audit Report Connection pane appears.
Note: Click Help for descriptions of settings and controls, including their respective requirements and limits.
The vendor-specific fields appear.
Note: The service name must be associated with the DSN you entered in the Data Tab of the Policy Server Management Console when configuring the audit database connection to the Policy Server. The service name must match the DSN you create on the Report Server.
Note: The DSN name must match the DSN you specified in the Data Tab of the Policy Server Management Console when configuring the audit database connection to the Policy Server. The DSN name must also match the DSN you create on the Report Server.
Note: The administrator credentials must match the credentials that you specified in the Data tab of the Policy Server Management Console when configuring the audit database connection to the Policy Server.
The audit database is registered with the Administrative UI.
A Report Server connects to a CA SiteMinder® audit database to create audit-based reports. When an audit-based report is scheduled in the Administrative UI, the Administrative UI passes the following connection information to the Report Server:
To configure connectivity between the audit database and the Report Server, do one of the following:
Note: For more information about supported database drivers, see the 12.52 CA SiteMinder® Platform Support Matrix.
(Windows) Follow these steps:
The Central Configuration Manager console appears.
The Report Server is started.
(UNIX) Follow these steps:
../setupenv.sh
Specifies the Report Server installation path.
report_server_home
Specifies the Report Server installation path.
Example: export LD_LIBRARY_PATH=$ORACLE_HOME/lib32:$ORACLE_HOME/lib:$ETPKIHOME/lib:$LD_LIBRARY_PATH
report_server_home
Specifies the Report Server installation path.
Specifies the Report Server installation path.
./startservers
./tomcatstartup.sh
The Report Server is started.
(Windows) Follow these steps:
The Central Configuration Manager console appears.
The Report Server is stopped.
(UNIX) Follow these steps:
../setupenv.sh
Specifies the Report Server installation path.
report_server_home
Specifies the Report Server installation path.
Example: export LD_LIBRARY_PATH=$ORACLE_HOME/lib32:$ORACLE_HOME/lib:$ETPKIHOME/lib:$LD_LIBRARY_PATH
report_server_home
Specifies the Report Server installation path.
Specifies the Report Server installation path.
./stopservers
./tomcatshutdown.sh
The Report Server is stopped.
|
Copyright © 2013 CA.
All rights reserved.
|
|